
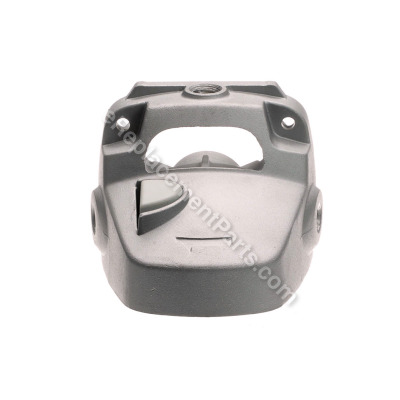


The gear case attaches to the pinion and the gear. This item is available as an individual replacement part. This is an original Ryobi part for use in grinders. A screwdriver may be necessary during the installation of this item. It is made of metal and will require replacing if it breaks.
Gear Case Assembly 039028008102
OEM part for: Ryobi, Ryobi -TTI
Part Number: 039028008102
$9.56
In Stock
Jump To:
Frequently Purchased Together ?
Compatibility
This part will fit the following 6 machines
Ryobi
AG452K Angle Grinder View Diagrams & Manuals
AG453 Angle Grinder View Diagrams & Manuals
AG454 18 Volt Angle Grinder View Diagrams & Manuals
AG4531G Angle Grinder View Diagrams & Manuals
AG452 Angle Grinder View Diagrams & Manuals
Ryobi -TTI
AG452 Angle Grinder View Diagrams & Manuals
Show More Compatible Models
This item works with the following types of products:
- Grinder Parts
This part replaces obsolete part #: 039028007102, 039028001073
Customer Part Reviews ?
Average Rating (out of 5):
Click to filter by ratings:
5 stars
7
4 stars
0
3 stars
0
2 stars
0
1 stars
0
< PREV
- 1
As described with fast shipment. Highly recommend.
Part was as described. Very fast shipment. Great people to do business with. Highly recommended.
Guest -
October 28, 2023
Verified Purchase
Easy repair
Part is original part it fits and working great no problem thanks
Guest -
March 28, 2021
Verified Purchase
Fastest service ever!
I ordered this grinder housing friday evening and it was on my porch monday. Fit perfectly, matched exactly and installed easily. I will use you again for all my repairs for sure!
Guest -
August 9, 2020
Verified Purchase
Perfect Replacement !!!
I received the part in good order and it was as described. Also, received helpful instructions with the part.
Henry -
April 13, 2020
Verified Purchase
Easy repair with the right parts!
Quality was perfect. Repair time was in minutes.
Joseph -
March 1, 2020
Verified Purchase
Straight forward installation
The part came in quickly and in perfect condition. However, the gear box assembly I ordered on Nov 14 have not arrived yet
iGlobal -
November 22, 2019
Verified Purchase
Easy DIY repair, note if you remove the armature from the case to grease inner bearing then you need to take the brush covers off that push the brushes against the motor contacts. Easy and simple swap out. Like new now.
Easy DIY repair, note if you remove the armature from the case to grease inner bearing then you need to take the brush covers off that push the brushes against the motor contacts. Easy and simple swap out. Like new now.
Guest -
July 23, 2019
Verified Purchase
t
t
t -
t days ago
Verified Purchase
eReplacementParts Team
t
Questions & Answers ?
Our customer Service team is at the ready daily to answer your part and product questions.

Ask our Team
We have a dedicated staff with decades of collective experience in helping customers just like you purchase parts to repair their products.
Does this fit my product?Questions & Answers for Gear Case Assembly
No questions have been asked yet
Customer Repair Instructions ?
All our customer repair instructions are solicited directly from other customers just like you who have purchased and replaced this exact part.
Blade lock button broke
Randy - October 16, 2017
👍 2 of 2 people found this instruction helpful
Tool Type
Grinder
Difficulty
Easy
Time
15-30 minutes
Tools Used
Screwdriver
Parts Used
Removed gear box
Pulled gears out of old gear case
Installed gears into new gear case
Filled new gear box with grease
Re-attached gear box to grinder
Pulled gears out of old gear case
Installed gears into new gear case
Filled new gear box with grease
Re-attached gear box to grinder
Did you find this story helpful?
Thanks for voting and helping fellow customers!
Lock button for changing disc’s broke.
Buster - November 4, 2022
Tool Type
Grinder
Difficulty
Hard
Time
15-30 minutes
Tools Used
Screwdriver, Pliers, Wrench Set, Small bearing puller
Parts Used
Removed the gear case and discovered the new one was one piece instead of two parts!
I had to remove the rotor, remove the bearing and retaining ring, then remove the gear case stabilizer plate!
Reinstall the rotor bearing, and the brushes, install rotor, then the new gear case and adjust clearance for the lock pin. Reinstall handle assembly.
Not a plug and play procedure! The replacement part fits several models, but this one had to be modified for the part to work!
Did you find this story helpful?
Thanks for voting and helping fellow customers!
Lock button/case cracked
Bob - June 13, 2021
Tool Type
Grinder
Difficulty
Easy
Time
Less than 15 minutes
Tools Used
Screwdriver
Parts Used
Removed screws from unit
Took gear drive off
Removed screws from old gear case
Took gear casing off
Replaced new gear case
Re-lubed new casing with grease
Tightened up casing screws
Replaced gear drive
Tightened up drive screws
Plugged in unit and ran it till lube was in casing and drive unit
Took gear drive off
Removed screws from old gear case
Took gear casing off
Replaced new gear case
Re-lubed new casing with grease
Tightened up casing screws
Replaced gear drive
Tightened up drive screws
Plugged in unit and ran it till lube was in casing and drive unit
Did you find this story helpful?
Thanks for voting and helping fellow customers!
Gear case broken
Frank - April 28, 2020
Tool Type
Grinder
Difficulty
Medium
Time
Less than 15 minutes
Tools Used
Screwdriver, Pliers
4 screws pull arbor housinf assembly
Remove excess grease:theres alot!
4 screws releases gear housing.
With finger Push armature thru housing pilot.
Change air intake bonnet
Stab new gear housing thru armature
Assemble reverse of sissassembly
Remove excess grease:theres alot!
4 screws releases gear housing.
With finger Push armature thru housing pilot.
Change air intake bonnet
Stab new gear housing thru armature
Assemble reverse of sissassembly
Did you find this story helpful?
Thanks for voting and helping fellow customers!
The nut was seized on the cutting wheel.
Michael - November 19, 2019
Tool Type
Grinder
Difficulty
Expert
Time
More than 2 hours
Tools Used
Screwdriver, Pliers, Wrench Set, bench grinder, bench cut off saw, pipe wrench
Parts Used
1. I attempted to remove the nut. This broke the spindle brake. It's bearing broke in the gear case.
2. I removed the guard and narrowed a wrench so I could hold the spindle still. This failed.
3. I removed the front plate from the gear case assy, and removed the spindle.NOTE: it's easy to loose the key if the pinion slides off the main shaft.
4. Using a vise and 2 pipe wrenches I was able to remove the nut and the remainder of the cutting wheel.
5. I ordered and received the gear case assy. While it was for my type of grinder, it was not identical to the original.
6. I used the bench cut off saw to cut about 3/8" off the face of the gear case assy where it attaches to the grinder motor. This needed to be done so that the pinion would engage with the ring gear. It would have been much better to do the job with a milling machine.
7. I put the pinion in place, then fastened the gear case assy. to the motor section.
8. I put lube in the gear case assy.
9. Then the front plate and ring gear were put in place. I did this a number of times because the four screws that hold the front in place needed to be shimmed, so the gears meshed smoothly.
10. Replace the guard.
Did you find this story helpful?
Thanks for voting and helping fellow customers!
Nothing everything fit easy to install
Richard - November 8, 2019
Tool Type
Grinder
Difficulty
Easy
Time
Less than 15 minutes
Tools Used
Screwdriver
Took the old gear case assembly off , then removed the old gear and replaced it, and replaced the two parts. Pulled the trigger and it worked perfectly. Very happy.
Did you find this story helpful?
Thanks for voting and helping fellow customers!
Old bearing seased up and the rubber case that the bearing is mounted in toast, this part not available
Steven - July 18, 2019
Tool Type
Grinder
Difficulty
Easy
Time
Less than 15 minutes
Tools Used
Screwdriver, bearing seater
Install new parts where needed
Did you find this story helpful?
Thanks for voting and helping fellow customers!
broke gear and cover assembly
Eddie - March 21, 2019
Tool Type
Grinder
Difficulty
Easy
Time
15-30 minutes
Tools Used
Screwdriver, Pliers, Wrench Set, specila pulley
remove old parts, and replacement new one
Did you find this story helpful?
Thanks for voting and helping fellow customers!
gear case broken replace whole gear case easy if done slowly and meticulously im pleased
patrick - February 6, 2019
Tool Type
Grinder
Difficulty
Easy
Time
15-30 minutes
Tools Used
Screwdriver, Pliers, Nutdriver
Parts Used
Pay strict attention when disassembling grinder. Clean everything thoroughly. Lay all parts out including broken parts. Take pictures as you go to remind you how you disassembled the grinder. Keep all parts separate from everything else so they don't get lost. Back engineer when reassembly. Don't forget the grease. Take your time and look at everything closely.
Did you find this story helpful?
Thanks for voting and helping fellow customers!
Top housing brokers well as the brushes for the motor were out
Michael - December 1, 2018
Tool Type
Grinder
Difficulty
Easy
Time
15-30 minutes
Tools Used
Screwdriver, Pliers
Simple screws and pressed fitting were removed easily. Greased the gears and extra in the motor housing. Put the unit back together with ease.
Did you find this story helpful?
Thanks for voting and helping fellow customers!
OEM stands for Original Equipment Manufacturer and means the part you’re buying is sourced directly from the manufacturer who made your product. At eReplacementParts, we sell only genuine OEM parts, guaranteeing the part you’re purchasing is of better design and of higher quality than aftermarket parts.
Our product descriptions are a combination of data sourced directly from the manufacturers who made your product as well as content researched and curated by our content & customer service teams. This content is edited and reviewed internally before being made public to customers.
Our customer service team are at the ready daily to answer your part and product questions. We have a dedicated staff with decades of collective experience in helping customers just like you purchase parts to repair their products.
All our part reviews are solicited directly from other customers who have purchased this exact part. While we moderate these reviews for profanity, offensive language or personally identifiable information, these reviews are posted exactly as submitted and no alterations are made by our team.
All our customer repair instructions are solicited directly from other customers just like you who have purchased and replaced this exact part. While we moderate these reviews for profanity, offensive language or personally identifiable information, these reviews are posted exactly as submitted and no alterations are made by our team.
Based on data from past customer purchasing behaviors, these parts are most commonly purchased together along with the part you are viewing. These parts may be necessary or helpful to replace to complete your current repair.
All our installation videos are created and produced in collaboration with our in-house repair technician, Mark Sodja, who has helped millions of eReplacementParts customers over the last 13 years repair their products. Mark has years of experience in selling and repairing both commercial and residential products with a specialty in gas-powered equipment.
This data is collected from customers who submitted a repair instruction after replacing this exact part. Customers can rate how easy the repair was to complete and how long it took. We aggregate this data to provide a repair rating that allows customers to quickly determine the difficulty and time needed to perform their own repair.