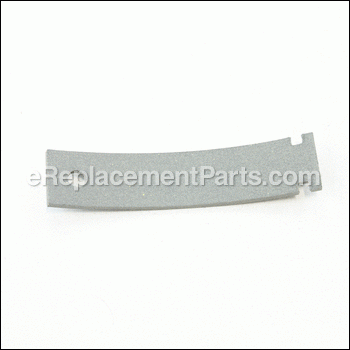

This is a genuine component that is supplied by the original equipment manufacturer for GE dryers. The green drum slides are used to support the weight of the drum. The most common reason for replacing the drum slides are when they begin to make noise due to being worn out. These are SOLD SEPARATELY and it is recommended you purchase TWO to replace both at the same time.
Bearing Slide WE1M1067
OEM part for: GE, Hotpoint
Part Number: WE1M1067
$15.08
In Stock
Jump To:
Frequently Purchased Together ?
Compatibility
This Bearing Slide will fit the following 2019 machines. Confirm this part works with your model, and view the detailed model diagrams and repair help we have to offer.
GE
Hotpoint
Show More Compatible ModelsThis item works with the following types of products:
- Dryer Parts
This part replaces obsolete part #: WE1M507
Customer Part Reviews ?
Average Rating (out of 5):
Click to filter by ratings:
5 stars
1
4 stars
2
3 stars
0
2 stars
0
1 stars
0
< PREV
- 1
Drum slides on dryer
Parts arrived in a timely manner and were correct. Dryer problem solved ! EReplacement parts has been my go to place for many years and for many different parts.
Excellent outfit and people !
Guest -
November 10, 2021
Verified Purchase
Squeaky dryer, searched for replacement parts
Website easy to navigate, diagrams with parts breakdown helpful. Parts were of good fit and finish, shipping was affordable. Prices comparable or below other websites. Easy shopping experience, would use again.
Guest -
April 24, 2020
Verified Purchase
Dryer squeaking
Perfect fit. Dryer is working. Moms happy everybody’s happy:)
Guest -
March 10, 2020
Verified Purchase
Questions & Answers ?
Our customer Service team is at the ready daily to answer your part and product questions.

Ask our Team
We have a dedicated staff with decades of collective experience in helping customers just like you purchase parts to repair their products.
Does this fit my product?Questions & Answers for Bearing Slide
If I order this part will I receive the greyish metallic colored inner slides or the outer white one? I need the inner darker colored ones that appear to be made out of different material vs the plastic outer ones.
Joshua
for model number DBXR463ED1WW
asked on 2023-03-02
Hello Joshua, Thank you for the question. This Slide would be the darker Grey Slide. The White Slide is Part Number:WE1M504. We hope this information helps!
eReplacementParts Team March 02, 2023
Customer Repair Instructions ?
All our customer repair instructions are solicited directly from other customers just like you who have purchased and replaced this exact part.
Upper bearing assembly was destroyed and lower felt was also compromised.
William - January 22, 2017
👍 2 of 2 people found this instruction helpful
Tool Type
Dryer
Difficulty
Medium
Time
30-60 minutes
Tools Used
Screwdriver, Power Drill
1. Watched several videos of the repair on YouTube.
2. Ordered parts from eReplacement Parts.
3. Remove upper cowl from the dryer.
4. Remove top lid from dryer body.
5. Disconnect 3 wiring connectors and then remove control panel from dryer body.
6. Remove front panel of dryer body, but do not remove screws from around the dryer door. This will allow blower manifold body to remain attached to dryer front panel.
7. Remove light bulb from upper bearing assembly.
8. Remove wiring from harness clips on upper bearing assembly.
9. Remove upper bearing assembly from front panel.
10. Remove blower manifold body from front panel.
11. Vacuum all lint, debris, and plastic pieces from front panel, blower manifold, etc. Upper bearing assembly was DESTROYED and all pieces of it were ground into dust.
12. Remove old felt and discard.
13. Purchase new felt strip.
15. Install felt strip into clips on blower manifold body and make sure it's fully seated.
16. Wrap felt strip ends around retainer clips at either end of felt strip retainer.
17. Re-install blower manifold onto front panel.
18. Re-install upper bearing manifold onto front panel, making sure that it clips together with blower manifold body.
19. Re-install wiring into retainer clips and re-install light bulb.
20. Reinstall front panel, making sure to lift dryer drum into place so that it rides on upper bearing assembly.
21. Reinstall control panel and re-connect wiring connectors.
22. Reinstall dryer lid.
23. Reinstall upper cowl.
24. Test out dryer operation. Notice howling screeching is gone and that dryer will probably keep going for another 10 years.
Did you find this story helpful?
Thanks for voting and helping fellow customers!
Drum wouldn't turn
william - October 5, 2018
👍 1 of 1 people found this instruction helpful
Tool Type
Dryer
Difficulty
Medium
Time
1-2 hours
Tools Used
Screwdriver, Pliers, Duct tape
1 Slid dryer away from wall and removed duct pipe and unplugged dryer
2 Removed control panel, making sure to unplug all internal connections, top of dryer and front of dryer which included door.
3 Found drive belt broke, and while I had dryer apart replaced drum slides, slide bearings, rear bearing assy., door felt, and idler pulley because I had this dryer apart before several years ago and the same parts were wore out.
4 Also replaced drive belt and cleaned all lint from blower housing and duct work, and everywhere else I found inside the dryer.
5 Putting the drum belt on was hard because you have no room for 2 arms inside and you have to route the belt around the drum, idler pulley, and motor pulley, very tricky with one arm and one hand, patience.
6 Reassembled sheet metal and ran, very quiet now
Did you find this story helpful?
Thanks for voting and helping fellow customers!
Odd rubbing sound from the drum
John - August 23, 2018
👍 1 of 1 people found this instruction helpful
Tool Type
Dryer
Difficulty
Easy
Time
Less than 15 minutes
Tools Used
Screwdriver, Nutdriver
Remove 2 screws that hold the top on
Remove the 2 screws that holds the front on.
Tilt front forward to access the slides
Pop the old ones out
Pop the new ones in
Replace front
Replaced top.
Remove the 2 screws that holds the front on.
Tilt front forward to access the slides
Pop the old ones out
Pop the new ones in
Replace front
Replaced top.
Did you find this story helpful?
Thanks for voting and helping fellow customers!
OEM stands for Original Equipment Manufacturer and means the part you’re buying is sourced directly from the manufacturer who made your product. At eReplacementParts, we sell only genuine OEM parts, guaranteeing the part you’re purchasing is of better design and of higher quality than aftermarket parts.
Our product descriptions are a combination of data sourced directly from the manufacturers who made your product as well as content researched and curated by our content & customer service teams. This content is edited and reviewed internally before being made public to customers.
Our customer service team are at the ready daily to answer your part and product questions. We have a dedicated staff with decades of collective experience in helping customers just like you purchase parts to repair their products.
All our part reviews are solicited directly from other customers who have purchased this exact part. While we moderate these reviews for profanity, offensive language or personally identifiable information, these reviews are posted exactly as submitted and no alterations are made by our team.
All our customer repair instructions are solicited directly from other customers just like you who have purchased and replaced this exact part. While we moderate these reviews for profanity, offensive language or personally identifiable information, these reviews are posted exactly as submitted and no alterations are made by our team.
Based on data from past customer purchasing behaviors, these parts are most commonly purchased together along with the part you are viewing. These parts may be necessary or helpful to replace to complete your current repair.
All our installation videos are created and produced in collaboration with our in-house repair technician, Mark Sodja, who has helped millions of eReplacementParts customers over the last 13 years repair their products. Mark has years of experience in selling and repairing both commercial and residential products with a specialty in gas-powered equipment.
This data is collected from customers who submitted a repair instruction after replacing this exact part. Customers can rate how easy the repair was to complete and how long it took. We aggregate this data to provide a repair rating that allows customers to quickly determine the difficulty and time needed to perform their own repair.