
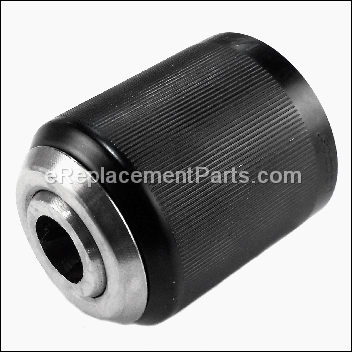
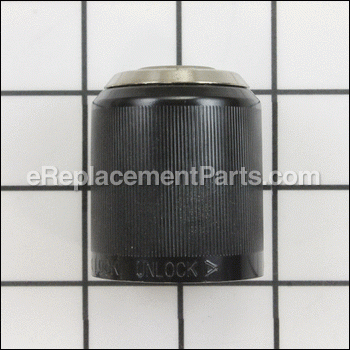
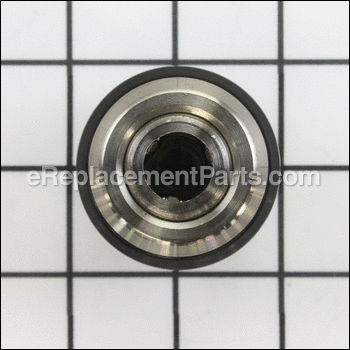
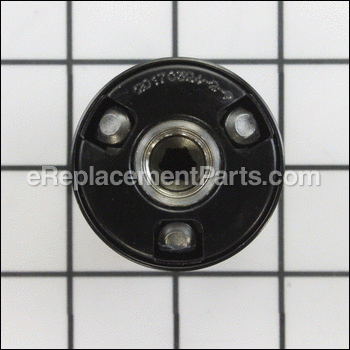
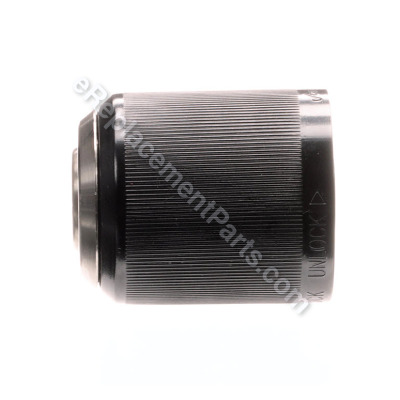


This is an authentic OEM supplied replacement part made for Ridgid hammer drill. Its purpose is to hold drill bits. This is a keyless chuck allowing for fast and easy exchange of bits without any tools. Includes one (1) chuck per order. Please note the chuck screw is sold separately.
To complete this repair you would need a screwdriver.
• Remove screw that holds chuck
• Replace old chuck with a new one
• Reassemble and test the unit
Chuck 670769004
OEM part for: Ryobi, Ridgid
Part Number: 670769004
$27.40
In Stock
Jump To:
Product Description ?
- Classification: Part
- Weight: 0.55 lbs.
- Shipping: Ships Worldwide
Frequently Purchased Together ?
Compatibility
This part will fit the following 2 machines
Ridgid
R8611501 18 V Hammer Drill View Diagrams & Manuals
R86116 18V Hammer Drill View Diagrams & Manuals
This item works with the following types of products:
- Drill Parts
- Hammer Drill Parts
Customer Part Reviews ?
Average Rating (out of 5):
Click to filter by ratings:
5 stars
5
4 stars
2
3 stars
0
2 stars
0
1 stars
0
< PREV
- 1
Quick and easy
Appreciate the help
Guest -
February 5, 2022
Verified Purchase
Excellent site
Drill works great.
Guest -
January 19, 2022
Verified Purchase
Easy repair
Excellent!!
Guest -
December 31, 2021
Verified Purchase
Fit well
The part is well constructed and fit well for my ridgid hammer drill. In my case I had to cut my old chuck since it was stuck. I did it carefully to avoid damage the screw. It save me to buy a new one hammer drill
Guest -
October 22, 2020
Verified Purchase
Fast easy reliable
great conditions, good product, fast shipping.
Guest -
July 18, 2020
Verified Purchase
Worked as it should
Part came in good condition. Was delivered when expected. Easy to order.
Guest -
March 1, 2024
Verified Purchase
Craftsman cordless drill
transposed part number, but it fit another craftsman drill that needed new chuck. Used contact us on web site to ask question but never received an answer, guess you need to call for help
Guest -
October 17, 2023
Verified Purchase
t
t
t -
t days ago
Verified Purchase
eReplacementParts Team
t
Questions & Answers ?
Our customer Service team is at the ready daily to answer your part and product questions.

Ask our Team
We have a dedicated staff with decades of collective experience in helping customers just like you purchase parts to repair their products.
Does this fit my product?Questions & Answers for Chuck
Will chuck part#670769004fit Ridgid drill R8611503 ?
David
asked on 2023-01-10
Hello David, Thank you for your inquiry. We have researched the model you have provided and do not show this part as compatible. The compatible part number is 670754010. Good luck with your repair.
eReplacementParts Team January 10, 2023
Customer Repair Instructions ?
All our customer repair instructions are solicited directly from other customers just like you who have purchased and replaced this exact part.
Chuck would no longer tighten.
Robert - November 27, 2017
👍 4 of 4 people found this instruction helpful
Tool Type
Cordless Drill
Difficulty
Easy
Time
Less than 15 minutes
Tools Used
Screwdriver, Pliers
Parts Used
Removed the old chuck and replaced it with the new one.
Did you find this story helpful?
Thanks for voting and helping fellow customers!
8 year old chuck no longer holds bits. Internal screw for jaws is stripped
Edward - May 24, 2019
👍 2 of 3 people found this instruction helpful
Tool Type
Cordless Drill
Difficulty
Easy
Time
15-30 minutes
Tools Used
Screwdriver, Allen key, Linesman (additional tools is a hammer and vice)
Parts Used
I did this at work with a Linesman, Allen key and screwdriver. Not the best setup but I needed my drill to work.
I placed short end of the Allen key in the chuck and set my drill to hammer mode, speed setting 1 and drive torque to 24. Laying my drill on a pile of sheetrock, I smacked the long side of the Allen key clockwise to help loosen the screw that keeps the chuck in. I removed Allen key and the chuck screw and then placed the Allen key back in the chuck and smacked it a few times counter clock wise which eventually loosened the chuck for removal.
Then I placed the Allen key in my new chuck and installed on my drill. I did this because screwing the new chuck on the drill will close the jaws and if your not careful, you may not unlock the jaws if the chuck is not all the way seated onto the drills thread boss. Keeping the Allen key in the new chuck will prevent the jaws from accidentally closing. Once the chuck is in, install the chuck screw and done
Did you find this story helpful?
Thanks for voting and helping fellow customers!
The chuck broken in the closed position
Jonn - May 22, 2018
👍 1 of 1 people found this instruction helpful
Tool Type
Cordless Drill
Difficulty
Medium
Time
15-30 minutes
Tools Used
, Allen wrench
Parts Used
I could not open the Chuck, used a grinder to cut chuck in half .
Then used Phillips screwdriver to remove screw. Then a pipe wrench and ran the drill backwards to remove chuck.
Then used Phillips screwdriver to remove screw. Then a pipe wrench and ran the drill backwards to remove chuck.
Did you find this story helpful?
Thanks for voting and helping fellow customers!
Chuck would not hold drill bits
Aaron - March 15, 2018
👍 1 of 1 people found this instruction helpful
Tool Type
Cordless Drill
Difficulty
Easy
Time
Less than 15 minutes
Tools Used
Screwdriver
Parts Used
Removed the reversed threaded screw from inside chuck
Removed old chuck by turning it
Installed new chuck
Removed old chuck by turning it
Installed new chuck
Did you find this story helpful?
Thanks for voting and helping fellow customers!
Original was so tight, that I had to cut it off.
Terry - November 17, 2015
👍 1 of 1 people found this instruction helpful
Tool Type
Cordless Drill
Difficulty
Hard
Time
30-60 minutes
Tools Used
Screwdriver, Band saw
Parts Used
This is not the first chuck that I have replaced, but the factory installed chuck was installed so tight that I had to cut it off with a band saw. After that the repair went easy.
Did you find this story helpful?
Thanks for voting and helping fellow customers!
Chuck surface was worn down and difficult to hold when changing bits
John - October 16, 2021
Tool Type
Hammer Drill
Difficulty
Easy
Time
Less than 15 minutes
Tools Used
Screwdriver, Chuck Key
Parts Used
1. Opened chuck
2. Removed screw with reverse thread
3. Put chuck key in place and struck key with soft hammer to loosen chuck
4. Remove old chuck and screwed on replacement
5. Reinstalled reverse thread screw.
2. Removed screw with reverse thread
3. Put chuck key in place and struck key with soft hammer to loosen chuck
4. Remove old chuck and screwed on replacement
5. Reinstalled reverse thread screw.
Did you find this story helpful?
Thanks for voting and helping fellow customers!
Great product
Jacob - December 9, 2019
Tool Type
Cordless Drill
Difficulty
Medium
Time
Less than 15 minutes
Tools Used
Screwdriver, Adjustable Wrench, Vice
Parts Used
Watched YouTube to figure out the sequence.. easy from there.
Did you find this story helpful?
Thanks for voting and helping fellow customers!
Chuck had seal that was ruined
Michael - April 16, 2019
Tool Type
Cordless Drill
Difficulty
Easy
Time
Less than 15 minutes
Tools Used
Screwdriver, Rubber mallet, large allen wrench
Parts Used
1. Removed chuck screw with large Phillips head screwdriver. The screw is a reverse thread so turn it clockwise.
2. Took largest allen wrench I had and tightened it in the chuck.
3. Made sure the drill was in drill mode and in low gear. This will provide the most resistance.
4. Hit allen wrench with rubber mallet until chuck loosened. The thread is a regular thread so turn counterclockwise. Some people put the drill body in a vice, but I just turned the drill upside down and let the chuck over the side of the table while striking the allen wrench with the mallet.
5. Put replacement chuck back on hand tight and then reinstalled chuck screw. I used the old screw because I didn't damage it when I removed it. I did order a new screw just in case since it was cheap.
Did you find this story helpful?
Thanks for voting and helping fellow customers!
OEM stands for Original Equipment Manufacturer and means the part you’re buying is sourced directly from the manufacturer who made your product. At eReplacementParts, we sell only genuine OEM parts, guaranteeing the part you’re purchasing is of better design and of higher quality than aftermarket parts.
Our product descriptions are a combination of data sourced directly from the manufacturers who made your product as well as content researched and curated by our content & customer service teams. This content is edited and reviewed internally before being made public to customers.
Our customer service team are at the ready daily to answer your part and product questions. We have a dedicated staff with decades of collective experience in helping customers just like you purchase parts to repair their products.
All our part reviews are solicited directly from other customers who have purchased this exact part. While we moderate these reviews for profanity, offensive language or personally identifiable information, these reviews are posted exactly as submitted and no alterations are made by our team.
All our customer repair instructions are solicited directly from other customers just like you who have purchased and replaced this exact part. While we moderate these reviews for profanity, offensive language or personally identifiable information, these reviews are posted exactly as submitted and no alterations are made by our team.
Based on data from past customer purchasing behaviors, these parts are most commonly purchased together along with the part you are viewing. These parts may be necessary or helpful to replace to complete your current repair.
All our installation videos are created and produced in collaboration with our in-house repair technician, Mark Sodja, who has helped millions of eReplacementParts customers over the last 13 years repair their products. Mark has years of experience in selling and repairing both commercial and residential products with a specialty in gas-powered equipment.
This data is collected from customers who submitted a repair instruction after replacing this exact part. Customers can rate how easy the repair was to complete and how long it took. We aggregate this data to provide a repair rating that allows customers to quickly determine the difficulty and time needed to perform their own repair.