eReplacementParts.com
877-346-4814
Briggs and Stratton Parts

Install
Videos!
Diaphragm-carburetor - 795083:Briggs and Stratton 360 View
Diaphragm-carburetor - 795083:Briggs and StrattonDiaphragm-carburetor - 795083:Briggs and StrattonDiaphragm-carburetor - 795083:Briggs and Stratton 360 View

Diaphragm-carburetor 795083

Part Number: 795083
Briggs and StrattonToroCraftsman
Availability: In Stock
Price: $4.72
Ships within 1 business day

*This part replaces obsolete part #: 281028, 272372 and 495770.

Product Information
Specifications
Part Type: Carburetor
Description:
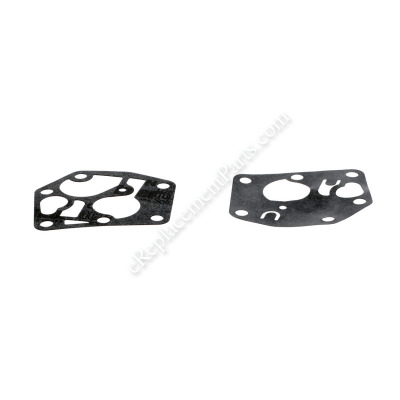
Genuine Briggs and Stratton replacement part, it includes the Diaphragm and Diaphragm Gasket.
The purpose of the Diaphragm is to draw out fuel into the engine.
The diaphragm is forced inward by ambient air pressure.
The diaphragm is connected to the needle valve and as it moves inward it opens the needle valve to admit more fuel, this replenishes the fuel as it is consumed.
As fuel is replenished the diaphragm moves out due to fuel pressure and a small spring, closing the needle valve.
Most manufactures will have rebuild kits that contain new Diaphragms in them.
Frequently Purchased With
Compatibility

This part is compatible with the following machines:

Briggs and Stratton
Toro
Expand the 150+ compatible machines
Products Compatibility

This item works with the following types of products:

  • • Engine
  • • Generator
  • • Lawn Mower

Questions & Answers for Diaphragm-carburetor


No questions have been asked yet
Repair Instructions: Submitted by Customers Like You
28 of 31 people found this instruction helpful
Tool Type:
Lawn Mower
Parts Used:
Diaphragm-carburetor - 795083
Repair Difficulty:
Easy
Time Spent Repairing:
15-30 minutes
Tools Used:
Screwdriver, Socket set
The diaphragm and other mated gasket were shot do to age and improper maintenance
Very easy fix remove 2 bolts from gas tank and 5 screws from carb release throttle linkage. Seperate carb from gas tank and replace gaskets. Just make sure diaphragm gasket goes against the gas tank and reassemble.
Did you find this story helpful?
Thanks for voting and helping fellow customers!
21 of 21 people found this instruction helpful
Tool Type:
Lawn Mower
Parts Used:
Diaphragm-carburetor - 795083
Repair Difficulty:
Easy
Time Spent Repairing:
15-30 minutes
Tools Used:
Screwdriver, Socket set, Wrench Set, Brake Cleaner spray
Engine surging, throttle doesn't seem to work.
Remove the air filter. Decrease, clean carb and fuel tank with parts cleaning spray. Especially the throttle/governor linkage, and the screw head area where the carb joins the fuel tank. Release the throttle/governor springs from the airspeed sensor shaft. This is a single clip that joins two springs coming from the carb, to a metal finger that swings easily in the cooling airflow under the shroud. Remove the two carb/tank assembly mounting bolts, and gently pull the assembly off the engine. Remove the 5 screws holding the carb to the tank. Gently lift the carb off of the tank, being careful not to damage the pickup tube and filters. Note the position of the old diaphragm and gasket. Remove these and safely dispose of them and any old or contaminated fuel. Clean the underside of the carb, ports and filter screens. Noting the position and alignment, install the new diaphragm and gasket. Carefully insert the carb assembly onto the tank, using a toothpick or Q-tip to recheck or align the gasket and diaphragm with the screw holes. Insert and start each of the screws, then tighten them in a cris-cross pattern. Remount the carb/tank assembly. Reinstall the governor linkage. Remount the air cleaner. Refuel. Prime. Pull, and relax in the warm glow of admiration from your family and friends, to the smooth, steady strum of your newly refurbished lawn machine.
Did you find this story helpful?
Thanks for voting and helping fellow customers!
6 of 6 people found this instruction helpful
Tool Type:
Lawn Mower
Parts Used:
Diaphragm-carburetor - 795083
Repair Difficulty:
Medium
Time Spent Repairing:
15-30 minutes
Tools Used:
Screwdriver, Socket set
Engine was surging
Remove the air cleaner. Remove the fuel tank and the carburetor and linkage. Remove the carburetor from the fuel tank. Remove the old diaphragm and the gasket. Clean up the surface on the fuel tank and the carburetor. Install the diaphragm onto the fuel tank followed by the gasket. Line up the screw holes in both . Install the carburetor. Attach the linkage to the carburetor and install the fuel tank. Install the air cleaner. You're done.
Did you find this story helpful?
Thanks for voting and helping fellow customers!
4 of 4 people found this instruction helpful
Tool Type:
Lawn Mower
Parts Used:
Diaphragm-carburetor - 795083
Repair Difficulty:
Medium
Time Spent Repairing:
15-30 minutes
Tools Used:
Screwdriver, Pliers, Socket set
Engine rpm would go up and down constantly
1. Removed fuel tank from the engine.
2. Remove carburetor from the fuel tank.
3. Clean off old gasket.
4. Clean carburetor with the carburetor cleaner.
5. Dry and place new gasket on carburetor.
6. Attach carburetor to fuel tank.
7. Install the fuel tank back to the engine.
8. Pour a little fuel or starting fluid down the carburetor.
9. Start engine, may have to repeat a few times until engine stays running on own
Did you find this story helpful?
Thanks for voting and helping fellow customers!
3 of 3 people found this instruction helpful
Tool Type:
Lawn Mower
Parts Used:
Diaphragm-carburetor - 795083
Filter-a/c Foam - 698369
Repair Difficulty:
Easy
Time Spent Repairing:
15-30 minutes
Tools Used:
Screwdriver, Socket set
Surging engine
Remove the air cleaner. Remove the bolts that are securing the fuel tank, then remove the fuel tank and the carburetor, remove the linkage from the carburetor. Remove the carburetor from the tank. Then remove the diaphragm and gasket. Clean the surface of the tank and the bottom of the carburetor. Place the diaphragm on the fuel tank and the gasket on top of it. Install the carburetor on the fuel tank then hook the linkage to the carburetor. And install the fuel tank to the engine. And replace the filter in the air cleaner. Then install the air cleaner.
Did you find this story helpful?
Thanks for voting and helping fellow customers!
3 of 3 people found this instruction helpful
Tool Type:
Lawn Mower
Parts Used:
Diaphragm-carburetor - 795083
Manifold-intake - 693446
Repair Difficulty:
Easy
Time Spent Repairing:
30-60 minutes
Tools Used:
Screwdriver, Socket set
Hard to start, when running ran rough.
I found this mower sitting next to trash cans at the road to be picked up. The owner said I could have it. Looked in good shape like it had not set outside. I got it to run after I gapped a newly installed plug from .060 to .025. but it ran rough. I suspected the carb and removed the it to clean and checked the diaphragm. I noticed when the hold down screws were removed it was loose at the outlet connected to the intake manifold. It should be a snug fit even with the screws removed. It was broke. I removed the top cover of the mower and noticed the other end of the intake where it bolts to the head was loose. No screws to be found and the gasket gone. I had to remove the coil and removed the old intake. I ordered the parts through your company. I was surprised the manifold kit you sent had the gaskets and screws that were missing. Easy installed the manifold, Installed the diaphragm. and gasket that was also missing from the carb. I also changed the engine oil. Mower blade and under the deck looked new like it had not been used much. Three pushes of the carb primer bulb per instruction label on the mower, one pull of the rope and it started and runs good. I have used it twice since the repair with no problems. I have since found two more push mowers set out to the trash and will be evaluating their issues and will be ordering parts through you. Excellent customer service and I don't have to go to the only lawn parts store around here and deal with people who don't know what a lawn mower is. Every time I go there its somebody new who doesn't know any more than the previous employee. Thanks, Ray.
Did you find this story helpful?
Thanks for voting and helping fellow customers!
2 of 2 people found this instruction helpful
Tool Type:
Lawn Mower
Parts Used:
Diaphragm-carburetor - 795083
Primer-carburetor - 694394
Plug-spark - 796112S
Repair Difficulty:
Easy
Time Spent Repairing:
15-30 minutes
Tools Used:
Screwdriver, Pliers, Wrench Set
Lawn mower engine would not stay running.
1. Removed the carburetor from engine.
2. Separated carburetor from gas tank,
3. Removed old carburetor diaphragm and put in new.
4. Put everything back together.
5. Replaced primer.
6. Replaced spark plug.
Did you find this story helpful?
Thanks for voting and helping fellow customers!
2 of 2 people found this instruction helpful
Tool Type:
Lawn Mower
Parts Used:
Diaphragm-carburetor - 795083
Primer-carburetor - 694394
Plug-spark - 796112S
Repair Difficulty:
Easy
Time Spent Repairing:
15-30 minutes
Tools Used:
Screwdriver, Socket set, Nutdriver
Lawn mower wont run
Took off carb, cleaned it, replaced diaphragm.
Remove the primer bulb and retainer.
Install the new bulb and retainer
Removed the old spark plug, gapped the new one at 0.030 and installed it
Did you find this story helpful?
Thanks for voting and helping fellow customers!
2 of 2 people found this instruction helpful
Tool Type:
Lawn Mower
Parts Used:
Diaphragm-carburetor - 795083
Control Bar - 532194177
Plug-spark - 796112S
Repair Difficulty:
Medium
Time Spent Repairing:
30-60 minutes
Tools Used:
Screwdriver, Socket set, gasket scraper
Engine would only run by using primer button.
Remove air cleaner, fuel tank then remove carb from tank, remove and replace diaphragm and gasket. Runs like champ.
Did you find this story helpful?
Thanks for voting and helping fellow customers!
1 of 1 people found this instruction helpful
Tool Type:
Lawn Mower
Parts Used:
Screen-carburetor - 691837
Diaphragm-carburetor - 795083
Repair Difficulty:
Medium
Time Spent Repairing:
15-30 minutes
Tools Used:
Screwdriver, Wrench Set, Adjustable Wrench
Dirty carburetor
Replaced carburetor filter, diaphragm
Starts and runs great now
Did you find this story helpful?
Thanks for voting and helping fellow customers!
Reviews
4.5
Average Rating (out of 5):
8 Reviews
Click to filter by ratings:
5 stars
4
4 stars
4
3 stars
0
2 stars
0
1 stars
0
  • Highest Rating
  • Most Recent
< PREV
  • 1
NEXT >
  • worked as expected
    I was sure of the right part with their ordering process.
    Guest - August 11, 2021 Verified Purchase
    gasket
    Nice work,
    Guest - September 26, 2019 Verified Purchase
    100% Original
    The diaphragm parts were exactly the same as on original. Received in new condition and packaging. I have never been disappointed by this company.
    James - July 19, 2019 Verified Purchase
    As Expected
    Very Slow Delivery.
    Guest - May 23, 2019 Verified Purchase
    Efficient transaction and the right part!
    Took a few more days than expected ...but nowadays, THAT'S to be expected! Main thing is, I got the RIGHT part, and it was very reasonably priced!
    Guest - July 2, 2021 Verified Purchase
    Easy Repair
    Quick shipping, part worked exactly as expected. Very satisfied.
    Guest - August 26, 2019 Verified Purchase
    diaphragm
    thought it was a little thin but works well so far
    Guest - June 17, 2019 Verified Purchase
    Gaskets
    Easy to look up ounce you have your model number. I thought $5 shipping was a bit high for two little gaskets that could have been mailed for $1.50.
    Guest - June 3, 2019 Verified Purchase
    Verified Purchase
    eReplacementParts Team
    • Highest Rating
    • Most Recent
    < PREV
    • 1
    NEXT >
    Product Information
    eReplacementParts.com
    7174 South 400 West
    Suite 5
    Midvale, UT 84047
    visa mastercard discover american express PayPal