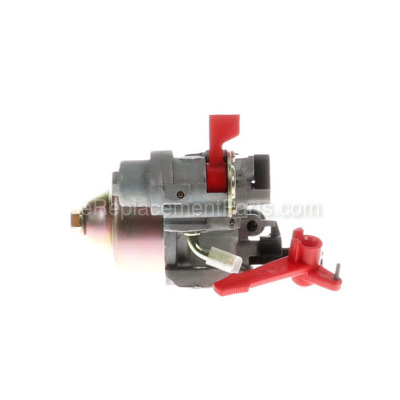


This authentic OEM sourced replacement carburetor assembly is designed for use on Homelite pressure washers. Carburetor plays an important role by mixing the gas and air before the fuel mix goes to the engine. This assembly includes a metal body carburetor with a plastic choke lever. To ensure top performance when replacing carburetor, it is advised that you also replace carburetor gaskets that are sold separately. You will need a screwdriver to complete this repair.
Carburetor Assembly 16100-Z440210-QG00
OEM part for: Homelite
Part Number: 16100-Z440210-QG00
$30.71
Usually ships in 7 - 12 business days
7 - 12 business days
Jump To:
Frequently Purchased Together ?


Compatibility
This part will fit the following 4 machines
Homelite
HL252300 Pressure Washer View Diagrams & Manuals
UT80522 Pressure Washer View Diagrams & Manuals
UT80522B 2700 PSI Gas Pressure Washer View Diagrams & Manuals
UT80522A Pressure Washer View Diagrams & Manuals
This item works with the following types of products:
- Pressure Washer Parts
This part replaces obsolete part #: 099980425067
Customer Part Reviews ?
Average Rating (out of 5):
Click to filter by ratings:
5 stars
6
4 stars
0
3 stars
0
2 stars
0
1 stars
0
< PREV
- 1
Excellent
"eParts" is where I go when I need small engine parts. The website is easy to use, parts are reasonably priced, shipment is quick and the parts always fit. It's a great place to do business with.
Guest -
13 days ago
Verified Purchase
hard to find and pressure sprayer works better than ever.
When ordering people were very helpful and knowledgable.
Guest -
July 3, 2023
Verified Purchase
PRESSURE WASHER CARBURETOR
The delivered Carburetor was the correct part. It arrived quickly and it was price right.
Guest -
October 14, 2020
Verified Purchase
easy repair
You guys quickly shipped the part I had ordered. I installed it, and quickly started the power washer.
Guest -
May 15, 2020
Verified Purchase
Easy repair
Got exactly what I needed in a timely manner. I have ordered several parts for different equipment and have had a very positive experience.
Barbara -
April 22, 2020
Verified Purchase
Carb for pressure washer
Arrived in a few days and perfect fit. Easy to install and the pressure washer that was not running started up quickly and runs perfect! price was very reasonable.
Guest -
May 20, 2019
Verified Purchase
t
t
t -
t days ago
Verified Purchase
eReplacementParts Team
t
Questions & Answers ?
Our customer Service team is at the ready daily to answer your part and product questions.

Ask our Team
We have a dedicated staff with decades of collective experience in helping customers just like you purchase parts to repair their products.
Does this fit my product?Questions & Answers for Carburetor Assembly
No questions have been asked yet
Customer Repair Instructions ?
All our customer repair instructions are solicited directly from other customers just like you who have purchased and replaced this exact part.
Fuel tank was rusty and carburetor clogged with old gasoline
Alan - February 1, 2016
👍 20 of 21 people found this instruction helpful
Tool Type
Pressure Washer
Difficulty
Medium
Time
30-60 minutes
Tools Used
Screwdriver, Pliers, Socket set, Wrench Set, Adjustable Wrench
My fault the washer failed because I didn't use it for more than a year and left untreated gas in the tank. I did manage to clean out fuel tank and carburetor well enough to power wash my driveway, however when I wanted to use the washer 3 weeks later it would not start. That's when I decided to look for new parts and was very pleased to find the entire fuel tank and carburetor assembly on eReplacementParts - the price and shipping were affordable and very quick.
As for the repair it's not too complicated but do plan to remove more parts then you might expect. I found it helpful to remove the wheels and place the washer on my workbench for easy access.
Plan on replacing the fuel line as well. The fuel shutoff is built into the carburetor, so drain the old gas before getting started. The gaskets are thick and easy to reuse, but I was pleased to find the replacement carburetor included a gasket.
Runs like new now and I will be sure to use Sta-Bil fuel treatment every time!
Did you find this story helpful?
Thanks for voting and helping fellow customers!
Carburetor was bad from not emptying old gas out
Victor - October 28, 2017
👍 1 of 1 people found this instruction helpful
Tool Type
Pressure Washer
Difficulty
Medium
Time
30-60 minutes
Tools Used
Socket set, Nutdriver, Adjustable Wrench
Parts Used
I unscrewed the carburetor cover and then I loosen the engine bolts and moved the engine in a direction that could pull the carburetor off. Pulled the 2 cables off installed the new carburetor and tighten the engine back up and put the cover back on the machine operated like brand new.
Did you find this story helpful?
Thanks for voting and helping fellow customers!
Engine stalling.
Jeffrey - July 21, 2017
👍 1 of 1 people found this instruction helpful
Tool Type
Pressure Washer
Difficulty
Medium
Time
30-60 minutes
Tools Used
Wrench Set, Nutdriver
1. Remove the engine from the frame.
2. Remove the carb heat shield.
3. Remove the pull rope assembly.
4. Replace the coil.
5. Replace the carb.
6. Reassemble.
2. Remove the carb heat shield.
3. Remove the pull rope assembly.
4. Replace the coil.
5. Replace the carb.
6. Reassemble.
Did you find this story helpful?
Thanks for voting and helping fellow customers!
Would not stay running. Also hard to get started.
paul - July 21, 2016
👍 2 of 3 people found this instruction helpful
Tool Type
Pressure Washer
Difficulty
Medium
Time
30-60 minutes
Tools Used
Pliers, Socket set, Wrench Set
Parts Used
1. Unbolted the motor.
2. Unbolt carb
3. Remove gas line
4. Reassemble
Unbolt motor with 4 bolts to get carb. to slide off.
2. Unbolt carb
3. Remove gas line
4. Reassemble
Unbolt motor with 4 bolts to get carb. to slide off.
Did you find this story helpful?
Thanks for voting and helping fellow customers!
Pressure Washer would not start.
Lanny - August 11, 2023
Tool Type
Pressure Washer
Difficulty
Medium
Time
1-2 hours
Tools Used
Socket set, Wrench Set, Spark Gap Gauge
1. Ordered parts that I thought might be required (received very quickly)
2. Put the entire Washer on a portable workbench
3. Removed wheels for easier access to mounting bolts and parts
4. unbolted motor mount for access to Nuts for housing cover for Air Breather and Carb
5. Replaced spark plug (adjusted Gap to specs)
6. Removed Air filter assembly for access to the carburetor - Disconnected and plugged fuel line
7. Disconnected throttle spring and bar
8. Removed old carb - slid off the two mounting bolts
9. replaced 1st gasket and slid on new Carb
10. reconnected, throttle spring, and bar replaced the front gasket
11. checked linkages
12. Reconnected fuel line and breather tube
12. Remounted Air Filter assembly replaced the two mounting Nuts
13. Reattached engine to the mounting bracket
14. Reattached Wheels
15. Tested and worked great
Note: it would not have been necessary to dismount the engine if there had been better clearance to the carburetor mounting nuts... Would have saved a lot of time.
Did you find this story helpful?
Thanks for voting and helping fellow customers!
Engine would not keep running.
Jimmy - September 9, 2019
Tool Type
Pressure Washer
Difficulty
Medium
Time
Less than 15 minutes
Tools Used
Socket set
Parts Used
Removed old carburetor and replaced with new. Also replaced pressure control valve.
Did you find this story helpful?
Thanks for voting and helping fellow customers!
Pressure washer engine would not start.
George - April 9, 2019
Tool Type
Pressure Washer
Difficulty
Medium
Time
30-60 minutes
Tools Used
Screwdriver, Pliers, Socket set
1. Troubleshooting from watching YouTube videos recommended a new carburetor. The choke lever and fuel on/off lever were frozen.
2. I had to remove the 2 wheels
3. I had to remove 3 bolts holding the engine to the frame.
4. Removed air filter.
5. Removed the gas tank.
6. Disconnected gas line from carburetor.
7. Disconnected spark plug wire.
8. Removed bolts holding flywheel housing and removed housing.
9. Disconnected throttle link to carburetor.
10. Disconnected spring assist to throttle lever.
11. Removed 2 nuts holding carburetor and removed carburetor.
12. Reversed the order to reassemble the parts.
13. After reassembling the engine parts, I moved the pressure washe outside.
14. With choke lever in ye0 cold start position I pulled 6 times. Nothing.
15. I moved the Choke to Run. And pulled 6 times. The engine did not start.
16. I did more troubleshooting and "eparts" suggested the ignition coil could be the reason for not starting. I ordered a new ignition coil.
Late today the part was delivered. I'll attempt to install the ignition coil asap.
Did you find this story helpful?
Thanks for voting and helping fellow customers!
Carb was leaking
Deborah - February 28, 2019
Tool Type
Pressure Washer
Difficulty
Easy
Time
Less than 15 minutes
Tools Used
Screwdriver, Socket set, Wrench Set
Parts Used
Carb was very easy to install. Parts were correct and easy to order.
Did you find this story helpful?
Thanks for voting and helping fellow customers!
Carburetor clogged with old gas
Steven - July 9, 2018
Tool Type
Pressure Washer
Difficulty
Medium
Time
15-30 minutes
Tools Used
Pliers, Socket set, Wrench Set
1. Unbolted engine mount bolts
2. Unbolted 2 cap nuts on end of carb/air assembly/ w/choke on and gas in off position
3. Pulled off air cleaner assembly while carefully disconnecting air breather hose
4. Take off air cleaner gasket
5. Pulled gas hose off carb assembly after using pliers to slide spring clamp up 1 inch from end(drain old gas into approved container)
6. 3 bolts hold gas tank, 2 under side of tank and 1 on other side going horizontally/ remove and slowly guide gas tank up and guide fuel line out as you remove tank/ remove spring clamp and replace hose/ if gas only trickled out of hose when draining also replace tank outlet which screws into tank/ inspect inside of tank for corrosion.
7. Pull off carb assembly - inspect gasket/ replace if needed(not usually needed to change) replace with new carb assembly.
8. Put tank back on while guiding fuel tube as was originally routed and connect to carb assembly and guide block/ use pliers and move clamp back to 1/2 inch from end of tube.
9. Put air assembly gasket back on- make sure that gasket is oriented correctly to air slot on carb assembly- place choke lever on carb so that it works on the butterfly valve on carb when moved
10. Place air assembly back on and connect air breather tube back on air breather/ put cap nuts back on and tighten firmly but not too tight.
11. Put engine back in place align bolts with nuts on top and tighten firmly.
Did you find this story helpful?
Thanks for voting and helping fellow customers!
Pressure washer would idle with choke engaged but kill when switched to run position
Jeffre - September 23, 2017
👍 0 of 1 people found this instruction helpful
Tool Type
Pressure Washer
Difficulty
Medium
Time
30-60 minutes
Tools Used
Screwdriver, Pliers, Wrench Set
Parts Used
Took spark plug wire off of plug, tilted pressure washer with oil dip stick side facing u, removed 4 bolts attaching pressure washer to frame, removed the engine then proceeded to remove filter housing and filter, then clamped fuel line . Removed the carburetor linkages, and removed carburetor, cleaned gasket surface, reinstalled new carburetor, attached linkages, attached fuel line, and reinstalled filter housing and filter, then attached engine back to frame, primed carburetor and engine started on first pull, carburetor was preset so it ran perfect!!
Did you find this story helpful?
Thanks for voting and helping fellow customers!
OEM stands for Original Equipment Manufacturer and means the part you’re buying is sourced directly from the manufacturer who made your product. At eReplacementParts, we sell only genuine OEM parts, guaranteeing the part you’re purchasing is of better design and of higher quality than aftermarket parts.
Our product descriptions are a combination of data sourced directly from the manufacturers who made your product as well as content researched and curated by our content & customer service teams. This content is edited and reviewed internally before being made public to customers.
Our customer service team are at the ready daily to answer your part and product questions. We have a dedicated staff with decades of collective experience in helping customers just like you purchase parts to repair their products.
All our part reviews are solicited directly from other customers who have purchased this exact part. While we moderate these reviews for profanity, offensive language or personally identifiable information, these reviews are posted exactly as submitted and no alterations are made by our team.
All our customer repair instructions are solicited directly from other customers just like you who have purchased and replaced this exact part. While we moderate these reviews for profanity, offensive language or personally identifiable information, these reviews are posted exactly as submitted and no alterations are made by our team.
Based on data from past customer purchasing behaviors, these parts are most commonly purchased together along with the part you are viewing. These parts may be necessary or helpful to replace to complete your current repair.
All our installation videos are created and produced in collaboration with our in-house repair technician, Mark Sodja, who has helped millions of eReplacementParts customers over the last 13 years repair their products. Mark has years of experience in selling and repairing both commercial and residential products with a specialty in gas-powered equipment.
This data is collected from customers who submitted a repair instruction after replacing this exact part. Customers can rate how easy the repair was to complete and how long it took. We aggregate this data to provide a repair rating that allows customers to quickly determine the difficulty and time needed to perform their own repair.