eReplacementParts.com
877-346-4814
Makita Parts
Repair Parts Home
  
Power Tool Parts
  
Makita Parts
  638614-1 Brush Holder

Brush Holder 638614-1

OEM part for: Makita

Part Number: 638614-1


Install
Videos!
Brush Holder - 638614-1:Makita 360 View
Brush Holder - 638614-1:MakitaBrush Holder - 638614-1:MakitaBrush Holder - 638614-1:Makita 360 View
In Stock
Ships within 1 business day
Medium 15-30 minutes (13 rated repairs)?
OEM: Original Equipment Manufacturer ?
Makita
Does this d-block d-md-none fit my product?

Product Description ?

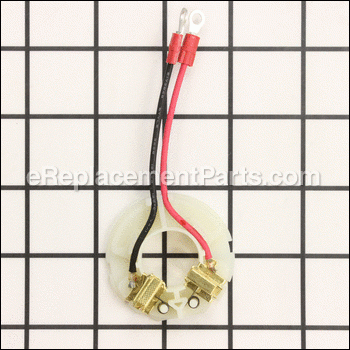
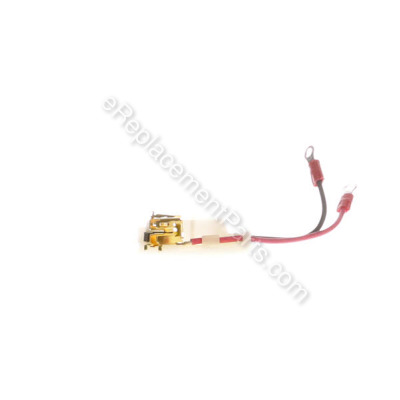
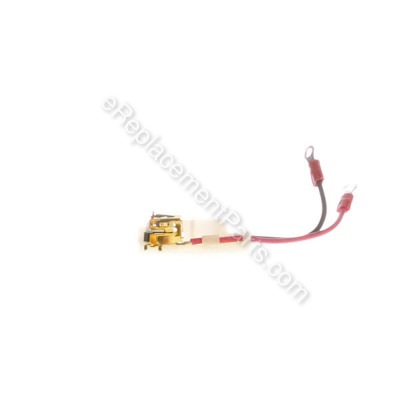
This is an Authentic Manufacturer Sourced replacement part used on a Makita Drills/Drivers. This part consists of: Plastic Holder Ring, Two (2) Metal Brush Holders With Springs and Two (2) Lead Wires Attached. This part holds Carbon Brushes around the Armature to provide stable and safe contact. Please note Carbon Brushes are Sold Separately.

To replace this assembly you would need a Screwdriver and Pliers.

• First remove Screws holding the cover together.
• Carefully remove Two (2) Halves of the housing to gain access to Armature and Brush Holder.
• Remove the screws holding Brush Holder to The Trigger.
• Remove the Armature Assembly and the Brush Holder.
• Install the New Brush Holder, Brushes and the Armature
• Reassemble and test your tool.

  • Classification: Part
  • Weight: 0.01 lbs.
  • Shipping: Ships Worldwide

Frequently Purchased Together ?

Compatibility

This part will fit the following 52 machines

Makita

BHP454 18V LXT Lithium-Ion Cordless 1/2" Hammer Driver-Drill View Diagrams & Manuals
LXPH03 18V Hamer Driver-Drill View Diagrams & Manuals
XPH03M 18V LXT Lithium-Ion Cordless 1/2" Hammer Driver-Drill Kit View Diagrams & Manuals
BDF454F (Type 1) Drill View Diagrams & Manuals
BDF454F (Type 2) Drill View Diagrams & Manuals
BDF454F (Type 3) Drill View Diagrams & Manuals
BDF454 (Type 2) Drill View Diagrams & Manuals
BDF454 (Type 3) Drill View Diagrams & Manuals
BDF454Z (Type 1) Drill View Diagrams & Manuals
BDF454Z (Type 2) Drill View Diagrams & Manuals
BDF454Z (Type 3) Drill View Diagrams & Manuals
BHP454F (Type 1) Drill View Diagrams & Manuals
BHP454F (Type 2) Drill View Diagrams & Manuals
BHP454F (Type 3) Drill View Diagrams & Manuals
BHP454S (Type 1) Drill View Diagrams & Manuals
BHP454S (Type 2) Drill View Diagrams & Manuals
BHP454S (Type 3) Drill View Diagrams & Manuals
BHP454 (Type 2) Drill View Diagrams & Manuals
BHP454 (Type 3) Drill View Diagrams & Manuals
BHP454Z (Type 1) Drill View Diagrams & Manuals
BHP454Z (Type 2) Drill View Diagrams & Manuals
BHP454Z (Type 3) Drill View Diagrams & Manuals
LXFD03 (Type 1) Drill View Diagrams & Manuals
LXFD03 (Type 2) Drill View Diagrams & Manuals
LXFD03X (Type 1) Drill View Diagrams & Manuals
LXFD03X (Type 2) Drill View Diagrams & Manuals
LXFD03Z1 (Type 1) Drill View Diagrams & Manuals
LXFD03Z1 (Type 2) Drill View Diagrams & Manuals
LXFD03Z (Type 1) Drill View Diagrams & Manuals
LXFD03Z (Type 2) Drill View Diagrams & Manuals
LXFD03ZX1 (Type 1) Drill View Diagrams & Manuals
LXFD03ZX1 (Type 2) Drill View Diagrams & Manuals
LXFD03ZX (Type 1) Drill View Diagrams & Manuals
LXFD03ZX (Type 2) Drill View Diagrams & Manuals
LXPH031 (Type 1) Drill View Diagrams & Manuals
LXPH031 (Type 2) Drill View Diagrams & Manuals
LXPH03 (Type 2) Drill View Diagrams & Manuals
LXPH03X (Type 1) Drill View Diagrams & Manuals
LXPH03X (Type 2) Drill View Diagrams & Manuals
LXPH03Z Drill View Diagrams & Manuals
LXPH03Z1 (Type 1) Drill View Diagrams & Manuals
LXPH03Z1 (Type 2) Drill View Diagrams & Manuals
LXPH03ZX1 (Type 1) Drill View Diagrams & Manuals
LXPH03ZX1 (Type 2) Drill View Diagrams & Manuals
LXPH03ZX (Type 1) Drill View Diagrams & Manuals
LXPH03ZX (Type 2) Drill View Diagrams & Manuals
XPH03MB Drill View Diagrams & Manuals
Show More Compatible Models
Don't see yours? Try searching our site for :

This item works with the following types of products:

  • Cordless Drill Parts
  • Drill Parts
  • Hammer Drill Parts

Customer Part Reviews ?

5
Average Rating (out of 5):
4 Reviews
Click to filter by ratings:
5 stars
4
4 stars
0
3 stars
0
2 stars
0
1 stars
0
  • Highest Rating
  • Most Recent
< PREV
  • 1
NEXT >
  • Great parts
    Arrived quickly,genuine parts.
    Guest - May 13, 2021 Verified Purchase
    Easy fix
    Replaced the brush holder and brushes on my hammer drill. Works great. Luckily it was a cheap fix.
    Guest - December 6, 2019 Verified Purchase
    Works 100%
    First time buying from this website and I have to say that's amazing. I just pay $15.00 for the parts that I needed and I was able to fix my drill, It's working like the first day.
    Guest - November 9, 2019 Verified Purchase
    Worked as expected
    Arrived on time, saved over $100 verses replacing drill. Easy repair. Works like new again.
    Guest - September 12, 2019 Verified Purchase
    t
    t
    t - t days ago Verified Purchase
    eReplacementParts Team
    t

    Questions & Answers ?

    Our customer Service team is at the ready daily to answer your part and product questions.

    photo of team member
    Ask our Team

    We have a dedicated staff with decades of collective experience in helping customers just like you purchase parts to repair their products.

    Does this fit my product?

    Questions & Answers for Brush Holder


    No questions have been asked yet

    Customer Repair Instructions ?

    All our customer repair instructions are solicited directly from other customers just like you who have purchased and replaced this exact part.

    Medium 15-30 minutes (13 rated repairs)?

    Motor kept stopping and sparks shooting out

    Neil - April 20, 2018
    👍 1 of 1 people found this instruction helpful
    Tool Type

    Cordless Drill

    Difficulty

    Medium

    Time

    15-30 minutes

    Tools Used

    Screwdriver

    Removed all screws holding casing and power head, separated case removed motor replaced armature, removed brush holder and 2 screws from trigger, installed new brush holder wires on trigger make sure which ones are red and black, re assembled in reverse order total time was maybe 20 minutes, make sure notch on motor lines in with the notch in the case.
    Did you find this story helpful?
    Thanks for voting and helping fellow customers!

    over heated & burned fan blades on armature & melted those to brush holder

    John - September 22, 2021
    Tool Type

    Hammer Drill

    Difficulty

    Easy

    Time

    30-60 minutes

    Tools Used

    Screwdriver, Pliers, needle nose pliers

    removed damaged / ruined parts
    installed new ones,
    most difficulty was re-aligning all parts correctly,
    Did you find this story helpful?
    Thanks for voting and helping fellow customers!

    Brush holder melted

    Marcel - February 28, 2020
    Tool Type

    Cordless Drill

    Difficulty

    Medium

    Time

    30-60 minutes

    Tools Used

    Screwdriver, Utility knife

    Take the case apart.
    Remove melted brush holder.
    Be sure to order brushes and brush holder, because the brushes will be melted to the old brush holder. I managed to pry the old brushes out of the melted brush holder but it took some delicate surgery to save the old brushes.
    Install the newvbrush holder back in the case and assemble the case. Done.
    Did you find this story helpful?
    Thanks for voting and helping fellow customers!

    Drill low on power and stalls

    Norm - June 4, 2018
    Tool Type

    Cordless Drill

    Difficulty

    Easy

    Time

    Less than 15 minutes

    Tools Used

    Screwdriver, Hook pick to release brush spring.

    Remove all screws holding housing together. Remove 4 screws holding gear drive assembly in place. Tip out brush assembly out with switch and wire assembly together. Unscrew brush wire screws and install new brush holder. Reassemble in reverse order.
    Did you find this story helpful?
    Thanks for voting and helping fellow customers!

    Drill left in rain, froze up

    Jeff - February 13, 2018
    Tool Type

    Impact Driver

    Difficulty

    Medium

    Time

    15-30 minutes

    Tools Used

    Screwdriver, Pliers, Needle nose pliers

    Split case, cleaned everything and installed new brushes, brush holder and armature
    Did you find this story helpful?
    Thanks for voting and helping fellow customers!

    Brushes were shot and brush holder was melted

    Mark - January 12, 2018
    Tool Type

    Cordless Drill

    Difficulty

    Medium

    Time

    30-60 minutes

    Tools Used

    Screwdriver

    Took drill apart and installed brush hold and brushes and re installed drill
    Did you find this story helpful?
    Thanks for voting and helping fellow customers!

    Drill would not turn.

    Alan - October 31, 2017
    Tool Type

    Cordless Drill

    Difficulty

    Easy

    Time

    15-30 minutes

    Tools Used

    Screwdriver

    1. Took apart the drill
    2. Replaced the broken parts.
    3. Reassembled the drill.
    Did you find this story helpful?
    Thanks for voting and helping fellow customers!

    Slow & didn't start

    Norm - March 14, 2017
    Tool Type

    Cordless Drill

    Difficulty

    Easy

    Time

    15-30 minutes

    Tools Used

    Screwdriver, Pick tool

    Removed the 2 phillips end cap screws to access the brushes. They simply pull out to the holder after I took a pick and held the brush spring off to the side. When replacing the holder you have to separate the two halves of the handle. Not a big job. Just make sure you line up the steel field that the armature turns in. It has a notch in it that has to line up with the one in the handle housing. If you don't do this you can't get the housings completely together and wonder why. This happened to me. Also make sure the detent springs for the High/Low don't fall out when putting the two halves together. Otherwise it was a simple repair. I have done 2 drills so far in our business and plan to get more parts to do more. Parts are identical to the original and are in Makita labeled packaging. Also great pricing.
    Did you find this story helpful?
    Thanks for voting and helping fellow customers!

    Fan blades broke off and armature fused to brush holder

    scott - October 15, 2016
    Tool Type

    Cordless Drill

    Difficulty

    Medium

    Time

    15-30 minutes

    Tools Used

    Screwdriver

    1) Removed battery
    2) Removed screws from case and set aside one half of the case
    3) Removed old brush holder from case and disconnected wiring from the trigger
    4) Moved magnet coil retention bracket out of the way
    5) Removed armature screws from front of drill around chuck
    6) Twisted plastic armature retainer and pulled armature assembly out of drill body, taking care not to damage the planetary gears
    7) Transferred plastic armature retainer to new armature
    8) Transferred magnet coil to new armature and installed the assembly
    9) Installed new brushes in new brush holder
    10) Installed new brush holder assembly in drill body and connected to the trigger
    11) Transferred speed selector switch to new armature.
    12) Installed new Rubber Pins into back of drill case
    13) Reinstalled magnet coil retention bracket
    14) Reassembled drill case and tested
    Did you find this story helpful?
    Thanks for voting and helping fellow customers!

    The motor brushes were worn causing the brush holder mechanism to heat up and melt.

    Jason - September 30, 2016
    Tool Type

    Hammer Drill

    Difficulty

    Easy

    Time

    Less than 15 minutes

    Tools Used

    Screwdriver

    1. Remove the back of the drill covering the brush holder.
    2. Remove all other screws, placing them in order for reinstall.
    3. Carefully slide drill rotor out from brush holder.
    4. Remove the black and red wires from the drill controller.
    5. Install the new brushes in the new brush holder, be sure to put the springs in holding slots.
    6. Attach the new brush holder to the drill controller, be sure to install the wire in the correct polarity.
    7. Carefully install the drill rotor into the new brush holder. Line the slot up to the drill housing to orient the parts correctly.
    8. Place the springs behind the brushes.
    9. Reassemble the drill.
    The brushes took a few uses to seat properly. The drill is working properly now.
    Did you find this story helpful?
    Thanks for voting and helping fellow customers!

    OEM stands for Original Equipment Manufacturer and means the part you’re buying is sourced directly from the manufacturer who made your product. At eReplacementParts, we sell only genuine OEM parts, guaranteeing the part you’re purchasing is of better design and of higher quality than aftermarket parts.

    Our product descriptions are a combination of data sourced directly from the manufacturers who made your product as well as content researched and curated by our content & customer service teams. This content is edited and reviewed internally before being made public to customers.

    Our customer service team are at the ready daily to answer your part and product questions. We have a dedicated staff with decades of collective experience in helping customers just like you purchase parts to repair their products.

    All our part reviews are solicited directly from other customers who have purchased this exact part. While we moderate these reviews for profanity, offensive language or personally identifiable information, these reviews are posted exactly as submitted and no alterations are made by our team.

    All our customer repair instructions are solicited directly from other customers just like you who have purchased and replaced this exact part. While we moderate these reviews for profanity, offensive language or personally identifiable information, these reviews are posted exactly as submitted and no alterations are made by our team.

    Based on data from past customer purchasing behaviors, these parts are most commonly purchased together along with the part you are viewing. These parts may be necessary or helpful to replace to complete your current repair.

    All our installation videos are created and produced in collaboration with our in-house repair technician, Mark Sodja, who has helped millions of eReplacementParts customers over the last 13 years repair their products. Mark has years of experience in selling and repairing both commercial and residential products with a specialty in gas-powered equipment.

    This data is collected from customers who submitted a repair instruction after replacing this exact part. Customers can rate how easy the repair was to complete and how long it took. We aggregate this data to provide a repair rating that allows customers to quickly determine the difficulty and time needed to perform their own repair.

    eReplacementParts.com
    7174 South 400 West
    Suite 5
    Midvale, UT 84047
    visa mastercard discover american express PayPal