
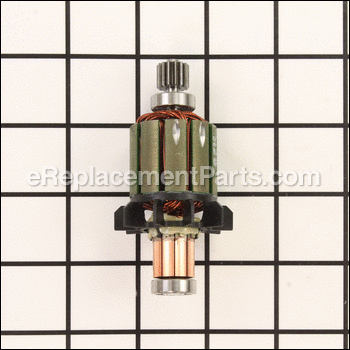
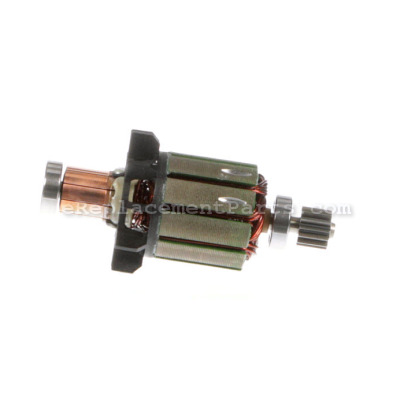


This replacement armature is specially produced for a Makita hammer drill-driver. It is an authentic item that is sourced directly from original equipment manufacturer, not an aftermarket imitation. This item includes a metal armature, a plastic fan, and two armature bearings. It is highly recommended to replace both carbon brushes when replacing an armature. To replace complete this repair you will need a screwdriver.
Armature 619230-8
OEM part for: Makita
Part Number: 619230-8
$21.53
In Stock
Jump To:
Frequently Purchased Together ?
Compatibility
This part will fit the following 21 machines
Makita
BHP454 18V LXT Lithium-Ion Cordless 1/2" Hammer Driver-Drill View Diagrams & Manuals
BDF454 Drill View Diagrams & Manuals
BDF454F (Type 1) Drill View Diagrams & Manuals
BDF454F (Type 2) Drill View Diagrams & Manuals
BDF454F (Type 3) Drill View Diagrams & Manuals
BDF454 (Type 2) Drill View Diagrams & Manuals
BDF454 (Type 3) Drill View Diagrams & Manuals
BDF454Z (Type 1) Drill View Diagrams & Manuals
BDF454Z (Type 2) Drill View Diagrams & Manuals
BDF454Z (Type 3) Drill View Diagrams & Manuals
BHP454F (Type 1) Drill View Diagrams & Manuals
BHP454F (Type 2) Drill View Diagrams & Manuals
BHP454F (Type 3) Drill View Diagrams & Manuals
BHP454S (Type 1) Drill View Diagrams & Manuals
BHP454S (Type 2) Drill View Diagrams & Manuals
BHP454S (Type 3) Drill View Diagrams & Manuals
BHP454 (Type 2) Drill View Diagrams & Manuals
BHP454 (Type 3) Drill View Diagrams & Manuals
BHP454Z (Type 1) Drill View Diagrams & Manuals
BHP454Z (Type 2) Drill View Diagrams & Manuals
BHP454Z (Type 3) Drill View Diagrams & Manuals
Show More Compatible Models
This item works with the following types of products:
- Cordless Drill Parts
- Drill Parts
- Hammer Drill Parts
Customer Part Reviews ?
Average Rating (out of 5):
Click to filter by ratings:
5 stars
4
4 stars
0
3 stars
0
2 stars
0
1 stars
0
< PREV
- 1
Fixed an old drill
Purchased this armature and new brushes. Now my old Makita is back! Glad I was able to make the repair myself, with YouTube help and a good cleaning it was simple. The reasonable price for the replacement parts was also a major plus. Thank you eReplacementParts.com,
Guest -
August 30, 2022
Verified Purchase
Top quality parts
Perfect condition, the first place to buy from every time.
iGlobal -
December 1, 2020
Verified Purchase
Im a skilled trades in the electrical field. Power tools are an assental for me to complete taske. And due to wear and tear tools tend to fail. Thanks to this site i was able to get my hammer drill back to peak performance.
Been installed in my hammer drill for about a week already. Constantly used and is performing like new. No bad review here. Satisfied customer. Will use this site again in the future.
Guest -
September 12, 2019
Verified Purchase
Easy repair
Part arrived quickly. And it saved me buying a new drill.
Guest -
July 1, 2019
Verified Purchase
t
t
t -
t days ago
Verified Purchase
eReplacementParts Team
t
Questions & Answers ?
Our customer Service team is at the ready daily to answer your part and product questions.

Ask our Team
We have a dedicated staff with decades of collective experience in helping customers just like you purchase parts to repair their products.
Does this fit my product?Questions & Answers for Armature
No questions have been asked yet
Customer Repair Instructions ?
All our customer repair instructions are solicited directly from other customers just like you who have purchased and replaced this exact part.
Drills armature fail/ drill will smoke heavily.
Hugo - January 31, 2018
Tool Type
Hammer Drill
Difficulty
Easy
Time
Less than 15 minutes
Tools Used
Power Drill
Parts Used
1. Removed all the (Philip) head screws around drill.
2. Pulled side cover off to access armature.
3. Took armature out replaced with new.
4. Put everything back together.
5. Got to work!
2. Pulled side cover off to access armature.
3. Took armature out replaced with new.
4. Put everything back together.
5. Got to work!
Did you find this story helpful?
Thanks for voting and helping fellow customers!
Fan blades broke off and armature fused to brush holder
scott - October 15, 2016
Tool Type
Cordless Drill
Difficulty
Medium
Time
15-30 minutes
Tools Used
Screwdriver
1) Removed battery
2) Removed screws from case and set aside one half of the case
3) Removed old brush holder from case and disconnected wiring from the trigger
4) Moved magnet coil retention bracket out of the way
5) Removed armature screws from front of drill around chuck
6) Twisted plastic armature retainer and pulled armature assembly out of drill body, taking care not to damage the planetary gears
7) Transferred plastic armature retainer to new armature
8) Transferred magnet coil to new armature and installed the assembly
9) Installed new brushes in new brush holder
10) Installed new brush holder assembly in drill body and connected to the trigger
11) Transferred speed selector switch to new armature.
12) Installed new Rubber Pins into back of drill case
13) Reinstalled magnet coil retention bracket
14) Reassembled drill case and tested
Did you find this story helpful?
Thanks for voting and helping fellow customers!
Fins on the armature broke off and damaged the yoke unit.
nealkumar - December 16, 2015
Tool Type
Hammer Drill
Difficulty
Medium
Time
Less than 15 minutes
Tools Used
Screwdriver
Parts Used
Take off all screws. Remove back plate and separate housing. Take a picture of how the internal part are in the housing. Carefully remove armature and yoke. Clean off inside debris and grease inner gears. And reassemble.
Did you find this story helpful?
Thanks for voting and helping fellow customers!
OEM stands for Original Equipment Manufacturer and means the part you’re buying is sourced directly from the manufacturer who made your product. At eReplacementParts, we sell only genuine OEM parts, guaranteeing the part you’re purchasing is of better design and of higher quality than aftermarket parts.
Our product descriptions are a combination of data sourced directly from the manufacturers who made your product as well as content researched and curated by our content & customer service teams. This content is edited and reviewed internally before being made public to customers.
Our customer service team are at the ready daily to answer your part and product questions. We have a dedicated staff with decades of collective experience in helping customers just like you purchase parts to repair their products.
All our part reviews are solicited directly from other customers who have purchased this exact part. While we moderate these reviews for profanity, offensive language or personally identifiable information, these reviews are posted exactly as submitted and no alterations are made by our team.
All our customer repair instructions are solicited directly from other customers just like you who have purchased and replaced this exact part. While we moderate these reviews for profanity, offensive language or personally identifiable information, these reviews are posted exactly as submitted and no alterations are made by our team.
Based on data from past customer purchasing behaviors, these parts are most commonly purchased together along with the part you are viewing. These parts may be necessary or helpful to replace to complete your current repair.
All our installation videos are created and produced in collaboration with our in-house repair technician, Mark Sodja, who has helped millions of eReplacementParts customers over the last 13 years repair their products. Mark has years of experience in selling and repairing both commercial and residential products with a specialty in gas-powered equipment.
This data is collected from customers who submitted a repair instruction after replacing this exact part. Customers can rate how easy the repair was to complete and how long it took. We aggregate this data to provide a repair rating that allows customers to quickly determine the difficulty and time needed to perform their own repair.