
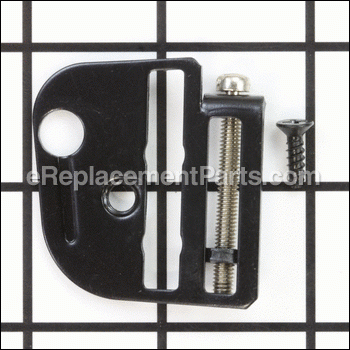
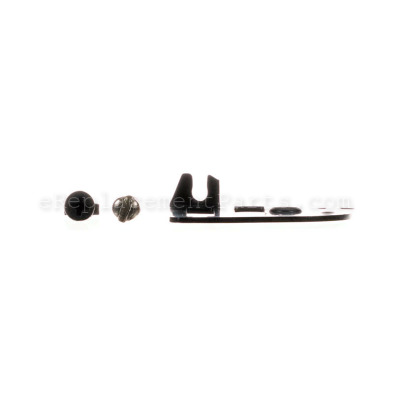


This is an authentic Poulan replacement part that has been sourced from the original manufacturer to be used with pole pruners and electric chainsaws. The kit includes the plate, screw, and pin. This item fits under the bar plate and is used to adjust the amount of tension between the bar and chain. This part is sold individually.
Bar Adjusting Kit 574409801
OEM part for: Poulan
Part Number: 574409801
$11.20
In Stock
Compatibility
This part will fit the following 3 machines
Poulan
PLN1510 Pro Pole Pruner View Diagrams & Manuals
PLN1514 Pro Electric Chainsaw View Diagrams & Manuals
PLN1510 Pro Pole Pruner View Diagrams & Manuals
This item works with the following types of products:
- Pruner Parts
- Chain Saw Parts
- Saw Parts
Customer Part Reviews ?
Average Rating (out of 5):
Click to filter by ratings:
5 stars
2
4 stars
0
3 stars
0
2 stars
0
1 stars
0
< PREV
- 1
Thanks for ,keeping me updated on backorder status. The parts worked great, thanks again.
The parts worked great.
Guest -
February 25, 2022
Verified Purchase
Chain saw repair
Replacement parts worked perfect. Was repaired in minutes. Fast shipping under circumstances. Will order from again if need be.
Guest -
May 6, 2020
Verified Purchase
t
t
t -
t days ago
Verified Purchase
eReplacementParts Team
t
Questions & Answers ?
Our customer Service team is at the ready daily to answer your part and product questions.

Ask our Team
We have a dedicated staff with decades of collective experience in helping customers just like you purchase parts to repair their products.
Does this fit my product?Questions & Answers for Bar Adjusting Kit
how to replace two bearins
byron
for model number pln1510
asked on 2022-08-09
Hi Byron,
Thank you for your question. Here are some instructions that a customer posted on how they installed the bearings, 1. Remove the plastic chain shroud.
2. Unbolt the chain bar and remove.
3. Unbolt the worn sprocket gear.
4. Simple replacement of two bearings after packing with grease.
5. Add grease on the sprocket gear.
6. Install the new parts and remount the chain bar.
7. Adjust the blade tension. We hope this helps! If you have any questions, please let us know. We are open 7 days a week. We look forward to hearing from you!
eReplacementParts Team August 09, 2022
Customer Repair Instructions ?
All our customer repair instructions are solicited directly from other customers just like you who have purchased and replaced this exact part.
I needed to replace the saw chain and I decided that I might as well replace the tension kit while I had the saw disassembled. (I cleaned the saw as well.)
Mary - June 30, 2016
👍 4 of 5 people found this instruction helpful
Tool Type
Chain Saw
Difficulty
Medium
Time
15-30 minutes
Tools Used
Screwdriver, Socket set
Parts Used
1. Gathered the correct tools needed for the job I a Phillips head screwdriver socket set
2. Removed the two Phillips head screws holding the outer cover.
3. Loosen the nuts on the bar chain and backed out the tension screw.
4. Remove the chain bar and the chain.
5. Remove the Phillips head screw holding the plate on the tensioner.
6. Installed the new tensioner kit and the new saw chain in reverse order.
Did you find this story helpful?
Thanks for voting and helping fellow customers!
Needed new chain and chain adjuster
Gordon - May 6, 2016
👍 1 of 1 people found this instruction helpful
Tool Type
Chain Saw
Difficulty
Easy
Time
Less than 15 minutes
Tools Used
Screwdriver, Socket set
Parts Used
Remove the left housing assembly by removing two screws. Then remove the sprocket support and the bar and chain. Remove the screws from the old bar adjusting kit and install the new one. The reassemble in reverse order. Then adjust the chain to proper tension.
Did you find this story helpful?
Thanks for voting and helping fellow customers!
The bar adjuster broke
Patrick - March 15, 2021
Tool Type
Chain Saw
Difficulty
Medium
Time
30-60 minutes
Tools Used
Screwdriver, Wrench Set
Parts Used
Removed 2 screws from outside cover
removed 2 bar nuts
removed phillips head screw on the cover for bar and chain guard
underneath was the bar adjuster 1 screw
replaced that and reassembled and new blade
removed 2 bar nuts
removed phillips head screw on the cover for bar and chain guard
underneath was the bar adjuster 1 screw
replaced that and reassembled and new blade
Did you find this story helpful?
Thanks for voting and helping fellow customers!
Worn chain saw bar to chain adjustment tang and adjustment screw. Also worn drive gear.
Juergen - October 13, 2018
Tool Type
Chain Saw
Difficulty
Easy
Time
15-30 minutes
Tools Used
Screwdriver, Socket set
Removed and replaced worn drive gear.
Removed and replaced chain to bar tension adjustment assy.
Removal and installation of the new parts was straight forward and no written instructions were needed. Also, the new parts were an exact fit.
Removed and replaced chain to bar tension adjustment assy.
Removal and installation of the new parts was straight forward and no written instructions were needed. Also, the new parts were an exact fit.
Did you find this story helpful?
Thanks for voting and helping fellow customers!
Wife hit chain link fence and broke chain adjuster
Frederick - August 27, 2018
Tool Type
Chain Saw
Difficulty
Easy
Time
15-30 minutes
Tools Used
Screwdriver, Socket set
Parts Used
Removed broken part and replaced with new
Did you find this story helpful?
Thanks for voting and helping fellow customers!
Bar adjuster broken
Alfred - November 26, 2017
Tool Type
Chain Saw
Difficulty
Easy
Time
Less than 15 minutes
Tools Used
Screwdriver, Wrench Set, Nutdriver
Parts Used
Removed the chain cover and the bar and chain
Removed the old adjusting kit and installed the new one
Assembled in reverse order
Removed the old adjusting kit and installed the new one
Assembled in reverse order
Did you find this story helpful?
Thanks for voting and helping fellow customers!
Chain adjustment screw broke.
William - September 26, 2017
Tool Type
Chain Saw
Difficulty
Medium
Time
30-60 minutes
Tools Used
Screwdriver, Socket set
Parts Used
1. Removed the chain cover.
2. Removed the chain and the chain bar.
3. Removed the bar adjustment kit.
4. Replaced the bar adjustment kit.
5. Replaced the chain bar and the chain.
6. Replaced the chain cover.
7. Adjusted the chain tension.
2. Removed the chain and the chain bar.
3. Removed the bar adjustment kit.
4. Replaced the bar adjustment kit.
5. Replaced the chain bar and the chain.
6. Replaced the chain cover.
7. Adjusted the chain tension.
Did you find this story helpful?
Thanks for voting and helping fellow customers!
Could not tighten chain,bar adjuster screw was bent
Jim - June 8, 2017
Tool Type
Chain Saw
Difficulty
Easy
Time
15-30 minutes
Tools Used
Screwdriver, Nutdriver
Put new kit on, cleaned up chain saw and was good to go saw down some overhanging branches over my garage
Did you find this story helpful?
Thanks for voting and helping fellow customers!
Bar adjuster was broken
Dennis - May 10, 2017
Tool Type
Pruner
Difficulty
Easy
Time
Less than 15 minutes
Tools Used
Screwdriver, Socket set
Parts Used
Removed the side cover, then the mounting plate. Then unscrewed the old adjust kit and removed it. Then put it back together in reverse order
Did you find this story helpful?
Thanks for voting and helping fellow customers!
OEM stands for Original Equipment Manufacturer and means the part you’re buying is sourced directly from the manufacturer who made your product. At eReplacementParts, we sell only genuine OEM parts, guaranteeing the part you’re purchasing is of better design and of higher quality than aftermarket parts.
Our product descriptions are a combination of data sourced directly from the manufacturers who made your product as well as content researched and curated by our content & customer service teams. This content is edited and reviewed internally before being made public to customers.
Our customer service team are at the ready daily to answer your part and product questions. We have a dedicated staff with decades of collective experience in helping customers just like you purchase parts to repair their products.
All our part reviews are solicited directly from other customers who have purchased this exact part. While we moderate these reviews for profanity, offensive language or personally identifiable information, these reviews are posted exactly as submitted and no alterations are made by our team.
All our customer repair instructions are solicited directly from other customers just like you who have purchased and replaced this exact part. While we moderate these reviews for profanity, offensive language or personally identifiable information, these reviews are posted exactly as submitted and no alterations are made by our team.
Based on data from past customer purchasing behaviors, these parts are most commonly purchased together along with the part you are viewing. These parts may be necessary or helpful to replace to complete your current repair.
All our installation videos are created and produced in collaboration with our in-house repair technician, Mark Sodja, who has helped millions of eReplacementParts customers over the last 13 years repair their products. Mark has years of experience in selling and repairing both commercial and residential products with a specialty in gas-powered equipment.
This data is collected from customers who submitted a repair instruction after replacing this exact part. Customers can rate how easy the repair was to complete and how long it took. We aggregate this data to provide a repair rating that allows customers to quickly determine the difficulty and time needed to perform their own repair.