
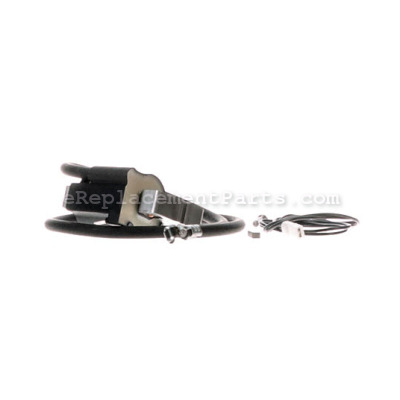
This replacement armature-magneto also known as an ignition module is specially designed for use with Briggs and Stratton engines commonly used on Toro lawn and garden equipment. It is a genuine OEM sourced item that is sold individually. The purpose of this item is to produce pulses of high voltage for the spark plugs. Please note, the spark plug boot is sold separately.
To complete this repair you will need screwdriver set.
Armature-magneto 398811
OEM part for: Briggs and Stratton, Toro, Lawn Boy, Murray
Part Number: 398811
Install
Videos!
Watch The
Repair Video
Repair Video
$69.30
In Stock
Jump To:
Product Description ?
- Classification: Part
- Weight: 0.10 lbs.
- Shipping: Ships Worldwide
Frequently Purchased Together ?
Compatibility
This Armature-magneto will fit the following 6815 machines. Confirm this part works with your model, and view the detailed model diagrams and repair help we have to offer.
Briggs and Stratton
Toro
Lawn Boy
Murray
Show More Compatible ModelsThis item works with the following types of products:
- Engine Parts
- Snowblower Parts
- Lawn Mower Parts
- Lawn Tractor Parts
This part replaces obsolete part #: 398265, 395492, 395326
Customer Part Reviews ?
Average Rating (out of 5):
Click to filter by ratings:
5 stars
6
4 stars
0
3 stars
0
2 stars
0
1 stars
0
< PREV
- 1
Engine coil
I was trying to replace the coil on an obsolete engine and ordered what appeared to be the right coil but it wasn’t so I had to return it. It was a quick and easy experience.
Guest -
February 14, 2023
Verified Purchase
Easy
Was really easy to order part arrived on time and was exactly right
Guest -
July 19, 2022
Verified Purchase
works great
fast service
Bart -
August 24, 2021
Verified Purchase
EASY INSTALL FAST SHIPPING
PART WAS CORRECT EASY INSTALL MOTOR UP & RUNNING
Guest -
July 15, 2020
Verified Purchase
Part in great condition delevered
Originel part, installed and working great!
iGlobal -
June 5, 2020
Verified Purchase
easy to work with
ill have to let you know
Guest -
September 9, 2019
Verified Purchase
Questions & Answers ?
Our customer Service team is at the ready daily to answer your part and product questions.

Ask our Team
We have a dedicated staff with decades of collective experience in helping customers just like you purchase parts to repair their products.
Does this fit my product?Questions & Answers for Armature-magneto
will this fit our tiller. Code 971027YE 4197 magneto. Thank you. If not can you tell which one would be the replacement part.
Sheryl
for model number 196402 1231 E1
asked on 2023-11-26
Hello Sheryl, Thank you for your inquiry. We confirm that this part will fit your model. Good luck with your repair.
eReplacementParts Team November 26, 2023
Will this fit this model
Marty
for model number 253707-0158-01
asked on 2023-04-27
Hi Marty,
Thank you for your question. Yes, this would be the correct armature magneto for your engine. We hope this helps!
eReplacementParts Team April 27, 2023
will this armature assembly fit the briggs engine I listed?
jon
for model number 252707 type 0621-03
asked on 2023-04-26
Hello Jon, Thank you for your inquiry. We confirm that this part will fit your model. We hope this helps.
eReplacementParts Team April 26, 2023
need a coil for this model will this coil fit
Ted
for model number 171432-0529-01
asked on 2022-07-24
Hello Ted, Thank you for your inquiry. We have researched the model number you have provided and confirm that this part will fit your model. We hope this helps and if you need help placing an order, customer service is open 7 days a week. Please feel free to give us a call. We look forward to hearing from you!
eReplacementParts Team July 24, 2022
will this work on this 11hp engine?
David
for model number 254422 0558 91120410
asked on 2022-04-18
Hello David, thank you for writing. Yes, the number 398811 you had chosen is compatible with your model. If you need help placing an order, customer service is open 7 days a week. Please feel free to give us a call. We look forward to hearing from you.
eReplacementParts Team April 18, 2022
Will this fit a 1971 cast iron 10hp Briggs
Russ
asked on 2022-03-25
Hello Russ, thank you for contacting us. In order for us to locate the correct parts and repair information we will require the model number of the unit. Once you have located the model number please feel free to resubmit the question and we will be happy to help you. We are looking forward to hearing from you!
eReplacementParts Team March 25, 2022
Does this armature magneto fit my BS 8 hp
Lloyd
for model number 195432-0291-01
asked on 2022-02-25
Hello Lloyd, Thank you for contacting us. We have researched the model you have provided and have found the part you are looking for is Part Number:398811. If you need help placing an order, customer service is open 7 days a week. Please feel free to give us a call. We look forward to hearing from you!
eReplacementParts Team February 25, 2022
Customer Repair Instructions ?
All our customer repair instructions are solicited directly from other customers just like you who have purchased and replaced this exact part.
A mouse ate the spark plug wire off the magneto
Marvin - October 13, 2016
👍 20 of 24 people found this instruction helpful
Tool Type
Engine
Difficulty
Easy
Time
15-30 minutes
Tools Used
Socket set
Parts Used
All I had to do was remove the old Magneto ( which was just two screws) then install the new magneto, it came with easy to understand instructions and a spacer for getting the right gap between the magneto and the flywheel magnets . Very simple . The engine started right up as if it was brand new.
Did you find this story helpful?
Thanks for voting and helping fellow customers!
Mice Munched on Spark plug wire
Mark - October 12, 2023
Tool Type
Lawn Tractor
Difficulty
Easy
Time
15-30 minutes
Tools Used
Screwdriver, Socket set, Wrench Set, Nutdriver, Feeler Gauges .003 ths.
Parts Used
MTD Yard -Bug riding mower .. Repair was removing cover 4 - 7mm screws 2 - 7/16 screws then 2- 1/4" screws to remove spark plug Armature.. and 1 ground wire 1/4" screw. Replaced old armature... Used old boot for spark plug. Then shorten & Strip new spark plug wire and then Crimped spark plug connector provided.. Then set gap on armature.. to .010ths. as suggested instructions.. and it fired .. Been good ever since.
Did you find this story helpful?
Thanks for voting and helping fellow customers!
Part was original and spark plug wire had worn through
Bonnie - November 10, 2022
Tool Type
Engine
Difficulty
Easy
Time
15-30 minutes
Tools Used
Screwdriver, Pliers, Socket set, Nutdriver
Parts Used
Remove carburetor shield and front cover to engine.
Removed old armature, then cleaned that area.
Installed new armature at proper gap measurement.
Also check the machines wiring.
I had a couple wires worn through that were making bad grounds.
I fixed these and then added some wire loom to protect wiring.
Put everything back together and worked great.
While doing this I replaced the spark plug , air filter, fuel filter, cleaned carb.
Did you find this story helpful?
Thanks for voting and helping fellow customers!
Rotor switch broke. Magneto produced no spark.
Keith - January 6, 2022
Tool Type
Engine
Difficulty
Easy
Time
15-30 minutes
Tools Used
Socket set, Nothing else required
Parts Used
1. Diagnosed problem.
2.removed starter rope housing to access magneto
3.removed and replaced magneto and set the air gap with the gauge provided.
4.removed and replaced rotor switch.
5.reassembled the housing and engine now functions .
2.removed starter rope housing to access magneto
3.removed and replaced magneto and set the air gap with the gauge provided.
4.removed and replaced rotor switch.
5.reassembled the housing and engine now functions .
Did you find this story helpful?
Thanks for voting and helping fellow customers!
lawn more had no spark
bart - August 23, 2021
Tool Type
Lawn Mower
Difficulty
Easy
Time
15-30 minutes
Tools Used
Screwdriver, Socket set, Nutdriver
Parts Used
replaced the coil had no spark
Did you find this story helpful?
Thanks for voting and helping fellow customers!
The armature magneto was out in my old mower. This mower is close to 20 years old and it has an 11 1/2 horse B&S motor. The engine would run until it got hot, initially, and then it would shut down un
William - December 20, 2020
Tool Type
Lawn Tractor
Difficulty
Easy
Time
15-30 minutes
Tools Used
Screwdriver, Pliers, Wrench Set, Wire strippers
Parts Used
Disconnect the battery
Remove the engine cover
Remove two screws that hold the armature magneto in place.
Remove the stop switch wire
Spin the flywheel so that the magnets are 180 degrees from the armature magneto.
Screw the new armature magneto on, making sure that the side that says "cylinder" is facing down. Loosely tighten the screws enough so that they stay in, but don't hold the armature magneto down. It should move in the groves.
Use the included feeler gauge to correctly gap the spacing between the armature magneto and the flywheel magnets.
Spin the flywheel back so that the magnets pull the armature magneto into position. The card feeler gauge will create the right gap. Tighten the screws.
Turn the flywheel some more and the card will come out.
Measure the sparkplug wire and cut it to the right length. Strip the wire and use the included tip to make your plug wire the right length. Crimp the tip brackets down with plyers.
Pull the boot off your old sparkplugs wire or install a new boot.
Put the boot back over the spark plug
Install the new stop switch wire, or just use the old one, if its in good condition.
Put the engine cover back on.
Reconnect the battery.
Did you find this story helpful?
Thanks for voting and helping fellow customers!
Would start but die after warmed up
Keith - August 15, 2020
Tool Type
Engine
Difficulty
Easy
Time
15-30 minutes
Tools Used
Socket set
Parts Used
Removed all parts in the way.
Installed part
Put all parts back on
Installed part
Put all parts back on
Did you find this story helpful?
Thanks for voting and helping fellow customers!
Replacement of 30- year old magneto
Jeff - August 7, 2020
Tool Type
Lawn Mower
Difficulty
Easy
Time
15-30 minutes
Tools Used
Socket set
Parts Used
I followed your instructions that came with the Magneto
Did you find this story helpful?
Thanks for voting and helping fellow customers!
Engine would not start
Brent - August 11, 2019
Tool Type
Generator
Difficulty
Easy
Time
15-30 minutes
Tools Used
Socket set, Wrench Set
Replaced the coil, and replaced the fuel shutoff, works great
Did you find this story helpful?
Thanks for voting and helping fellow customers!
OEM stands for Original Equipment Manufacturer and means the part you’re buying is sourced directly from the manufacturer who made your product. At eReplacementParts, we sell only genuine OEM parts, guaranteeing the part you’re purchasing is of better design and of higher quality than aftermarket parts.
Our product descriptions are a combination of data sourced directly from the manufacturers who made your product as well as content researched and curated by our content & customer service teams. This content is edited and reviewed internally before being made public to customers.
Our customer service team are at the ready daily to answer your part and product questions. We have a dedicated staff with decades of collective experience in helping customers just like you purchase parts to repair their products.
All our part reviews are solicited directly from other customers who have purchased this exact part. While we moderate these reviews for profanity, offensive language or personally identifiable information, these reviews are posted exactly as submitted and no alterations are made by our team.
All our customer repair instructions are solicited directly from other customers just like you who have purchased and replaced this exact part. While we moderate these reviews for profanity, offensive language or personally identifiable information, these reviews are posted exactly as submitted and no alterations are made by our team.
Based on data from past customer purchasing behaviors, these parts are most commonly purchased together along with the part you are viewing. These parts may be necessary or helpful to replace to complete your current repair.
All our installation videos are created and produced in collaboration with our in-house repair technician, Mark Sodja, who has helped millions of eReplacementParts customers over the last 13 years repair their products. Mark has years of experience in selling and repairing both commercial and residential products with a specialty in gas-powered equipment.
This data is collected from customers who submitted a repair instruction after replacing this exact part. Customers can rate how easy the repair was to complete and how long it took. We aggregate this data to provide a repair rating that allows customers to quickly determine the difficulty and time needed to perform their own repair.