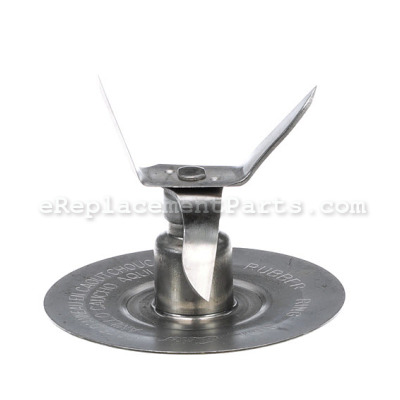


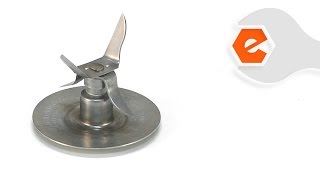
The 031014-104-000 Agitator is sold individually. The Agitator Assembly (Or Blade Assembly) is the part of the blender that chops, blends or mixes the product that is put into the blender jar. After time the blades will become dull or break or the spline that is attached to the shaft may wear out. When replacing the Agitator it is advisable to inspect the Sealing Ring, which is in between the agitator and the jar for cracks and if it has been compressed too much, which will cause it to leak from the bottom.
Agitator Assembly 31014904000
OEM part for: Oster, Sunbeam
Part Number: 31014904000
$5.38
In Stock
Jump To:
Frequently Purchased Together ?


Compatibility
This Agitator Assembly will fit the following 134 machines. Confirm this part works with your model, and view the detailed model diagrams and repair help we have to offer.
Sunbeam
Oster
Show More Compatible ModelsThis item works with the following types of products:
- Blender Parts
- Food Processor Parts
This part replaces obsolete part #: 31014104000, 031014-002-000, 031014-001-000, 031014-104-000, 015126-000-000, 031014-004-000
Repair Videos ?
Watch the Repair Video for
Agitator Assembly
Articles:
|
Step-by-step instructions for removing and installing the blade assembly (agitator) on your Oster blender....
October 10, 2017
|

Customer Part Reviews ?
Average Rating (out of 5):
Click to filter by ratings:
5 stars
38
4 stars
2
3 stars
1
2 stars
0
1 stars
0
< PREV
- 1
- 2
- 3
Fits works
Fair price but back ordered ok arrived all good
Vince -
May 1, 2023
Verified Purchase
Excellent service, very professional
Part worked as expected fast delivery. Would use the company again.
Guest -
February 1, 2023
Verified Purchase
Amazing Resource!
I was amazed that I could get a replacement part for a blender from the early 1970's and that it fit perfectly. The blender now works like new! The guide on your website to determine the problem with the appliance confirmed my choice of this replacement part, the blade or agitator assembly. Thank you for providing this service! It saved me from throwing away a blender that just needed a part.
Guest -
December 28, 2022
Verified Purchase
Great part, functions well
Great part, functions well
Guest -
December 24, 2022
Verified Purchase
Proper part
My part arrived as promised. It was a back order so I had to wait. However you were very communicative about the status of my order. I appreciate that.
Guest -
August 23, 2022
Verified Purchase
part
received correct part.
Guest -
June 8, 2022
Verified Purchase
My blender works again!!
The agitator fit and works perfectly!! My blender is 51 years old and I am so glad I can still use it!! Thanks!!
Guest -
June 7, 2022
Verified Purchase
Blender is back in action
I really needed it thanks
iGlobal -
April 21, 2022
Verified Purchase
Agitator, great Customer Service, excellent
Due to the supply chain delays that Covid has caused, we were advised from the beginning that there would be an extended delay in the agitator's arrival and there was. However, I was surprised and pleased that throughout the wait, we received regular advisories that we were not forgotten! Then, shortly before the agitator actually arrived, we were e-mailed that it was on it way. Excellent communication from REPAIR PARTS HOME. Thank you
Guest -
January 21, 2022
Verified Purchase
Just like the original
I needed a replacement blade assembly for my trusty Oster blender and I got exactly what I ordered.
Guest -
January 20, 2022
Verified Purchase
Questions & Answers ?
Our customer Service team is at the ready daily to answer your part and product questions.

Ask our Team
We have a dedicated staff with decades of collective experience in helping customers just like you purchase parts to repair their products.
Does this fit my product?Questions & Answers for Agitator Assembly
Not finding a replacement blade assembly/agitator. Is one available?
Robert
for model number 6844
asked on 2022-03-28
Hello Robert, Thank you for contacting us. We have researched the model you have provided and have found the part you are looking for is Part Number:31014904000. If you need help placing an order, customer service is open 7 days a week. Please feel free to give us a call. We look forward to hearing from you!
eReplacementParts Team March 28, 2022
Customer Repair Instructions ?
All our customer repair instructions are solicited directly from other customers just like you who have purchased and replaced this exact part.
Oster blender agitator /blade was heavily worn.
mark - December 4, 2015
👍 21 of 24 people found this instruction helpful
Tool Type
Blender
Difficulty
Easy
Time
Less than 15 minutes
Tools Used
Replaced the hand removable screw-on blade and seal ring on an Oster blender. One has to remove the blade and sealing gasket to clean anyway, so there were no tools involved.
Did you find this story helpful?
Thanks for voting and helping fellow customers!
Existing agitator assembly leaked.
David - December 26, 2015
👍 15 of 18 people found this instruction helpful
Tool Type
Blender
Difficulty
Easy
Time
Less than 15 minutes
Tools Used
, A pipe wrench to remove the base that was stuck.
Disassembled Container bottom and replaced all parts. I noticed that the old agitator assembly appeared to have worn bearing seals and wobbled, probably causing the leaking. I was a little worried because the replacement part numbers were off by a digit or two, but the replacement parts were the same size and fit perfectly. I reassembled and the blender no longer leaked.
Did you find this story helpful?
Thanks for voting and helping fellow customers!
The assembly was worn out. Blades dull and the drive was slipping.
Donald - January 21, 2016
👍 10 of 11 people found this instruction helpful
Tool Type
Blender
Difficulty
Easy
Time
Less than 15 minutes
Tools Used
Pliers
Parts Used
Disassembled the base of the blender jar and replaced the old assembly with the new one. One snag: it vibrated badly at first. When I looked at the blades one was bent out too far. Straightened it with pliers and now it works fine.
The odd thing is, I remember when I got the blender I had exactly the same problem. I had to straighten one of the blades in the brand new blender.
The odd thing is, I remember when I got the blender I had exactly the same problem. I had to straighten one of the blades in the brand new blender.
Did you find this story helpful?
Thanks for voting and helping fellow customers!
Motor worked but blades didn't turn
Carol - September 27, 2017
👍 8 of 9 people found this instruction helpful
Tool Type
Blender
Difficulty
Easy
Time
Less than 15 minutes
Tools Used
Replaced blades and seal, which was old but not damaged. Surprised and pleased that I could find the right parts for a blender that is probably 25-30 years old.
Did you find this story helpful?
Thanks for voting and helping fellow customers!
Blender was leaking and blades were dull
Dale - December 12, 2016
👍 5 of 6 people found this instruction helpful
Tool Type
Blender
Difficulty
Easy
Time
Less than 15 minutes
Tools Used
Remove the old bottom, blades and seal
Place the new blades in the container
Put the seal on top of the blade base
Thread the assembly onto the jar
Place the new blades in the container
Put the seal on top of the blade base
Thread the assembly onto the jar
Did you find this story helpful?
Thanks for voting and helping fellow customers!
Leakage & smoke from chopper blades
Caroline - March 26, 2016
👍 5 of 6 people found this instruction helpful
Tool Type
Blender
Difficulty
Easy
Time
Less than 15 minutes
Tools Used
, no tool needed
Installed new chopper blades and seal. No more smoke. It works great.
Did you find this story helpful?
Thanks for voting and helping fellow customers!
The blender was leaking
Carney - November 10, 2016
👍 4 of 5 people found this instruction helpful
Tool Type
Blender
Difficulty
Easy
Time
Less than 15 minutes
Tools Used
Removed the old parts and put in the new ones. Pretty basic
works perfectly and doesn't leak anymore.
works perfectly and doesn't leak anymore.
Did you find this story helpful?
Thanks for voting and helping fellow customers!
Blender leaking
Lora - October 10, 2018
👍 1 of 1 people found this instruction helpful
Tool Type
Blender
Difficulty
Easy
Time
Less than 15 minutes
Tools Used
Removed old assembly, screwed in new assembly
Did you find this story helpful?
Thanks for voting and helping fellow customers!
Agitator assy. was worn and it was making a loud noise
Jeryl - March 30, 2018
👍 2 of 3 people found this instruction helpful
Tool Type
Blender
Difficulty
Easy
Time
Less than 15 minutes
Tools Used
Unscrewed the old agitator assy and seal. Put new agitator and seal together and put in..It works great and saves me from buying a new one. Thank You
Did you find this story helpful?
Thanks for voting and helping fellow customers!
Blender agitator assembly
BAUDILIO - March 16, 2018
👍 2 of 3 people found this instruction helpful
Tool Type
Blender
Difficulty
Easy
Time
Less than 15 minutes
Tools Used
Took out the old part and install the new one, it is very easy to do just using my hands.
Did you find this story helpful?
Thanks for voting and helping fellow customers!
Load More Install Stories
OEM stands for Original Equipment Manufacturer and means the part you’re buying is sourced directly from the manufacturer who made your product. At eReplacementParts, we sell only genuine OEM parts, guaranteeing the part you’re purchasing is of better design and of higher quality than aftermarket parts.
Our product descriptions are a combination of data sourced directly from the manufacturers who made your product as well as content researched and curated by our content & customer service teams. This content is edited and reviewed internally before being made public to customers.
Our customer service team are at the ready daily to answer your part and product questions. We have a dedicated staff with decades of collective experience in helping customers just like you purchase parts to repair their products.
All our part reviews are solicited directly from other customers who have purchased this exact part. While we moderate these reviews for profanity, offensive language or personally identifiable information, these reviews are posted exactly as submitted and no alterations are made by our team.
All our customer repair instructions are solicited directly from other customers just like you who have purchased and replaced this exact part. While we moderate these reviews for profanity, offensive language or personally identifiable information, these reviews are posted exactly as submitted and no alterations are made by our team.
Based on data from past customer purchasing behaviors, these parts are most commonly purchased together along with the part you are viewing. These parts may be necessary or helpful to replace to complete your current repair.
All our installation videos are created and produced in collaboration with our in-house repair technician, Mark Sodja, who has helped millions of eReplacementParts customers over the last 13 years repair their products. Mark has years of experience in selling and repairing both commercial and residential products with a specialty in gas-powered equipment.
This data is collected from customers who submitted a repair instruction after replacing this exact part. Customers can rate how easy the repair was to complete and how long it took. We aggregate this data to provide a repair rating that allows customers to quickly determine the difficulty and time needed to perform their own repair.