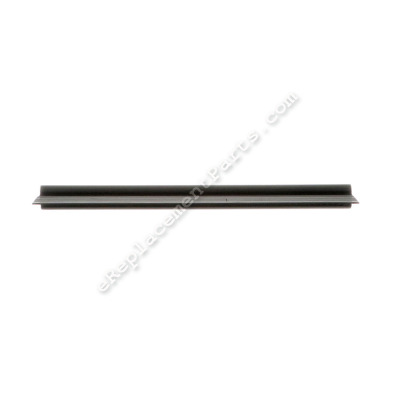
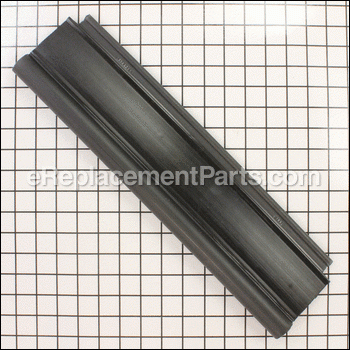


This is a genuine item that is supplied by the original equipment manufacturer for use with walk-behind lawn mowers. It is an identical replacement for a missing or damaged rear trail shield that was originally installed on a new unit, please make sure to refer to the owners manual of your model for the correct application of this component. This high-quality part is made of durable material and is sold individually, keep in mind the wire rod to secure this shield is sold separately.
Rear Trail Shield 731-04998
OEM part for: Yard Machines, Ryobi, MTD, Troy-Bilt, Bolens, Yard Man, Craftsman, Cub Cadet, Husky
Part Number: 731-04998
$32.09
In Stock
Jump To:
Frequently Purchased Together ?

Compatibility
This Rear Trail Shield will fit the following 2785 machines. Confirm this part works with your model, and view the detailed model diagrams and repair help we have to offer.
Ryobi
MTD
Yard Machines
Troy-Bilt
Bolens
Yard Man
Craftsman
Cub Cadet
Husky
Show More Compatible ModelsThis item works with the following types of products:
- Lawn Mower Parts
This part replaces obsolete part #: 731-1236A, 7311236, 731-1236
Customer Part Reviews ?
Average Rating (out of 5):
Click to filter by ratings:
5 stars
5
4 stars
0
3 stars
0
2 stars
0
1 stars
0
< PREV
- 1
Just a swinging
Great Product, Perfect Fit, Fast Shipping, Thanks
Guest -
May 5, 2022
Verified Purchase
Perfect fit
In
Guest -
January 7, 2022
Verified Purchase
Easy repair. Fit perfectly
Part in great condition.
Guest -
September 23, 2021
Verified Purchase
Equipment repair made easy.
ereplacement parts.com makes repairing lawn equipment easy. Found just the part I needed and received it within a few days. Will definitely order from here again.
Guest -
June 22, 2019
Verified Purchase
Mower
Excellent parts, I've never had a problem ordering from e replacement parts.
John -
April 27, 2019
Verified Purchase
Questions & Answers ?
Our customer Service team is at the ready daily to answer your part and product questions.

Ask our Team
We have a dedicated staff with decades of collective experience in helping customers just like you purchase parts to repair their products.
Does this fit my product?Questions & Answers for Rear Trail Shield
No questions have been asked yet
Customer Repair Instructions ?
All our customer repair instructions are solicited directly from other customers just like you who have purchased and replaced this exact part.
Replace rear trail shield
Thomas - May 2, 2016
👍 4 of 4 people found this instruction helpful
Tool Type
Lawn Mower
Difficulty
Easy
Time
Less than 15 minutes
Tools Used
Pliers, Hack saw to remove old hang bracket.
Parts Used
The replacement rear trail shield was an exact match for the OEM. Used a thin stainless steel rod for the hang bracket. Just bent the ends at 90 degrees to hang shield. Ordered part on a Monday, received part in three days. Part was as described in perfect condition. Really pleased, recommend ereplacement parts highly. Will do business again with this vendor. TD
Did you find this story helpful?
Thanks for voting and helping fellow customers!
Dirty air filter, damaged rear safety shield, missing height adjuster knob
James - November 18, 2016
👍 1 of 1 people found this instruction helpful
Tool Type
Lawn Mower
Difficulty
Medium
Time
1-2 hours
Tools Used
Screwdriver, Pliers, Power Drill, Socket set, Nutdriver, Adjustable Wrench, Dremel tool with grinder point, and drill, a tube of gorilla
Loosen the bolt securing the air filter cover and remove revealing air filter. Clean area under cover and around filter and remove the dirty filter. Carefully clean air intake behind filter. Install the new filter and replace the cover and tightened the bolt.
A conventional replacement of the rear safety shield would have required dismantling and removing both rear wheels and height adjusting mechanisms and I did not have the time to do that. The shield hangs on a rod behind the rear wheels. The rod slides through a channel in the molded plastic shield with the ends extending through holes on the right and left metal sides of the mower and the ends of the rod are crimped flat. My solution was to drill a small hole adjoining the hole that held rod on the right side. This enlarged the hole enough to allow the crimped end to pass through the side of the mower and slide off the damaged shield. Slide the new shield on the rod, a little lubricant makes an easier job. Find two washers of a correct size and use the Dremel tool with grinder tip to enlarge the holes in the washers to slide over the crimp on the rod end, one next to the shield one on the outer side of the mower. Then drill a small hole in the crimp on the rod end and secure with a cotter pin of the correct size. Everything should stay put completing the repair. This power mower is 14 years old and has been hard used, so the slight modification to make this repair to enable mowing a little more safely seemed like a good time saving option.
Replacing the missing adjusting lever knob is simple. Clean the end of the adjusting lever. I put a dab of gorilla glue on the lever and placed the new knob on the lever correctly oriented.
Did you find this story helpful?
Thanks for voting and helping fellow customers!
Rear Tail Shield had split
James - May 7, 2022
Tool Type
Lawn Mower
Difficulty
Easy
Time
Less than 15 minutes
Tools Used
, Push Nuts
Parts Used
Replaced Rear Tail Shield with new rod and installed push nuts on end of wire rod.
Did you find this story helpful?
Thanks for voting and helping fellow customers!
Worn blade, broken wheel and broken blade adapter
Ron - July 19, 2017
Tool Type
Lawn Mower
Difficulty
Medium
Time
15-30 minutes
Tools Used
Screwdriver, Pliers, Socket set, Wrench Set, file, emery cloth, soft hammer
Removed blade adapter. The new adapter would not fit without slight sanding of mating surface on the motor shaft. The wheel was straight forward-remove and replace. The shaft that held on the grass guard was replaced with a new shaft because one one the tool was crimped on and could not be removed without destroying the shaft. Also both of the rear wheels needed to be removed to accomplish the repair.
Did you find this story helpful?
Thanks for voting and helping fellow customers!
OEM stands for Original Equipment Manufacturer and means the part you’re buying is sourced directly from the manufacturer who made your product. At eReplacementParts, we sell only genuine OEM parts, guaranteeing the part you’re purchasing is of better design and of higher quality than aftermarket parts.
Our product descriptions are a combination of data sourced directly from the manufacturers who made your product as well as content researched and curated by our content & customer service teams. This content is edited and reviewed internally before being made public to customers.
Our customer service team are at the ready daily to answer your part and product questions. We have a dedicated staff with decades of collective experience in helping customers just like you purchase parts to repair their products.
All our part reviews are solicited directly from other customers who have purchased this exact part. While we moderate these reviews for profanity, offensive language or personally identifiable information, these reviews are posted exactly as submitted and no alterations are made by our team.
All our customer repair instructions are solicited directly from other customers just like you who have purchased and replaced this exact part. While we moderate these reviews for profanity, offensive language or personally identifiable information, these reviews are posted exactly as submitted and no alterations are made by our team.
Based on data from past customer purchasing behaviors, these parts are most commonly purchased together along with the part you are viewing. These parts may be necessary or helpful to replace to complete your current repair.
All our installation videos are created and produced in collaboration with our in-house repair technician, Mark Sodja, who has helped millions of eReplacementParts customers over the last 13 years repair their products. Mark has years of experience in selling and repairing both commercial and residential products with a specialty in gas-powered equipment.
This data is collected from customers who submitted a repair instruction after replacing this exact part. Customers can rate how easy the repair was to complete and how long it took. We aggregate this data to provide a repair rating that allows customers to quickly determine the difficulty and time needed to perform their own repair.