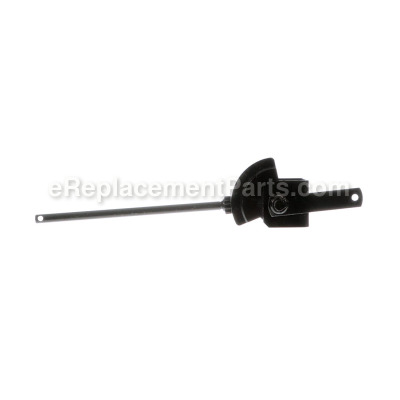
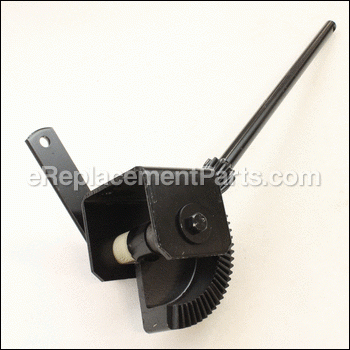


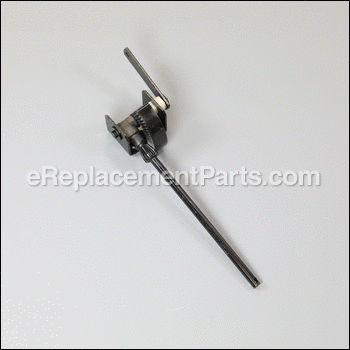
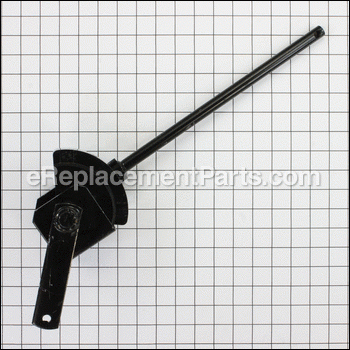

This is a genuine Husqvarna, Poulan, Weed Eater part for use with Lawn Tractors. The steering sector gear kit is part of the lawn tractor's steering mechanism. The steering shaft gear moves the steering sector gear to turn the lawn tractor wheels left or right. The most common reason for replacing the gear sector is when the lawn mower is hard to steer. This part is sold individually. Here is a list of tools that are needed to replace the steering sector gear kit a 3/8 inch socket, 9/16 inch socket, 1/2 inch socket, 15/16 inch socket, adjustable wrench and a 1/2 inch wrench.
Kit-steering Assembly-service 584371701
OEM part for: Husqvarna, Poulan, Craftsman, Weed Eater
Part Number: 584371701
$145.89
In Stock
Compatibility
This part will fit the following 689 machines
Husqvarna
CT 130 (HECT130B) (954170017) (1999-10) Ride Mower View Diagrams & Manuals
CT 130 (HECT130C) (954170017) (2000-02) Ride Mower View Diagrams & Manuals
CT 130 (HECT150B) (954170019) (2000-01) Ride Mower View Diagrams & Manuals
CTH 130 (954140100A) (1999-10) Ride Mower View Diagrams & Manuals
CTH 150 (954140101A) (1999-10) Ride Mower View Diagrams & Manuals
GTVH 200 (954140016B) (1999-03) Ride Mower View Diagrams & Manuals
GTVH 205 (954140102A) (1999-10) Ride Mower View Diagrams & Manuals
GTVH 205 (954140102B) (2000-03) Ride Mower View Diagrams & Manuals
LT 120 (954140002A) (1996-12) Ride Mower View Diagrams & Manuals
LT 120 (954140002B) (1997-12) Ride Mower View Diagrams & Manuals
LT 120 (HCLT120A) (954140047) (1998-01) Ride Mower View Diagrams & Manuals
LT 1238 A (9545677024) (2000-10) Ride Mower View Diagrams & Manuals
LT 130 (1997-12) Ride Mower View Diagrams & Manuals
LTH 130 (954140005K) (1999-03) Ride Mower View Diagrams & Manuals
LTH 130 (954140107A) (1999-11) Ride Mower View Diagrams & Manuals
LTH 130 (HCLTH130J) (954140005) (1999-01) Ride Mower View Diagrams & Manuals
LTH 1342 A (954567031) (2000-12) Ride Mower View Diagrams & Manuals
LTH 145 (1997-12) Ride Mower View Diagrams & Manuals
LTH 145 (954140006D) (1998-07) Ride Mower View Diagrams & Manuals
YT 180 (954140009A) (1997-01) Ride Mower View Diagrams & Manuals
YTH 130 (HEYTH130K) (954170026) (2000-10) Ride Mower View Diagrams & Manuals
YTH 145 (954140015A) (1999-05) Ride Mower View Diagrams & Manuals
YTH 150 (954140007B) (1997-12) Ride Mower View Diagrams & Manuals
YTH 150 (954140007C) (1997-12) Ride Mower View Diagrams & Manuals
YTH 150 (954140007D) (1998-02) Ride Mower View Diagrams & Manuals
YTH 150 (954140007E) (1998-02) Ride Mower View Diagrams & Manuals
YTH 150 (954140007J) (1999-03) Ride Mower View Diagrams & Manuals
YTH 150 (95414007) (1997-12) Ride Mower View Diagrams & Manuals
YTH 150 (954140108A) (1999-11) Ride Mower View Diagrams & Manuals
YTH 150 (954140108B) (1999-11) Ride Mower View Diagrams & Manuals
YTH 150 (HCLTH150E) (954140007) (1998-03) Ride Mower View Diagrams & Manuals
YTH 150 (HCLTH150H) (954140007) (1998-10) Ride Mower View Diagrams & Manuals
YTH 150 (HCLTH150J) (954140007) (1999-03) Ride Mower View Diagrams & Manuals
YTH 1542 A (954567048) (2000-11) Ride Mower View Diagrams & Manuals
YTH 1746 A (954567055) (2000-11) Ride Mower View Diagrams & Manuals
YTH 180 (1997-12) Ride Mower View Diagrams & Manuals
YTH 180 (954140010B) (1996-12) Ride Mower View Diagrams & Manuals
YTH 180 (954140010C) (1997-12) Ride Mower View Diagrams & Manuals
YTH 180 (954140010D) (1997-12) Ride Mower View Diagrams & Manuals
YTH 180 (954140010E) (1998-02) Ride Mower View Diagrams & Manuals
YTH 180 (954140010E) (1998-06) Ride Mower View Diagrams & Manuals
YTH 180 (954140010F) (1998-07) Ride Mower View Diagrams & Manuals
YTH 180 (954140010F) (1998-08) Ride Mower View Diagrams & Manuals
YTH 180 (954140010H) (1999-03) Ride Mower View Diagrams & Manuals
YTH 180 (954140109A) (1999-10) Ride Mower View Diagrams & Manuals
YTH 180 (954140109B) (1999-11) Ride Mower View Diagrams & Manuals
YTH 180 (HCYTH180C) (954140010) (1997-01) Ride Mower View Diagrams & Manuals
YTH 180 (HCYTH180E) (1997-11) Ride Mower View Diagrams & Manuals
YTH 2046 A (954567079) (2000-11) Ride Mower View Diagrams & Manuals
Y1242C (1999 And Before) Y1242C (1999 And Before) View Diagrams & Manuals
Y1242D (1999 And Before) Y1242D (1999 And Before) View Diagrams & Manuals
Y12542E (1999 And Before) Y12542E (1999 And Before) View Diagrams & Manuals
Y12542G (1999 And Before) Y12542G (1999 And Before) View Diagrams & Manuals
Y12592RBA (1999 And Before) Y12592RBA (1999 And Before) View Diagrams & Manuals
Y1292RBA (1999 And Before) Y1292RBA (1999 And Before) View Diagrams & Manuals
Y1292RBB (1999 And Before) Y1292RBB (1999 And Before) View Diagrams & Manuals
Y145H92RBA (1999 And Before) Y145H92RBA (1999 And Before) View Diagrams & Manuals
Y145H92RBB (1999 And Before) Y145H92RBB (1999 And Before) View Diagrams & Manuals
Y155H107RBA (1999 And Before) Y155H107RBA (1999 And Before) View Diagrams & Manuals
Y155H92RBA (1999 And Before) Y155H92RBA (1999 And Before) View Diagrams & Manuals
YGT20H46A (1999) YGT20H46A (1999) View Diagrams & Manuals
YP1342A (1997) YP1342A (1997) View Diagrams & Manuals
YP1342B (1997) YP1342B (1997) View Diagrams & Manuals
YP1342C (1998) YP1342C (1998) View Diagrams & Manuals
YP1342D (1998) YP1342D (1998) View Diagrams & Manuals
YP1342E (1999) YP1342E (1999) View Diagrams & Manuals
YP1542A (1997) YP1542A (1997) View Diagrams & Manuals
YP1542B (1998) YP1542B (1998) View Diagrams & Manuals
YP1542C (1999) YP1542C (1999) View Diagrams & Manuals
YP15H42A (1997) YP15H42A (1997) View Diagrams & Manuals
YP15H42B (1997) YP15H42B (1997) View Diagrams & Manuals
YP15H42D (1999) YP15H42D (1999) View Diagrams & Manuals
YP17H42A (1999) YP17H42A (1999) View Diagrams & Manuals
YP1946A (1997) YP1946A (1997) View Diagrams & Manuals
YP1946B (1998) YP1946B (1998) View Diagrams & Manuals
YP1946C (1999) YP1946C (1999) View Diagrams & Manuals
YPB1742A (1999) YPB1742A (1999) View Diagrams & Manuals
YPB17H42A (1999) YPB17H42A (1999) View Diagrams & Manuals
YPB17H42B (1999) YPB17H42B (1999) View Diagrams & Manuals
YPQ185H46A (1999) YPQ185H46A (1999) View Diagrams & Manuals
YPQ20H46A (1999) YPQ20H46A (1999) View Diagrams & Manuals
WP145H42G (1999) WP145H42G (1999) View Diagrams & Manuals
WZ145H42B (1999 And Before) WZ145H42B (1999 And Before) View Diagrams & Manuals
WZ145H42C (1999 And Before) WZ145H42C (1999 And Before) View Diagrams & Manuals
WZ15536RDHA (1999 And Before) WZ15536RDHA (1999 And Before) View Diagrams & Manuals
WZ185H46B (1999 And Before) WZ185H46B (1999 And Before) View Diagrams & Manuals
WE12538B (1997) WE12538B (1997) View Diagrams & Manuals
WE12538C (1997) WE12538C (1997) View Diagrams & Manuals
WE12538D (1997) WE12538D (1997) View Diagrams & Manuals
WE12538E (1997) WE12538E (1997) View Diagrams & Manuals
WE13T38A (1998) WE13T38A (1998) View Diagrams & Manuals
WE13T38B (1998) WE13T38B (1998) View Diagrams & Manuals
WE13T38C (1999) WE13T38C (1999) View Diagrams & Manuals
WE13T38D (2001) WE13T38D (2001) View Diagrams & Manuals
WE145H42A (1997) WE145H42A (1997) View Diagrams & Manuals
WE145H42B (1997) WE145H42B (1997) View Diagrams & Manuals
WE145H42C (1998) WE145H42C (1998) View Diagrams & Manuals
WE145H42D (1998) WE145H42D (1998) View Diagrams & Manuals
WE145H42E (1999) WE145H42E (1999) View Diagrams & Manuals
WE145H42F (1999) WE145H42F (1999) View Diagrams & Manuals
WE15T42A (1999) WE15T42A (1999) View Diagrams & Manuals
WE12538F (1999) WE12538F (1999) View Diagrams & Manuals
WE12538G (2000) WE12538G (2000) View Diagrams & Manuals
WE12538H (2001) WE12538H (2001) View Diagrams & Manuals
WE12542A (1997) WE12542A (1997) View Diagrams & Manuals
WE12542B (1998) WE12542B (1998) View Diagrams & Manuals
WE12542C (1998) WE12542C (1998) View Diagrams & Manuals
WE12542D (1998) WE12542D (1998) View Diagrams & Manuals
WE12542E (1999) WE12542E (1999) View Diagrams & Manuals
WE12542F (2000) WE12542F (2000) View Diagrams & Manuals
WE14542E (1997) WE14542E (1997) View Diagrams & Manuals
WE14542F (1998) WE14542F (1998) View Diagrams & Manuals
WE14542G (1998) WE14542G (1998) View Diagrams & Manuals
WE14542GH (1999 And Before) WE14542GH (1999 And Before) View Diagrams & Manuals
WE14542J (1999) WE14542J (1999) View Diagrams & Manuals
WE14542K (2000) WE14542K (2000) View Diagrams & Manuals
WE14542L (2001) WE14542L (2001) View Diagrams & Manuals
WE16542A (1998) WE16542A (1998) View Diagrams & Manuals
WE16542B (1999) WE16542B (1999) View Diagrams & Manuals
WE16542D (2001) WE16542D (2001) View Diagrams & Manuals
WE18542A (1997) WE18542A (1997) View Diagrams & Manuals
WE18542B (1997) WE18542B (1997) View Diagrams & Manuals
WE18542C (1998) WE18542C (1998) View Diagrams & Manuals
WE18542D (1998) WE18542D (1998) View Diagrams & Manuals
WE18542E (1999) WE18542E (1999) View Diagrams & Manuals
WE18542F (2000) WE18542F (2000) View Diagrams & Manuals
259720 (1999 & Before) Tractor View Diagrams & Manuals
259721 (1999 & Before) Tractor View Diagrams & Manuals
259722 (1999 & Before) Tractor View Diagrams & Manuals
259723 (1999 & Before) Tractor View Diagrams & Manuals
270450 (1999 & Before) Tractor View Diagrams & Manuals
270451 (1999 & Before) Tractor View Diagrams & Manuals
271470 (2001) Tractor View Diagrams & Manuals
7124A89 (1998) Tractor View Diagrams & Manuals
7134A99 (1999) Tractor View Diagrams & Manuals
7143A89 (1998) Tractor View Diagrams & Manuals
7143A99 (1999) Tractor View Diagrams & Manuals
7143B89 (1998) Tractor View Diagrams & Manuals
7169A99 (1999) Tractor View Diagrams & Manuals
7169B99 (1999) Tractor View Diagrams & Manuals
7177A89 (1998) Tractor View Diagrams & Manuals
7178B99 (1999) Tractor View Diagrams & Manuals
7178C99 (1999) Tractor View Diagrams & Manuals
7187A89 (1998) Tractor View Diagrams & Manuals
7187A99 (1999) Tractor View Diagrams & Manuals
8196A89 (1998) Tractor View Diagrams & Manuals
8196A99 (1999) Tractor View Diagrams & Manuals
8196B89 (1998) Tractor View Diagrams & Manuals
9149A89 (1998) Tractor View Diagrams & Manuals
9149B89 (1998) Tractor View Diagrams & Manuals
9169A99 (1999) Tractor View Diagrams & Manuals
9177A89 (1998) Tractor View Diagrams & Manuals
9177B89 (1998) Tractor View Diagrams & Manuals
9178A99 (1999) Tractor View Diagrams & Manuals
9178B99 (1999) Tractor View Diagrams & Manuals
9187A89 (1998) Tractor View Diagrams & Manuals
9187A99 (1999) Tractor View Diagrams & Manuals
9187B89 (1998) Tractor View Diagrams & Manuals
9191A89 (1998) Tractor View Diagrams & Manuals
9191A99 (1999) Tractor View Diagrams & Manuals
9191B89 (1998) Tractor View Diagrams & Manuals
9209A99 (1999) Tractor View Diagrams & Manuals
AB13107B (1999 & Before) Tractor View Diagrams & Manuals
AK12542C (1999 & Before) Tractor View Diagrams & Manuals
AK12542D (1999 & Before) Tractor View Diagrams & Manuals
AK125H42B (1999 & Before) Tractor View Diagrams & Manuals
AK125H42C (1999 & Before) Tractor View Diagrams & Manuals
AYP7124A79 (1997) Tractor View Diagrams & Manuals
AYP7124B79 (1997) Tractor View Diagrams & Manuals
AYP7143A79 (1997) Tractor View Diagrams & Manuals
AYP7143B79 (1997) Tractor View Diagrams & Manuals
AYP7143C79 (1997) Tractor View Diagrams & Manuals
AYP7157A79 (1997) Tractor View Diagrams & Manuals
AYP7157B79 (1997) Tractor View Diagrams & Manuals
AYP7167A79 (1997) Tractor View Diagrams & Manuals
AYP7167B79 (1997) Tractor View Diagrams & Manuals
AYP7167C79 (1997) Tractor View Diagrams & Manuals
AYP8186A79 (1997) Tractor View Diagrams & Manuals
AYP8186B79 (1997) Tractor View Diagrams & Manuals
AYP9149A79 (1997) Tractor View Diagrams & Manuals
AYP9149B79 (1997) Tractor View Diagrams & Manuals
AYP9149C79 (1997) Tractor View Diagrams & Manuals
AYP9158A79 (1997) Tractor View Diagrams & Manuals
AYP9158B79 (1997) Tractor View Diagrams & Manuals
AYP9167A79 (1997) Tractor View Diagrams & Manuals
AYP9167B79 (1997) Tractor View Diagrams & Manuals
AYP9167C79 (1997) Tractor View Diagrams & Manuals
AYP9167D79 (1997) Tractor View Diagrams & Manuals
AYP9182A79 (1997) Tractor View Diagrams & Manuals
AYP9182B79 (1997) Tractor View Diagrams & Manuals
AYP9182C79 (1997) Tractor View Diagrams & Manuals
BM125M92EJA (1999 & Before) Tractor View Diagrams & Manuals
BM155H92EJA (1999 & Before) Tractor View Diagrams & Manuals
CHD12538A (1997) Tractor View Diagrams & Manuals
CHD12538B (1998) Tractor View Diagrams & Manuals
CHD12538C (1998) Tractor View Diagrams & Manuals
CHD12538D (1999) Tractor View Diagrams & Manuals
CHD14542A (1999) Tractor View Diagrams & Manuals
CHD145H42A (1997) Tractor View Diagrams & Manuals
CHD145H42C (1998) Tractor View Diagrams & Manuals
CHD145H42D (1998) Tractor View Diagrams & Manuals
CS12538A (1997) Tractor View Diagrams & Manuals
CS16H42A (1997) Tractor View Diagrams & Manuals
CS16H42B (1997) Tractor View Diagrams & Manuals
CSGT18546A (1997) Tractor View Diagrams & Manuals
CT12542K (1997) Tractor View Diagrams & Manuals
CT12542L (1997) Tractor View Diagrams & Manuals
CT12542M (1997) Tractor View Diagrams & Manuals
CT12542N (1997) Tractor View Diagrams & Manuals
CT12542P (1998) Tractor View Diagrams & Manuals
CT12542R (1998) Tractor View Diagrams & Manuals
CT12542S (1999) Tractor View Diagrams & Manuals
CT14542G (1999) Tractor View Diagrams & Manuals
CT14542H (1999) Tractor View Diagrams & Manuals
CTH14542J (1999) Tractor View Diagrams & Manuals
DE1236RBA (1999 & Before) Tractor View Diagrams & Manuals
DE1236RBB (1999 & Before) Tractor View Diagrams & Manuals
DE1242A (1999 & Before) Tractor View Diagrams & Manuals
DE1336RBA (1999 & Before) Tractor View Diagrams & Manuals
DE14536RBA (1999 & Before) Tractor View Diagrams & Manuals
DE14542RBA (1999 & Before) Tractor View Diagrams & Manuals
DE145H36RBA (1999 & Before) Tractor View Diagrams & Manuals
DE145H36RBC (1999 & Before) Tractor View Diagrams & Manuals
DE155H42A (1999 & Before) Tractor View Diagrams & Manuals
DE16H36RBA (1999 & Before) Tractor View Diagrams & Manuals
DE16HT36RBA (1999 & Before) Tractor View Diagrams & Manuals
DPR20H42STA (1999 & Before) Tractor View Diagrams & Manuals
DPR20H46STA (2000) Tractor View Diagrams & Manuals
DPR20H46STB (2000) Tractor View Diagrams & Manuals
EN145RBA (1999 & Before) Tractor View Diagrams & Manuals
EN145RBHA (1999 & Before) Tractor View Diagrams & Manuals
GS12536A (1999 & Before) Tractor View Diagrams & Manuals
GS14536HA (1999 & Before) Tractor View Diagrams & Manuals
HALT150E (1999 & Before) Tractor View Diagrams & Manuals
HCD145H42A (1999 & Before) Tractor View Diagrams & Manuals
HD12538A (1997) Tractor View Diagrams & Manuals
HD12538B (1997) Tractor View Diagrams & Manuals
HD12538C (1997) Tractor View Diagrams & Manuals
HD12538D (1997) Tractor View Diagrams & Manuals
HD12538E (1998) Tractor View Diagrams & Manuals
HD12538F (1998) Tractor View Diagrams & Manuals
HD12538G (1998) Tractor View Diagrams & Manuals
HD12538H (1999) Tractor View Diagrams & Manuals
HD12538J (1999) Tractor View Diagrams & Manuals
HD14542A (1999) Tractor View Diagrams & Manuals
HD14542B (1999) Tractor View Diagrams & Manuals
HD145H42A (1997) Tractor View Diagrams & Manuals
HD145H42B (1997) Tractor View Diagrams & Manuals
HD145H42C (1997) Tractor View Diagrams & Manuals
HD145H42D (1997) Tractor View Diagrams & Manuals
HD145H42E (1997) Tractor View Diagrams & Manuals
HD145H42G (1997) Tractor View Diagrams & Manuals
HD145H42H (1998) Tractor View Diagrams & Manuals
HD145H42J (1998) Tractor View Diagrams & Manuals
HD185H46A (1997) Tractor View Diagrams & Manuals
HD185H46B (1997) Tractor View Diagrams & Manuals
HDC12538A (1997) Tractor View Diagrams & Manuals
HDC12538B (1997) Tractor View Diagrams & Manuals
HDC12538C (1997) Tractor View Diagrams & Manuals
HDC145H42A (1997) Tractor View Diagrams & Manuals
HDC145H42B (1997) Tractor View Diagrams & Manuals
HDC145H42C (1997) Tractor View Diagrams & Manuals
HDC145H42D (1997) Tractor View Diagrams & Manuals
HDC185H46A (1997) Tractor View Diagrams & Manuals
HDC185H46B (1997) Tractor View Diagrams & Manuals
HDT1338A (1999) Tractor View Diagrams & Manuals
HDT1542A (1999) Tractor View Diagrams & Manuals
LT150 (1999 & Before) Tractor View Diagrams & Manuals
M14542A (1997) Tractor View Diagrams & Manuals
M14542B (1997) Tractor View Diagrams & Manuals
MBA1392A (1999 & Before) Tractor View Diagrams & Manuals
MBA1392B (1999 & Before) Tractor View Diagrams & Manuals
MBA16107A (1999 & Before) Tractor View Diagrams & Manuals
MBA16107B (1999 & Before) Tractor View Diagrams & Manuals
MT12536RBA (1999 & Before) Tractor View Diagrams & Manuals
MT15536RBHA (1999 & Before) Tractor View Diagrams & Manuals
PC1338A (2000) Tractor View Diagrams & Manuals
PC14542A (2000) Tractor View Diagrams & Manuals
PC14542B (2001) Tractor View Diagrams & Manuals
PO14542A (2000) Tractor View Diagrams & Manuals
PO14542B (2001) Tractor View Diagrams & Manuals
PO165H42A (2001) Tractor View Diagrams & Manuals
PP1338 (1999 & Before) Tractor View Diagrams & Manuals
PP1338A (1997) Tractor View Diagrams & Manuals
PP1338B (1998) Tractor View Diagrams & Manuals
PP1338D (2000) Tractor View Diagrams & Manuals
PP145H42 (1999 & Before) Tractor View Diagrams & Manuals
PP145H42A (1997) Tractor View Diagrams & Manuals
PP145H42B (1997) Tractor View Diagrams & Manuals
PP165H42 (1999 & Before) Tractor View Diagrams & Manuals
PP165H42A (1998) Tractor View Diagrams & Manuals
PP16H46 (1999 & Before) Tractor View Diagrams & Manuals
PP16H46A (1997) Tractor View Diagrams & Manuals
PP16H46B (1997) Tractor View Diagrams & Manuals
PP18H46 (1999 & Before) Tractor View Diagrams & Manuals
PP18H46A (1998) Tractor View Diagrams & Manuals
PP18H46B (1998) Tractor View Diagrams & Manuals
PP20H46 (1999 & Before) Tractor View Diagrams & Manuals
PP20H46A (1999) Tractor View Diagrams & Manuals
PPR14542A (1999) Tractor View Diagrams & Manuals
PPR14542B (1999) Tractor View Diagrams & Manuals
PPR16H42STA (1999) Tractor View Diagrams & Manuals
PPR1742STA (1999) Tractor View Diagrams & Manuals
PPR1742STB (1999 & Before) Tractor View Diagrams & Manuals
PPR1742STC (2000) Tractor View Diagrams & Manuals
PPR17H42STA (1999) Tractor View Diagrams & Manuals
PPR17H42STB (1999) Tractor View Diagrams & Manuals
PPR17H42STC (2000) Tractor View Diagrams & Manuals
PPR20H46STA (1999) Tractor View Diagrams & Manuals
PR1642STA (2000) Tractor View Diagrams & Manuals
PR16H42STA (2000) Tractor View Diagrams & Manuals
PR16H42STB (2000) Tractor View Diagrams & Manuals
PR1742STA (2000) Tractor View Diagrams & Manuals
PR1742STB (2001) Tractor View Diagrams & Manuals
PR17H42STA (2000) Tractor View Diagrams & Manuals
PR17H42STB (2001) Tractor View Diagrams & Manuals
PR18542STA (2000) Tractor View Diagrams & Manuals
PR18542STB (2000) Tractor View Diagrams & Manuals
PR185H42STA (2000) Tractor View Diagrams & Manuals
PR185H42STB (2000) Tractor View Diagrams & Manuals
PR185H42STC (2001) Tractor View Diagrams & Manuals
PR2042STA (2000) Tractor View Diagrams & Manuals
PR20H42STA (2000) Tractor View Diagrams & Manuals
PR20H42STB (2001) Tractor View Diagrams & Manuals
PR20H46STA (1999 & Before) Tractor View Diagrams & Manuals
PRK17G42STA (2001) Tractor View Diagrams & Manuals
PRK17H42STA (2001) Tractor View Diagrams & Manuals
Q12538A (2000) Tractor View Diagrams & Manuals
Q12538B (2000) Tractor View Diagrams & Manuals
Q12538C (2000) Tractor View Diagrams & Manuals
Q14542A (2000) Tractor View Diagrams & Manuals
Q14542B (2000) Tractor View Diagrams & Manuals
Q14542C (2000) Tractor View Diagrams & Manuals
Q165H46A (2000) Tractor View Diagrams & Manuals
Q165H46B (2000) Tractor View Diagrams & Manuals
Q185H46A (2000) Tractor View Diagrams & Manuals
Q185H46B (2000) Tractor View Diagrams & Manuals
QGT2046A (2000) Tractor View Diagrams & Manuals
QGT2046B (2000) Tractor View Diagrams & Manuals
QP17H42STA (2000) Tractor View Diagrams & Manuals
QP17H42STB (2000) Tractor View Diagrams & Manuals
QP20H46A (2000) Tractor View Diagrams & Manuals
QP20H46B (2000) Tractor View Diagrams & Manuals
RE1242B (1999 & Before) Tractor View Diagrams & Manuals
RE12538B (1999 & Before) Tractor View Diagrams & Manuals
RE14542D (1999 & Before) Tractor View Diagrams & Manuals
RE145H42F (1999 & Before) Tractor View Diagrams & Manuals
RE145H42H (1999 & Before) Tractor View Diagrams & Manuals
RED145H36A (1999 & Before) Tractor View Diagrams & Manuals
RER1236A (1999 & Before) Tractor View Diagrams & Manuals
RER12536A (1999 & Before) Tractor View Diagrams & Manuals
RER12536C (1999 & Before) Tractor View Diagrams & Manuals
RER145H36A (1999 & Before) Tractor View Diagrams & Manuals
RER145H36B (1999 & Before) Tractor View Diagrams & Manuals
RER145H36C (1999 & Before) Tractor View Diagrams & Manuals
RER145H36D (1999 & Before) Tractor View Diagrams & Manuals
RER155H42A (1999 & Before) Tractor View Diagrams & Manuals
RK185H46A (1999) Tractor View Diagrams & Manuals
RK20H46A (1999) Tractor View Diagrams & Manuals
S165H42A (2001) Tractor View Diagrams & Manuals
SE1342A (1997) Tractor View Diagrams & Manuals
SE1342B (1997) Tractor View Diagrams & Manuals
SN14542D (1999 & Before) Tractor View Diagrams & Manuals
T12542E (1997) Tractor View Diagrams & Manuals
T12542F (1998) Tractor View Diagrams & Manuals
T145H42C (1998) Tractor View Diagrams & Manuals
TMH1450 (1999 & Before) Tractor View Diagrams & Manuals
TMH1450H (1999 & Before) Tractor View Diagrams & Manuals
TP1946A (1999 & Before) Tractor View Diagrams & Manuals
VL1336BAA (1999 & Before) Tractor View Diagrams & Manuals
VL155H36BAA (1999 & Before) Tractor View Diagrams & Manuals
WE1642B (1997) Tractor View Diagrams & Manuals
WE165H42A (1998) Tractor View Diagrams & Manuals
WE165H42B (1998) Tractor View Diagrams & Manuals
WE17TH42A (1999) Tractor View Diagrams & Manuals
WE185H42A (1997) Tractor View Diagrams & Manuals
WE185H42B (1997) Tractor View Diagrams & Manuals
WE185H42C (1997) Tractor View Diagrams & Manuals
WE185H42D (1998) Tractor View Diagrams & Manuals
WE185H42E (1998) Tractor View Diagrams & Manuals
WE185H42F (1999) Tractor View Diagrams & Manuals
WE185H46A (1998) Tractor View Diagrams & Manuals
WE185H46B (1998) Tractor View Diagrams & Manuals
WET12538A (1999) Tractor View Diagrams & Manuals
WET13T38A (1999 & Before) Tractor View Diagrams & Manuals
WET14542A (1999) Tractor View Diagrams & Manuals
WET1742A (1997) Tractor View Diagrams & Manuals
WET1742B (1997) Tractor View Diagrams & Manuals
WEX1242B (1999 & Before) Tractor View Diagrams & Manuals
WEX1242C (1999 & Before) Tractor View Diagrams & Manuals
WEX125CRDA (1999 & Before) Tractor View Diagrams & Manuals
WEX125H42D (1999 & Before) Tractor View Diagrams & Manuals
WEX12TCRDA (1999 & Before) Tractor View Diagrams & Manuals
WEX12TCRDB (1999 & Before) Tractor View Diagrams & Manuals
WEX13TCRDA (1999 & Before) Tractor View Diagrams & Manuals
WEX155HCRDA (1999 & Before) Tractor View Diagrams & Manuals
WEX155HCRDB (1999 & Before) Tractor View Diagrams & Manuals
WEX155HCRDC (1999 & Before) Tractor View Diagrams & Manuals
WEX16THCRDA (1999 & Before) Tractor View Diagrams & Manuals
Y18542A (1999 & Before) Tractor View Diagrams & Manuals
YGTB18546A (1999) Tractor View Diagrams & Manuals
Poulan
PP1338 Lawn Tractor View Diagrams & Manuals
PP1338A Lawn Tractor View Diagrams & Manuals
PO14542B Lawn Tractor View Diagrams & Manuals
HDT1542A Lawn Tractor View Diagrams & Manuals
PR1742STA Tractor View Diagrams & Manuals
HD145H42F Lawn Tractor View Diagrams & Manuals
270450 Lawn Tractor View Diagrams & Manuals
271470 Tractor View Diagrams & Manuals
PPR1742STA (1999) Lawn Tractor View Diagrams & Manuals
PPR1742STB (Before 1999) Lawn Tractor View Diagrams & Manuals
PPR1742STC (2000) Lawn Tractor View Diagrams & Manuals
HD145H42G (1997) Lawn Tractor View Diagrams & Manuals
PPR17H42STA (1999) Lawn Tractor View Diagrams & Manuals
PR16H42STA (2000) Lawn Tractor View Diagrams & Manuals
PR185H42STA (2000) Lawn Tractor View Diagrams & Manuals
HD145H42J 14.5 HP 42 Inch Lawn Tractor View Diagrams & Manuals
HD185H46 Tractor 18.5 Hp 46" View Diagrams & Manuals
PP16H46 Lawn Tractor View Diagrams & Manuals
PP16H46B Lawn Tractor View Diagrams & Manuals
PP20H46A Lawn Tractor View Diagrams & Manuals
PP145H42 Lawn Tractor View Diagrams & Manuals
PP145H42A Lawn Tractor View Diagrams & Manuals
Weed Eater
WE13T38D Lawn Tractor View Diagrams & Manuals
WE12538H Lawn Tractor View Diagrams & Manuals
WE12542A Lawn Tractor View Diagrams & Manuals
WE12542D Lawn Tractor View Diagrams & Manuals
WE12542E Lawn Tractor View Diagrams & Manuals
WE14542L Lawn Tractor View Diagrams & Manuals
WE16542D Lawn Tractor View Diagrams & Manuals
WET12538A Lawn Tractor View Diagrams & Manuals
WE12538F Lawn Tractor View Diagrams & Manuals
WE12538B Lawn Tractor View Diagrams & Manuals
WE12538D Lawn Tractor View Diagrams & Manuals
HD12538J Lawn Tractor View Diagrams & Manuals
S165H42A Lawn Tractor View Diagrams & Manuals
HD12538G Lawn Tractor View Diagrams & Manuals
Craftsman
917270750 Lawn Tractor View Diagrams & Manuals
917271011 Lawn Tractor View Diagrams & Manuals
917259573 Tractor View Diagrams & Manuals
917270760 Lawn Tractor View Diagrams & Manuals
917270820 Lawn Tractor View Diagrams & Manuals
917270810 Lawn Tractor View Diagrams & Manuals
917271050 Lawn Tractor View Diagrams & Manuals
917270532 Lawn Tractor View Diagrams & Manuals
917272070 Lawn Tractor View Diagrams & Manuals
917.259544 Mower View Diagrams & Manuals
917271080 Lawn Tractor View Diagrams & Manuals
917259121 Lawn Tractor View Diagrams & Manuals
917270641 Mower View Diagrams & Manuals
917.271061 Tractor View Diagrams & Manuals
917271030 Tractor View Diagrams & Manuals
917270821 42In. Lawn Tractor View Diagrams & Manuals
25991 Lawn Tractor View Diagrams & Manuals
25993 Lawn Tractor View Diagrams & Manuals
25996 Lawn Tractor View Diagrams & Manuals
756-052 Lawn Tractor View Diagrams & Manuals
917250571 Lawn Tractor View Diagrams & Manuals
917252590 Lawn Tractor View Diagrams & Manuals
917252720 Lawn Tractor View Diagrams & Manuals
917252731 Lawn Tractor View Diagrams & Manuals
917253920 Lawn Tractor View Diagrams & Manuals
917253930 Lawn Tractor View Diagrams & Manuals
917279840 Riding Mower View Diagrams & Manuals
917279841 Riding Mower View Diagrams & Manuals
917279910 Riding Mower View Diagrams & Manuals
917279911 Riding Mower View Diagrams & Manuals
917279920 Riding Mower View Diagrams & Manuals
917279921 Riding Mower View Diagrams & Manuals
917279940 Riding Mower View Diagrams & Manuals
917279950 Riding Mower View Diagrams & Manuals
917279960 Riding Mower View Diagrams & Manuals
917256360 Lawn Tractor View Diagrams & Manuals
917256370 Lawn Tractor View Diagrams & Manuals
917256380 Lawn Tractor View Diagrams & Manuals
917256420 Lawn Tractor View Diagrams & Manuals
917256421 Lawn Tractor View Diagrams & Manuals
917256430 Lawn Tractor View Diagrams & Manuals
917256522 Lawn Tractor View Diagrams & Manuals
917256523 Lawn Tractor View Diagrams & Manuals
917271820 Riding Mower View Diagrams & Manuals
917271830 Riding Mower View Diagrams & Manuals
917271840 Riding Mower View Diagrams & Manuals
917271841 Riding Mower View Diagrams & Manuals
917272050 Riding Mower View Diagrams & Manuals
917272052 Riding Mower View Diagrams & Manuals
917256524 Lawn Tractor View Diagrams & Manuals
917256530 Lawn Tractor View Diagrams & Manuals
917256531 Lawn Tractor View Diagrams & Manuals
917256532 Lawn Tractor View Diagrams & Manuals
917256540 Lawn Tractor View Diagrams & Manuals
917256541 Lawn Tractor View Diagrams & Manuals
917256542 Lawn Tractor View Diagrams & Manuals
917256543 Lawn Tractor View Diagrams & Manuals
917256545 Lawn Tractor View Diagrams & Manuals
917256550 Lawn Tractor View Diagrams & Manuals
917256551 Lawn Tractor View Diagrams & Manuals
917256552 Lawn Tractor View Diagrams & Manuals
917256553 Lawn Tractor View Diagrams & Manuals
917256560 Lawn Tractor View Diagrams & Manuals
917256561 Lawn Tractor View Diagrams & Manuals
917256562 Lawn Tractor View Diagrams & Manuals
917256563 Lawn Tractor View Diagrams & Manuals
917256570 Lawn Tractor View Diagrams & Manuals
917256670 Lawn Tractor View Diagrams & Manuals
917256680 Lawn Tractor View Diagrams & Manuals
917256690 Lawn Tractor View Diagrams & Manuals
917258020 Lawn Tractor View Diagrams & Manuals
917258021 Lawn Tractor View Diagrams & Manuals
917258030 Lawn Tractor View Diagrams & Manuals
917258160 Lawn Tractor View Diagrams & Manuals
917258161 Lawn Tractor View Diagrams & Manuals
917258170 Lawn Tractor View Diagrams & Manuals
917258171 Lawn Tractor View Diagrams & Manuals
917258172 Lawn Tractor View Diagrams & Manuals
917258260 Lawn Tractor View Diagrams & Manuals
917258261 Lawn Tractor View Diagrams & Manuals
917258270 Lawn Tractor View Diagrams & Manuals
917258271 Lawn Tractor View Diagrams & Manuals
917258331 Lawn Tractor View Diagrams & Manuals
917258440 Lawn Tractor View Diagrams & Manuals
917258520 Lawn Tractor View Diagrams & Manuals
917258521 Lawn Tractor View Diagrams & Manuals
917258522 Lawn Tractor View Diagrams & Manuals
917258523 Lawn Tractor View Diagrams & Manuals
917258524 Lawn Tractor View Diagrams & Manuals
917258530 Lawn Tractor View Diagrams & Manuals
917258531 Lawn Tractor View Diagrams & Manuals
917258532 Lawn Tractor View Diagrams & Manuals
917258534 Lawn Tractor View Diagrams & Manuals
917258535 Lawn Tractor View Diagrams & Manuals
917258541 Lawn Tractor View Diagrams & Manuals
917258542 Lawn Tractor View Diagrams & Manuals
917258544 Lawn Tractor View Diagrams & Manuals
917258550 Lawn Tractor View Diagrams & Manuals
917258551 Lawn Tractor View Diagrams & Manuals
917258552 Lawn Tractor View Diagrams & Manuals
917258553 Lawn Tractor View Diagrams & Manuals
917258554 Lawn Tractor View Diagrams & Manuals
917258555 Lawn Tractor View Diagrams & Manuals
917258557 Lawn Tractor View Diagrams & Manuals
917258560 Lawn Tractor View Diagrams & Manuals
917258561 Lawn Tractor View Diagrams & Manuals
917258562 Lawn Tractor View Diagrams & Manuals
917258563 Lawn Tractor View Diagrams & Manuals
917258564 Lawn Tractor View Diagrams & Manuals
917258565 Lawn Tractor View Diagrams & Manuals
917258566 Lawn Tractor View Diagrams & Manuals
917258570 Lawn Tractor View Diagrams & Manuals
917258572 Lawn Tractor View Diagrams & Manuals
917258573 Lawn Tractor View Diagrams & Manuals
917258660 Lawn Tractor View Diagrams & Manuals
917258661 Lawn Tractor View Diagrams & Manuals
917258662 Lawn Tractor View Diagrams & Manuals
917258663 Lawn Tractor View Diagrams & Manuals
917258670 Lawn Tractor View Diagrams & Manuals
917258671 Lawn Tractor View Diagrams & Manuals
917258672 Lawn Tractor View Diagrams & Manuals
917258673 Lawn Tractor View Diagrams & Manuals
917259021 Lawn Tractor View Diagrams & Manuals
917259022 Lawn Tractor View Diagrams & Manuals
917259030 Lawn Tractor View Diagrams & Manuals
917259031 Lawn Tractor View Diagrams & Manuals
917259071 Lawn Tractor View Diagrams & Manuals
917259080 Lawn Tractor View Diagrams & Manuals
917259110 Lawn Tractor View Diagrams & Manuals
917259120 Lawn Tractor View Diagrams & Manuals
917259150 Lawn Tractor View Diagrams & Manuals
917259160 Lawn Tractor View Diagrams & Manuals
917259161 Lawn Tractor View Diagrams & Manuals
917259162 Lawn Tractor View Diagrams & Manuals
917259170 Lawn Tractor View Diagrams & Manuals
917259171 Lawn Tractor View Diagrams & Manuals
917259330 Lawn Tractor View Diagrams & Manuals
917259331 Lawn Tractor View Diagrams & Manuals
917259340 Lawn Tractor View Diagrams & Manuals
917259341 Lawn Tractor View Diagrams & Manuals
917259370 Lawn Tractor View Diagrams & Manuals
917259380 Lawn Tractor View Diagrams & Manuals
917259381 Lawn Tractor View Diagrams & Manuals
917259440 Lawn Tractor View Diagrams & Manuals
917259442 Lawn Tractor View Diagrams & Manuals
917259443 Lawn Tractor View Diagrams & Manuals
917259462 Lawn Tractor View Diagrams & Manuals
917259520 Lawn Tractor View Diagrams & Manuals
917259521 Lawn Tractor View Diagrams & Manuals
917259522 Lawn Tractor View Diagrams & Manuals
917259530 Lawn Tractor View Diagrams & Manuals
917259531 Lawn Tractor View Diagrams & Manuals
917259541 Lawn Tractor View Diagrams & Manuals
917259542 Lawn Tractor View Diagrams & Manuals
917259543 Lawn Tractor View Diagrams & Manuals
917259545 Lawn Tractor View Diagrams & Manuals
917259546 Lawn Tractor View Diagrams & Manuals
917259550 Lawn Tractor View Diagrams & Manuals
917259551 Lawn Tractor View Diagrams & Manuals
917259552 Lawn Tractor View Diagrams & Manuals
917259553 Lawn Tractor View Diagrams & Manuals
917259555 Lawn Tractor View Diagrams & Manuals
917259556 Lawn Tractor View Diagrams & Manuals
917259560 Lawn Tractor View Diagrams & Manuals
917259561 Lawn Tractor View Diagrams & Manuals
917259564 Lawn Tractor View Diagrams & Manuals
917259565 Lawn Tractor View Diagrams & Manuals
917259566 Lawn Tractor View Diagrams & Manuals
917259567 Lawn Tractor View Diagrams & Manuals
917259570 Lawn Tractor View Diagrams & Manuals
917259572 Lawn Tractor View Diagrams & Manuals
917259820 Lawn Tractor View Diagrams & Manuals
917259830 Lawn Tractor View Diagrams & Manuals
917259910 Lawn Tractor View Diagrams & Manuals
917259930 Lawn Tractor View Diagrams & Manuals
917259940 Lawn Tractor View Diagrams & Manuals
917259950 Lawn Tractor View Diagrams & Manuals
917270712 Lawn Tractor View Diagrams & Manuals
917270721 Lawn Tractor View Diagrams & Manuals
917270722 Lawn Tractor View Diagrams & Manuals
917270723 Lawn Tractor View Diagrams & Manuals
917270751 Lawn Tractor View Diagrams & Manuals
917270752 Lawn Tractor View Diagrams & Manuals
917270771 Lawn Tractor View Diagrams & Manuals
917270773 Lawn Tractor View Diagrams & Manuals
917270774 Lawn Tractor View Diagrams & Manuals
917270780 Lawn Tractor View Diagrams & Manuals
917270781 Lawn Tractor View Diagrams & Manuals
917270782 Lawn Tractor View Diagrams & Manuals
917270811 Lawn Tractor View Diagrams & Manuals
917270812 Lawn Tractor View Diagrams & Manuals
917270814 Lawn Tractor View Diagrams & Manuals
917270822 Lawn Tractor View Diagrams & Manuals
917270823 Lawn Tractor View Diagrams & Manuals
917270824 Lawn Tractor View Diagrams & Manuals
917270830 Lawn Tractor View Diagrams & Manuals
917270831 Lawn Tractor View Diagrams & Manuals
917270840 Lawn Tractor View Diagrams & Manuals
917270841 Lawn Tractor View Diagrams & Manuals
917270850 Lawn Tractor View Diagrams & Manuals
917270851 Lawn Tractor View Diagrams & Manuals
917270860 Lawn Tractor View Diagrams & Manuals
917270861 Lawn Tractor View Diagrams & Manuals
917270891 Lawn Tractor View Diagrams & Manuals
917270910 Lawn Tractor View Diagrams & Manuals
917270911 Lawn Tractor View Diagrams & Manuals
917270912 Lawn Tractor View Diagrams & Manuals
917270913 Lawn Tractor View Diagrams & Manuals
917270920 Lawn Tractor View Diagrams & Manuals
917270921 Lawn Tractor View Diagrams & Manuals
917270922 Lawn Tractor View Diagrams & Manuals
917270923 Lawn Tractor View Diagrams & Manuals
917270930 Lawn Tractor View Diagrams & Manuals
917270940 Lawn Tractor View Diagrams & Manuals
917270941 Lawn Tractor View Diagrams & Manuals
917270950 Lawn Tractor View Diagrams & Manuals
917270951 Lawn Tractor View Diagrams & Manuals
917270960 Lawn Tractor View Diagrams & Manuals
917270961 Lawn Tractor View Diagrams & Manuals
917270962 Lawn Tractor View Diagrams & Manuals
917270963 Lawn Tractor View Diagrams & Manuals
917271020 Lawn Tractor View Diagrams & Manuals
917271021 Lawn Tractor View Diagrams & Manuals
917271022 Lawn Tractor View Diagrams & Manuals
917271023 Lawn Tractor View Diagrams & Manuals
917271024 Lawn Tractor View Diagrams & Manuals
917271031 Lawn Tractor View Diagrams & Manuals
917271040 Lawn Tractor View Diagrams & Manuals
917271041 Lawn Tractor View Diagrams & Manuals
917271042 Lawn Tractor View Diagrams & Manuals
917271070 Lawn Tractor View Diagrams & Manuals
917271071 Lawn Tractor View Diagrams & Manuals
917271072 Lawn Tractor View Diagrams & Manuals
917271090 Lawn Tractor View Diagrams & Manuals
917271100 Lawn Tractor View Diagrams & Manuals
917271120 Lawn Tractor View Diagrams & Manuals
917271121 Lawn Tractor View Diagrams & Manuals
917271130 Lawn Tractor View Diagrams & Manuals
917271131 Lawn Tractor View Diagrams & Manuals
917271132 Lawn Tractor View Diagrams & Manuals
917271133 Lawn Tractor View Diagrams & Manuals
917271140 Lawn Tractor View Diagrams & Manuals
917271141 Lawn Tractor View Diagrams & Manuals
917271142 Lawn Tractor View Diagrams & Manuals
917271810 Lawn Tractor View Diagrams & Manuals
917270450 Lawn Tractor View Diagrams & Manuals
917270451 Lawn Tractor View Diagrams & Manuals
917270533 Lawn Tractor View Diagrams & Manuals
917271470 Lawn Tractor View Diagrams & Manuals
917250420 Lawn Tractor View Diagrams & Manuals
917250430 Lawn Tractor View Diagrams & Manuals
917253850 Lawn Tractor View Diagrams & Manuals
Show More Compatible Models
This item works with the following types of products:
- Lawn Mower Parts
- Lawn Tractor Parts
This part replaces obsolete part #: 156594, 532156594, 167902X431, 532167902, 167902
Customer Part Reviews ?
Average Rating (out of 5):
Click to filter by ratings:
5 stars
5
4 stars
1
3 stars
0
2 stars
0
1 stars
0
< PREV
- 1
Happy mower
This was in great condition, arrived quickly. Lawn mower steers like new again! I have used ereplacementparts many times for various repairs and they never disappoint.
Nathan -
March 24, 2022
Verified Purchase
Steering assembly
We received the steering assembly and installed the part and now, we are mowing the lawn, again
Eileen -
September 23, 2020
Verified Purchase
Saved the Mower
Exactly as listed, fit perfect, excellent quality. EReplacement parts is the best for hard to find parts at a good price.
Guest -
July 23, 2019
Verified Purchase
Easy repair
Perfect fit
Guest -
June 3, 2019
Verified Purchase
Perfect replacement parts and fairly easy install.
The part was delivered on a Saturday. The part exactly replaced the original factory part that had worn out.
Ronald -
April 23, 2019
Verified Purchase
Repair part fit as expected
Part arrived a couple of days later than expected but probably due to covid regulations
Guest -
October 29, 2020
Verified Purchase
t
t
t -
t days ago
Verified Purchase
eReplacementParts Team
t
Questions & Answers ?
Our customer Service team is at the ready daily to answer your part and product questions.

Ask our Team
We have a dedicated staff with decades of collective experience in helping customers just like you purchase parts to repair their products.
Does this fit my product?Questions & Answers for Kit-steering Assembly-service
No questions have been asked yet
Customer Repair Instructions ?
All our customer repair instructions are solicited directly from other customers just like you who have purchased and replaced this exact part.
Fuel tank was leaking and steering ws very sloppy.
Parker - September 2, 2017
👍 5 of 5 people found this instruction helpful
Tool Type
Lawn Tractor
Difficulty
Hard
Time
More than 2 hours
Tools Used
Screwdriver, Pliers, Power Drill, Socket set, Wrench Set, Nutdriver
1. Removed engine cowling and steering wheel and shafts.
2. Removed mower frame to obtain enough room to remove fuel tank.
3. Removed fuel tank and fuel tank mounting bracket to gain access to steering assembly.
4. Removed mower deck to gain access to bolts holding the steering assembly.
5 Removed the four bolts holding the steering assembly.
6. Removed the steering assembly.
7. Cleaned the four self tapping bolts that hold the steering assembly.
8. Used the bolts to cut the threads in the new steering assembly.
9. Installed the new steering assembly.
10. Remounted the fuel tank mounting bracket.
11. Installed the new fuel tank.
12 Replaced the fuel line with new fuel line and clamps
13. Installed the steering shaft extension, steering shroud, and steering wheel.
14. Reattached mower frame.
15. Installed engine shroud.
16 Filled fuel tank and checked for fuel leaks.
17. Started the engine and checked performance and any fuel leaks.
18. Reinstalled the mower deck and checked for performance.
19. Checked steering performance, steering performance was excellent.
Did you find this story helpful?
Thanks for voting and helping fellow customers!
Steering loose, worn out
George - May 24, 2017
👍 5 of 5 people found this instruction helpful
Tool Type
Lawn Tractor
Difficulty
Medium
Time
1-2 hours
Tools Used
Pliers, Socket set, Wrench Set
Parts Used
1, Removed the mower deck
2, Removed the battery
3, Removed the battery box
4, Removed the steering wheel
5, Removed steering extension
6, Removed the linkages
7, Removed the old steering kit
8, Installed the new steering kit and everything
2, Removed the battery
3, Removed the battery box
4, Removed the steering wheel
5, Removed steering extension
6, Removed the linkages
7, Removed the old steering kit
8, Installed the new steering kit and everything
Did you find this story helpful?
Thanks for voting and helping fellow customers!
A 1996 Craftsman Model 917-256522, the steering gears were worn out (stripped), mower wouldn't turn left.
Doug - January 13, 2017
👍 4 of 5 people found this instruction helpful
Tool Type
Lawn Mower
Difficulty
Medium
Time
1-2 hours
Tools Used
Screwdriver, Socket set, Wrench Set
Parts Used
1. Removed steering wheel insert (cover) with a flat head screw driver, the 9/16" steering wheel bolt, the steering wheel boot, the 1/2" steering shaft extension bolt, removed the steering wheel assembly, the lower steering shaft holder (two 3/8" bolts), the gas tank (two 3/8" bolts) and cover to steering shaft compartment (wing clip).
2. Removed steering pitman arm connection below the compartment and above mower deck (1/2" and 9/16" combination wrenches, tight work space).
3. Removed four 9/16" bolts holding the steering assembly in place, three with a 1/4" ratchet with 6" extension, the other by hand with a combination wrench (hard to get at).
5. Installed new steering assembly, four base bolts and connected the steering pitman arm.
6. Centered wheels and reinstalled steering wheel. Reinstalled gas tank and compartment cover.
7. Tested steering. Okay.
Did you find this story helpful?
Thanks for voting and helping fellow customers!
Mower would not turn-stripped steering gear
J. - November 26, 2018
👍 2 of 2 people found this instruction helpful
Tool Type
Lawn Tractor
Difficulty
Medium
Time
30-60 minutes
Tools Used
Screwdriver, Pliers, Socket set
Parts Used
1. Disconnect battery and remove from mower
2. Removed mower deck
3. Removed battery and battery support plate
4. Removed steering wheel
5. Removed steering column cover
6. Remove steering shaft extension
7. Disconnected steering link
8. Unbolted old steering gear assembly
9. Pre tap new steering kit assembly using original mounting bolts
10. Bolt in new steering kit
11. Reconnect steering link rod
12. Reinstall battery support plate and battery
13. Reinstall steering shaft extension
14. Reinstall steering column cover
15. Reinstall steering wheel
16. Reinstall mower deck
17. Reinstall and connect battery
Did you find this story helpful?
Thanks for voting and helping fellow customers!
Steering column had stripped out
Jacob - September 7, 2017
👍 2 of 2 people found this instruction helpful
Tool Type
Lawn Tractor
Difficulty
Easy
Time
15-30 minutes
Tools Used
Socket set, Wrench Set
Parts Used
Pretty simple pull deck off remove belt remove collar around steering shaft undo bolts on the underside of mower for the unit, remove and reinstall new
Did you find this story helpful?
Thanks for voting and helping fellow customers!
Steering gear was wore out
james - July 16, 2016
👍 2 of 2 people found this instruction helpful
Tool Type
Lawn Tractor
Difficulty
Medium
Time
30-60 minutes
Tools Used
Pliers, Socket set, Wrench Set, None
Parts Used
Removed the hood, fuel tank, steering wheel, steering column extension, column shaft bushing, steering linkage from pitman. I removed the bolts from the under side of the chassis.
Did you find this story helpful?
Thanks for voting and helping fellow customers!
Broken gears on steering shaft.
scott - August 29, 2016
👍 2 of 3 people found this instruction helpful
Tool Type
Lawn Tractor
Difficulty
Easy
Time
15-30 minutes
Tools Used
Screwdriver, Socket set
Installed new steering assembly.
Did you find this story helpful?
Thanks for voting and helping fellow customers!
Steering was worn out.
Charles - July 1, 2020
Tool Type
Lawn Tractor
Difficulty
Easy
Time
1-2 hours
Tools Used
Socket set, Wrench Set
Parts Used
Removed the bad steering shaft assy & replaced it with a new assy & all the steering play was gone.
Did you find this story helpful?
Thanks for voting and helping fellow customers!
Steering gears were stripping. There was play in the steering gear knuckle.
Dan - June 7, 2020
Tool Type
Lawn Tractor
Difficulty
Easy
Time
1-2 hours
Tools Used
Screwdriver, Pliers, Socket set, Wrench Set, Adjustable Wrench
Parts Used
Took off gas tank and steering assembly.
Put on new steering assembly and put the rest back together.
Put on new steering assembly and put the rest back together.
Did you find this story helpful?
Thanks for voting and helping fellow customers!
Tractor wouldn't steer at all
KEVIN - May 20, 2020
Tool Type
Lawn Tractor
Difficulty
Medium
Time
1-2 hours
Tools Used
Screwdriver, Socket set, Wrench Set
Parts Used
remove steering wheel
Remove battery and tray
Remove steering bushing
Remove steering linkage
Remove 4 bolts under frame plate
Tap holes in new steering assembly to 3/8 x 16 nc.
Insert steering column and install bushing
Align holes and install bolts
Reinstall linkage, battery tray and battery and wheel .
Remove battery and tray
Remove steering bushing
Remove steering linkage
Remove 4 bolts under frame plate
Tap holes in new steering assembly to 3/8 x 16 nc.
Insert steering column and install bushing
Align holes and install bolts
Reinstall linkage, battery tray and battery and wheel .
Did you find this story helpful?
Thanks for voting and helping fellow customers!
OEM stands for Original Equipment Manufacturer and means the part you’re buying is sourced directly from the manufacturer who made your product. At eReplacementParts, we sell only genuine OEM parts, guaranteeing the part you’re purchasing is of better design and of higher quality than aftermarket parts.
Our product descriptions are a combination of data sourced directly from the manufacturers who made your product as well as content researched and curated by our content & customer service teams. This content is edited and reviewed internally before being made public to customers.
Our customer service team are at the ready daily to answer your part and product questions. We have a dedicated staff with decades of collective experience in helping customers just like you purchase parts to repair their products.
All our part reviews are solicited directly from other customers who have purchased this exact part. While we moderate these reviews for profanity, offensive language or personally identifiable information, these reviews are posted exactly as submitted and no alterations are made by our team.
All our customer repair instructions are solicited directly from other customers just like you who have purchased and replaced this exact part. While we moderate these reviews for profanity, offensive language or personally identifiable information, these reviews are posted exactly as submitted and no alterations are made by our team.
Based on data from past customer purchasing behaviors, these parts are most commonly purchased together along with the part you are viewing. These parts may be necessary or helpful to replace to complete your current repair.
All our installation videos are created and produced in collaboration with our in-house repair technician, Mark Sodja, who has helped millions of eReplacementParts customers over the last 13 years repair their products. Mark has years of experience in selling and repairing both commercial and residential products with a specialty in gas-powered equipment.
This data is collected from customers who submitted a repair instruction after replacing this exact part. Customers can rate how easy the repair was to complete and how long it took. We aggregate this data to provide a repair rating that allows customers to quickly determine the difficulty and time needed to perform their own repair.