
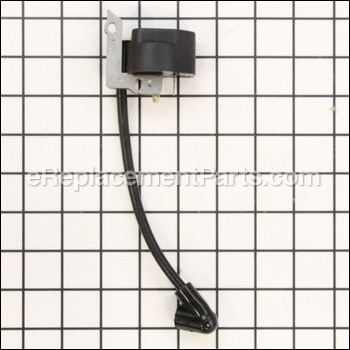
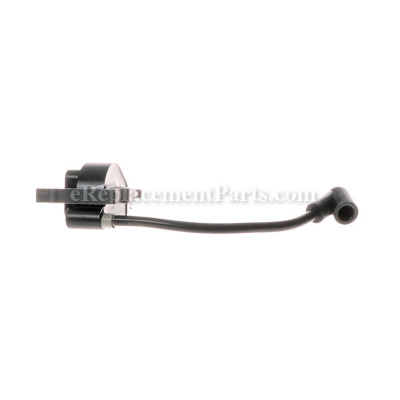


It is an authentic OEM sourced replacement item designed for use with Homelite and Ryobi handheld lawn and garden equipment. The ignition module also known as an armature-magneto provides an electric current for the ignition system. It produces high voltage pulses for the spark plugs. It is made out of metal with a rubberized wire and a spark plug boot. Please note, this ignition module is sold individually.
Ignition Module (w/ 3 Sec.) 850080001
OEM part for: Ryobi, Homelite
Part Number: 850080001
$16.39
Usually ships in 7 - 12 business days
7 - 12 business days
Compatibility
This part will fit the following 91 machines
Ryobi
CS30 (RY30000) 30cc String Trimmer View Diagrams & Manuals
CS30 (RY30000A) 30cc String Trimmer View Diagrams & Manuals
RY30000B 30cc String Trimmer View Diagrams & Manuals
SS30 (RY30002) 30cc String Trimmer View Diagrams & Manuals
SS30 (RY30002A) 30cc String Trimmer View Diagrams & Manuals
RY30002B 30cc String Trimmer View Diagrams & Manuals
BC30 (RY30004) 30cc Brushcutter View Diagrams & Manuals
BC30 (RY30004A) 30cc Brushcutter View Diagrams & Manuals
RY30004B 30cc Brushcutter View Diagrams & Manuals
RY30004D 30cc Brushcutter View Diagrams & Manuals
RY30020 30cc Curved Shaft String Trimmer View Diagrams & Manuals
RY30020A 30cc String Trimmer View Diagrams & Manuals
RY30020B 30cc String Trimmer View Diagrams & Manuals
CS30 (RY30021A) 30cc String Trimmer View Diagrams & Manuals
RY30023 30cc Curved Shaft String Trimmer View Diagrams & Manuals
SS30 (RY30040) 30cc Straight Shaft String Trimmer View Diagrams & Manuals
RY30040A 30cc String Trimmer View Diagrams & Manuals
RY30040B 30cc String Trimmer View Diagrams & Manuals
SS30 (RY30041A) 30cc String Trimmer View Diagrams & Manuals
SS30 (RY30043) 30cc Straight Shaft String Trimmer View Diagrams & Manuals
RY30060A 30cc Brushcutter View Diagrams & Manuals
RY30060B 30cc Brushcutter View Diagrams & Manuals
BC30 (RY30061A) 30cc Brushcutter View Diagrams & Manuals
RY30063 30cc Brushcutter View Diagrams & Manuals
RY52001 Pruner / Trimmer View Diagrams & Manuals
RY52001A Pruner / Trimmer View Diagrams & Manuals
RY52002 Pruner / Trimmer View Diagrams & Manuals
RY52002A Pruner / Trimmer View Diagrams & Manuals
RY52003 Gas Pruner View Diagrams & Manuals
RY52003A Gas Pruner View Diagrams & Manuals
RY52004 30cc Gas Pruner View Diagrams & Manuals
RY52004A Gas Pruner View Diagrams & Manuals
RY30060 30cc Brushcutter View Diagrams & Manuals
RY30000 RY30000 30CC String Trimmer View Diagrams & Manuals
RY30000A RY30000A 30CC String Trimmer View Diagrams & Manuals
RY30002 RY30002 30CC String Trimmer View Diagrams & Manuals
RY30002A RY30002A 30CC String Trimmer View Diagrams & Manuals
RY30004 RY30004 30CC Brushcutter View Diagrams & Manuals
RY30004A RY30004A 30CC Brushcutter View Diagrams & Manuals
RY30021A RY30021A 30CC String Trimmer View Diagrams & Manuals
RY30041A RY30041A 30CC String Trimmer View Diagrams & Manuals
RY30061A RY30061A 30CC Brushcutter View Diagrams & Manuals
RY52002A (PC30) Pruner/Trimmer View Diagrams & Manuals
RY52004 (TP30) 30cc Gas Pruner View Diagrams & Manuals
RY52001A (PC30) Pruner/Trimmer View Diagrams & Manuals
RY52003A (TP30) Gas Pruner View Diagrams & Manuals
RY52001 (PC30) Pruner/Trimmer View Diagrams & Manuals
RY52003 (TP30) Gas Pruner View Diagrams & Manuals
RY52002 (PC30) Pruner/Trimmer View Diagrams & Manuals
RY52004A (TP30) Gas Pruner View Diagrams & Manuals
Homelite
UT-20042 25cc EZ Reach String Trimmer View Diagrams & Manuals
UT-20042-A 25cc EZ Reach String Trimmer View Diagrams & Manuals
UT-20043-A 25cc EZ Reach String Trimmer View Diagrams & Manuals
UT-20022 25cc Trimmer View Diagrams & Manuals
UT-20022-A 25cc Trimmer View Diagrams & Manuals
UT-20023-A 25cc Trimmer View Diagrams & Manuals
UT-20002 25cc Trimmer View Diagrams & Manuals
UT-20002-A 25cc Trimmer View Diagrams & Manuals
UT-20003-A 25cc Trimmer View Diagrams & Manuals
UT15198 (BC1600) Trimmer View Diagrams & Manuals
C1200 (UT-20809) Trimmer View Diagrams & Manuals
UT08514 Yard Broom View Diagrams & Manuals
UT-08542 Vac Attack II Blower View Diagrams & Manuals
UT-08542-A Vac Attack II Blower View Diagrams & Manuals
UT-08542-B Vac Attack II Blower View Diagrams & Manuals
UT-08544 Vac Attack II View Diagrams & Manuals
UT20006 25cc String Trimmer View Diagrams & Manuals
UT20026 String Trimmer View Diagrams & Manuals
UT20046 String Trimmer View Diagrams & Manuals
UT-08121 Backpack Blower View Diagrams & Manuals
UT-08072 Backpacker II Blower View Diagrams & Manuals
UT-08072A Backpacker II Blower View Diagrams & Manuals
UT-08546 Vac Attack II View Diagrams & Manuals
UT08012 Yard Broom II Blower View Diagrams & Manuals
UT08512 Yard Broom II Blower View Diagrams & Manuals
UT08512A Yard Broom II Blower View Diagrams & Manuals
UT08512B Yard Broom II Blower View Diagrams & Manuals
UT20004A (TrimLite) 25 CC String Trimmer View Diagrams & Manuals
UT20004B (TrimLite) 25cc String Trimmer View Diagrams & Manuals
UT08042 Vac Attack II Blowers View Diagrams & Manuals
UT08572 Backpacker II Blower View Diagrams & Manuals
UT08572A Backpacker II Blower View Diagrams & Manuals
UT08929A (Yard Sweeper) Blower View Diagrams & Manuals
UT08930A (Yard Sweeper Vac) Blower View Diagrams & Manuals
UT08947 Vac Attack II View Diagrams & Manuals
UT200044A 25cc String Trimmer View Diagrams & Manuals
UT20810 (S1400) Trimmer View Diagrams & Manuals
UT20024A (Trim N' Edge) 25cc String Trimmer View Diagrams & Manuals
UT20044A (EZ Reach) 25cc String Trimmer View Diagrams & Manuals
UT-08929-A Yard Sweeper Blower View Diagrams & Manuals
UT-08930-A Yard Sweeper Vac Blower View Diagrams & Manuals
Show More Compatible Models
This item works with the following types of products:
- Trimmer Parts
- Pruner Parts
- Blower Parts
- Vacuum Parts
This part replaces obsolete part #: 4306401, PS02762, 308064001
Repair Videos ?
Watch the Repair Video for
Ignition Module (w/ 3 Sec.)

Articles:
|
Ignition Failure? Step-by-step instructions show you how to remove and install the ignition module on your Ryobi trimmer...
September 01, 2016
|

Customer Part Reviews ?
Average Rating (out of 5):
Click to filter by ratings:
5 stars
1
4 stars
0
3 stars
0
2 stars
0
1 stars
0
< PREV
- 1
Perfect fit
The ignition module fit perfectly. The part arrived on time. Trimmer is back in action for under 50.00. Thanks so much!
Guest -
June 19, 2019
Verified Purchase
t
t
t -
t days ago
Verified Purchase
eReplacementParts Team
t
Questions & Answers ?
Our customer Service team is at the ready daily to answer your part and product questions.

Ask our Team
We have a dedicated staff with decades of collective experience in helping customers just like you purchase parts to repair their products.
Does this fit my product?Questions & Answers for Ignition Module (w/ 3 Sec.)
I have a Ryobi ry30530 weed trimmer and I need a new coil, is 850080001 and 308389002 the same coil?
Allen
for model number ry30530
asked on 2023-02-08
Hello Allen, Thank you for contacting us. We have researched the model you have provided and have found the part you are looking for is Part Number:308389002. The 850080001 is not the same as the 308389002 Ignition. We hope this is what you were looking for!
eReplacementParts Team February 08, 2023
Customer Repair Instructions ?
All our customer repair instructions are solicited directly from other customers just like you who have purchased and replaced this exact part.
No power to the spark plug.
Daniel - May 13, 2017
👍 3 of 4 people found this instruction helpful
Tool Type
Trimmer
Difficulty
Easy
Time
15-30 minutes
Tools Used
, Star bit.
I followed the steps laid out in you video. Replaced the bumper and the ignition module. Thanks!
Did you find this story helpful?
Thanks for voting and helping fellow customers!
Coil went bad
Daniel - April 16, 2017
👍 2 of 3 people found this instruction helpful
Tool Type
Trimmer
Difficulty
Medium
Time
15-30 minutes
Tools Used
Screwdriver, Power Drill, Socket set
Parts Used
Removed the four screws to remove lower shaft and made sure to remove the throttle connector and the two wires so could separate the lower shaft.
Removed spark plug and put a piece of pull cord and inserted it into the cylinder. I then used a star screwdriver and remove the drum and connector.
I removed the two clutch plates and washer.
I removed the four screws that secure the starter house.
Once done, I disconnected the red wire and the grounding wires from the ignition module.
Put the new module in place adjusted the space between the magnet and module to 0.010.
I then reversed the process to put back together.
Did you find this story helpful?
Thanks for voting and helping fellow customers!
dog chewed the tip off the spark plug wire
Roger - August 18, 2023
Tool Type
Trimmer
Difficulty
Easy
Time
30-60 minutes
Tools Used
Screwdriver, adjustable spanner wrench
Parts Used
1' removed the shaft to include disconnecting two wires and throttle cable
2 removed the clutch drum and clutch disks you do need an adjustable spanner wrench
3 removed front and back covers
4. replaced ignition coil and plug wire
2 removed the clutch drum and clutch disks you do need an adjustable spanner wrench
3 removed front and back covers
4. replaced ignition coil and plug wire
Did you find this story helpful?
Thanks for voting and helping fellow customers!
OEM stands for Original Equipment Manufacturer and means the part you’re buying is sourced directly from the manufacturer who made your product. At eReplacementParts, we sell only genuine OEM parts, guaranteeing the part you’re purchasing is of better design and of higher quality than aftermarket parts.
Our product descriptions are a combination of data sourced directly from the manufacturers who made your product as well as content researched and curated by our content & customer service teams. This content is edited and reviewed internally before being made public to customers.
Our customer service team are at the ready daily to answer your part and product questions. We have a dedicated staff with decades of collective experience in helping customers just like you purchase parts to repair their products.
All our part reviews are solicited directly from other customers who have purchased this exact part. While we moderate these reviews for profanity, offensive language or personally identifiable information, these reviews are posted exactly as submitted and no alterations are made by our team.
All our customer repair instructions are solicited directly from other customers just like you who have purchased and replaced this exact part. While we moderate these reviews for profanity, offensive language or personally identifiable information, these reviews are posted exactly as submitted and no alterations are made by our team.
Based on data from past customer purchasing behaviors, these parts are most commonly purchased together along with the part you are viewing. These parts may be necessary or helpful to replace to complete your current repair.
All our installation videos are created and produced in collaboration with our in-house repair technician, Mark Sodja, who has helped millions of eReplacementParts customers over the last 13 years repair their products. Mark has years of experience in selling and repairing both commercial and residential products with a specialty in gas-powered equipment.
This data is collected from customers who submitted a repair instruction after replacing this exact part. Customers can rate how easy the repair was to complete and how long it took. We aggregate this data to provide a repair rating that allows customers to quickly determine the difficulty and time needed to perform their own repair.