
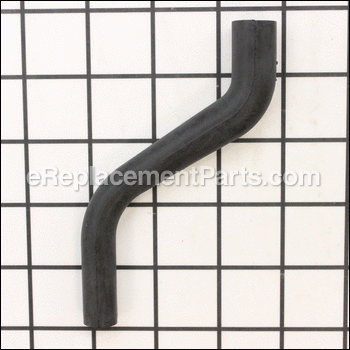
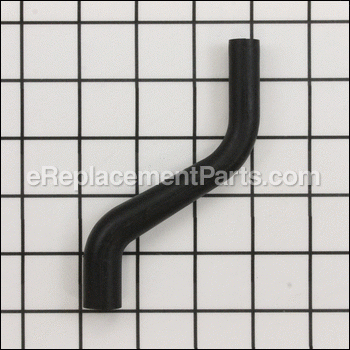


Hose, Breather 12 326 03-S
OEM part for: Kohler, MTD, Toro, Craftsman
Part Number: 12 326 03-S
$11.75
In Stock
Jump To:
Frequently Purchased Together ?

Compatibility
This Hose, Breather will fit the following 443 machines. Confirm this part works with your model, and view the detailed model diagrams and repair help we have to offer.
MTD
Kohler
Toro
30527 (230000001-230999999) Mid-size Mower, Proline Pistol Grip Hydro 15 Hp W/ 36-in. Sd Mower, 2003
30528 (230000001-230999999) Mid-size Mower, Proline Pistol Grip Hydro 15 Hp W/ 48-in. Sd Mower, 2003
Craftsman
Show More Compatible ModelsThis item works with the following types of products:
- Lawn Mower Parts
- Engine Parts
- Lawn Tractor Parts
This part replaces obsolete part #: 12-326-03, 1232603, KH-12-326-03
Customer Part Reviews ?
Average Rating (out of 5):
Click to filter by ratings:
5 stars
4
4 stars
0
3 stars
0
2 stars
0
1 stars
1
< PREV
- 1
Great part
It was right part, arrived quickly. Definitely will recommend and will order from here again should we have other repairs!
Guest -
April 13, 2023
Verified Purchase
Easy replacement for missing part
Arrived quickly, perfect fit.
Guest -
June 13, 2022
Verified Purchase
Perfect replacement part
I have purchased several items from you and have always had great customer service and great products. Thank you
Guest -
September 1, 2021
Verified Purchase
brought old lawn tractor back to life
Great service, easy and the parts were a perfect fit.
Dan -
August 6, 2021
Verified Purchase
Wrong hose
The hose I received was wrong part
Guest -
May 1, 2019
Verified Purchase
eReplacementParts Team
Hi Brian, Thank you for your review. Please accept our apologies that you received the wrong part. We will contact you shortly with information.
Questions & Answers ?
Our customer Service team is at the ready daily to answer your part and product questions.

Ask our Team
We have a dedicated staff with decades of collective experience in helping customers just like you purchase parts to repair their products.
Does this fit my product?Questions & Answers for Hose, Breather
No questions have been asked yet
Customer Repair Instructions ?
All our customer repair instructions are solicited directly from other customers just like you who have purchased and replaced this exact part.
Surging Engine with stalling, unusable
Reid - June 11, 2018
👍 1 of 1 people found this instruction helpful
Tool Type
Engine
Difficulty
Easy
Time
30-60 minutes
Tools Used
Screwdriver, Pliers, Socket set, Adjustable Wrench
1. Disconnect battery. Positive and negative both for safety. Socket set.
2. Disconnect push terminal wire from fuel shut off solenoid on bottom of carburetor. Pull by hand.
3. Remove hose clamps from breather tube. Pliers.
4. Remove breather tube. Pull by hand.
5. You may remove the air filter housing lid, wing nut, gasket and air filter to aid in removal and install of carburetor. I did not for this procedure.
6. Remove hose clamps from fuel hose on right side of carburetor going into the metal fuel line. Pliers.
7. Carefully twist the fuel hose to break it free from the carburetor and metal fuel line. By hand. (if really stuck, use pliers that fit well around the hose and carefully apply light pressure while turning the fuel hose with the pliers.) It should break free using this method. Take extreme caution or have new fuel line ready to replace.
8. Remove the two mounting nuts securing the air cleaner box AND carburetor in place. Take care as there is a small washer and lock washer for the carburetor ground wire on the right side stud.
9. Gently pull the air cleaner and separate from the carburetor, set aside.
10. Make sure the throttle is in the full choke position, then carefully slide the carburetor off the studs. The throttle and choke cables will still be connected.
11. Carefully tilt the carburetor to remove the throttle and choke cables one at a time.
12. Carburetor removed. Clean all gasket surfaces extremely well. Both sides of the carburetor, the engine intake to carburetor surface and the air cleaner to carburetor surface. On the metal surfaces, very light pressure with a scotch bright pad should do the trick. A little carburetor cleaner may help. Use your fingernail or a plastic scraper to remove excess gasket material from non-metal surfaces.
13. Disassemble carburetor by using an adjustable wrench, removing the fuel shut off solenoid. Take care here as fuel will likely leak from the carburetor.
14. Using a small razor blade and extreme care, scrape the excess gasket material from the ring type gasket area at the base of the threads on the fuel shut off solenoid. DO NOT scrape towards yourself as you could injure yourself or gouge the sealing surface. Install new gasket and rubber stop onto fuel shutoff solenoid. Set aside.
15. Twist the float bowl by hand to release it from the carburetor.
16. Clean the bowl thoroughly with carburetor cleaner and wipe away any excess debris. Set aside.
17. Carefully remove the float retaining pin by tapping one end very lightly with a small tool and use needle nose pliers from the other end to pull it out. Set it aside. Carefully remove the float and needle valve together. Set aside the old needle valve. Clean the float and make sure there is zero liquid inside of it and no signs of cracks or holes. It MUST float. Set aside.
18. Saturate the insides of the carburetor with carburetor cleaner. Using a very fine wire(bread tie in my case), run the wire through the tiny jets and ports in the carburetor. IF you have a straw, some times you can force the carburetor cleaner through the small orifices with the concentrated jet from the cleaner. Once satisfied that all orifices have been cleaned, saturate once more with carburetor cleaner to rinse out any left over debris. Ensure the throttle and choke plates operate fully by opening and closing.
19. Clean old float bowl gasket material from carburetor.
20. Install new needle into float.
21. Holding carburetor upside down, install float assembly into carburetor. Carefully press in the retaining pin by hand.
22. Still holding carburetor upside down, set the float bowl gasket into place on the carburetor followed by the float bowl.
23. Using the fuel shutoff solenoid with new gasket and new rubber stop, begin threading it into the hole in the bottom of the float bowl. Tighten finger tight. Then very carefully tighten to specified torque or until a snug resistance is felt. DO NOT over tighten! This could cause severe damage to the carburetor and require the entire carburetor to be replaced. Small tools are best!
24. Install new gasket for carburetor to intake/engine.
25. Carefully install the throttle and choke linkages into the carburetor.
26. Slide the carburetor onto the studs, while working it into place, insert and clamp the fuel hose, connecting the carburetor to the metal fuel inlet line.
27. Install carburetor to air cleaner gasket on to studs.
28. Install air cleaner box onto studs. (reinstall remaining air cleaner components if removed in earlier steps.)
29. Install the ground wire, washer, and lock washer.
30. Install the mounting nuts. Finger tight. Torque to spec.
31. Install new breather tube with clamps.
32. Install push terminal wire onto bottom of fuel shutoff solenoid.
32. Remove governor spring by positioning the throttle to a position with little/least resistance on the spring. Use pliers to carefully pry it out and then again use the pliers to install the new spring.
33. Ensure all work is complete and fittings are tight. Check for fuel leaks.
34. Reconnect positive and negative battery terminals.
35. Start and enjoy! It will take a few moments longer than usual to start after disconnecting the fuel line and draining the carburetor.
For me, it started up in just a few moments of cranking and is now running extremely well! No surging, no popping or backfires, no stalling. Works well in all throttle positions. Starts right up with little to no effort. Job well done!
Did you find this story helpful?
Thanks for voting and helping fellow customers!
Bowl gasket damaged & hose rotted
Fred - September 13, 2016
Tool Type
Lawn Tractor
Difficulty
Medium
Time
15-30 minutes
Tools Used
Screwdriver, Pliers, Socket set
Removed carb and replaced gaskets, removed breather hosed and replaced with new one.
Did you find this story helpful?
Thanks for voting and helping fellow customers!
OEM stands for Original Equipment Manufacturer and means the part you’re buying is sourced directly from the manufacturer who made your product. At eReplacementParts, we sell only genuine OEM parts, guaranteeing the part you’re purchasing is of better design and of higher quality than aftermarket parts.
Our product descriptions are a combination of data sourced directly from the manufacturers who made your product as well as content researched and curated by our content & customer service teams. This content is edited and reviewed internally before being made public to customers.
Our customer service team are at the ready daily to answer your part and product questions. We have a dedicated staff with decades of collective experience in helping customers just like you purchase parts to repair their products.
All our part reviews are solicited directly from other customers who have purchased this exact part. While we moderate these reviews for profanity, offensive language or personally identifiable information, these reviews are posted exactly as submitted and no alterations are made by our team.
All our customer repair instructions are solicited directly from other customers just like you who have purchased and replaced this exact part. While we moderate these reviews for profanity, offensive language or personally identifiable information, these reviews are posted exactly as submitted and no alterations are made by our team.
Based on data from past customer purchasing behaviors, these parts are most commonly purchased together along with the part you are viewing. These parts may be necessary or helpful to replace to complete your current repair.
All our installation videos are created and produced in collaboration with our in-house repair technician, Mark Sodja, who has helped millions of eReplacementParts customers over the last 13 years repair their products. Mark has years of experience in selling and repairing both commercial and residential products with a specialty in gas-powered equipment.
This data is collected from customers who submitted a repair instruction after replacing this exact part. Customers can rate how easy the repair was to complete and how long it took. We aggregate this data to provide a repair rating that allows customers to quickly determine the difficulty and time needed to perform their own repair.