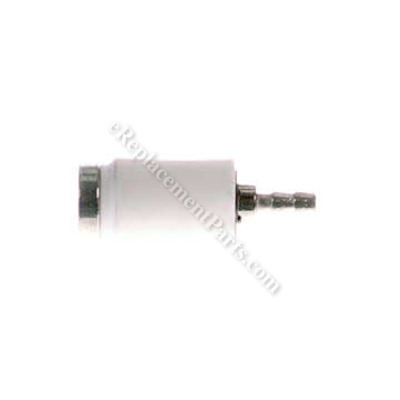


This is a genuine OEM replacement part, it is made out of Metal with Fabric Filter Material. It is sold individually and is used on a variety of Lawn and Garden Equipment. This is an in-tank fuel filter which makes sure that the fuel delivered to the engine is free of any debris or contaminants. It will over time become clogged and restrict the fuel getting to the engine so it will need to be replaced.
Fuel Filter 300759005
OEM part for: Homelite, Ryobi, Toro
Part Number: 300759005
$4.99
In Stock
Jump To:
Frequently Purchased Together ?


Compatibility
This part will fit the following 61 machines
Homelite
UT10540 14 In. 35cc Chainsaw View Diagrams & Manuals
UT10517 Chainsaw View Diagrams & Manuals
UT10518 Chainsaw View Diagrams & Manuals
UT10520 Chainsaw View Diagrams & Manuals
UT10560 16" Gas Chainsaw View Diagrams & Manuals
UT10580 18" Gas Chainsaw View Diagrams & Manuals
UT09521 26cc Blower View Diagrams & Manuals
UT10514 33cc Chainsaw View Diagrams & Manuals
UT10516 33cc Chainsaw View Diagrams & Manuals
UT32601 Gas Trimmer View Diagrams & Manuals
UT10519 46cc Chain Saw View Diagrams & Manuals
UT10522 46CC Chain Saw View Diagrams & Manuals
UT10526 46CC Chain Saw View Diagrams & Manuals
UT10544 14 In. 35cc Chainsaw View Diagrams & Manuals
UT10546 14 In. 35cc Chainsaw View Diagrams & Manuals
UT10564 16 In. 38cc Chainsaw View Diagrams & Manuals
UT10566 16 In. 38cc Chainsaw View Diagrams & Manuals
UT10584 18 In. 42cc Chainsaw View Diagrams & Manuals
UT10586 18 In. 42cc Chainsaw View Diagrams & Manuals
UT09523 26cc Blower View Diagrams & Manuals
UT10548 14 In. 35cc Chainsaw View Diagrams & Manuals
UT10568 16 In. 38cc Chainsaw View Diagrams & Manuals
UT10588 18 In. 42cc Chainsaw View Diagrams & Manuals
UT09525 26cc Blower View Diagrams & Manuals
UT10542 14 in. 35cc Chain Saw View Diagrams & Manuals
UT10562 16 in. 38cc Chain Saw View Diagrams & Manuals
UT10582 18 in. 42cc Chain Saw View Diagrams & Manuals
UT32601A 26cc String Trimmers View Diagrams & Manuals
UT32651A 26cc String Trimmers View Diagrams & Manuals
UT10918 18 Inch 42cc Chainsaw View Diagrams & Manuals
RY3714 (Rev01)(090180505)(090180507)(4-27-18) Chain Saw View Diagrams & Manuals
RY3714 (Rev05)(090180501)(4-27-18) 37cc Chain Saw (Rev:05) View Diagrams & Manuals
RY3716 (Rev01)(090180506)(090180508)(4-27-18) Chain Saw View Diagrams & Manuals
RY3716 (Rev05)(090180502)(4-27-18) 37cc Chain Saw (Rev:05) View Diagrams & Manuals
Ryobi
RY09460 4 Cycle Handheld Blower View Diagrams & Manuals
RY13050A 4 Cycle Wheeled Edger View Diagrams & Manuals
RY64400 4 Cycle Cultivator View Diagrams & Manuals
RY09440 Blower View Diagrams & Manuals
RY10518 18 in. 46cc Chainsaw View Diagrams & Manuals
RY10520 20 in. 46cc Chainsaw View Diagrams & Manuals
RY09053 2 Cycle Blower / Vacuum View Diagrams & Manuals
RY09800 2-Cycle Backpack Blower View Diagrams & Manuals
RY34426 30cc String Trimmers View Diagrams & Manuals
RY34446 30cc String Trimmers View Diagrams & Manuals
RY34006 30cc Power Head Trimmer View Diagrams & Manuals
RY09466 BLOWER View Diagrams & Manuals
RY13016 4-Cycle Wheeled Trimmer View Diagrams & Manuals
RY34007 30CC Power Head Trimmer View Diagrams & Manuals
RY34427 30CC String Trimmer View Diagrams & Manuals
RY34447 30CC String Trimmer View Diagrams & Manuals
RY3716 (090382002) Chain Saws View Diagrams & Manuals
RY3714 (090180501) 37cc Chain Saw View Diagrams & Manuals
RY3818 (090382008) Chain Saw View Diagrams & Manuals
RY3714 (090382009) Chain Saws View Diagrams & Manuals
RY3716 (090180502) 37cc Chain Saw View Diagrams & Manuals
RY3714 (090382003) Chain Saws View Diagrams & Manuals
RY3714 (090180505)(090180507) Chain Saw 090180505 View Diagrams & Manuals
RY3716 (090180506)(090180508) Chain Saw 090180506 View Diagrams & Manuals
RY3716 (090382010) Chain Saws View Diagrams & Manuals
RY3818 (090382001) Chain Saw View Diagrams & Manuals
Toro
51954 17" Curved Shaft Gas Trimmer View Diagrams & Manuals
Show More Compatible Models
This item works with the following types of products:
- Chain Saw Parts
- Saw Parts
- Blower Parts
- Edger Parts
- Cultivator Parts
- Vacuum Parts
- Trimmer Parts
Customer Part Reviews ?
Average Rating (out of 5):
Click to filter by ratings:
5 stars
5
4 stars
0
3 stars
0
2 stars
0
1 stars
0
< PREV
- 1
A quick and easy fix to get my saw working again
The fuel filers were exactly what I needed to get my chainsaw working again. Great service.
Guest -
October 19, 2021
Verified Purchase
Worked as expected
Arrived quickly and in good condition- Thanks
iGlobal -
June 30, 2021
Verified Purchase
Worked as expected
Arrived on time, worked perfectly 👌
Guest -
September 8, 2020
Verified Purchase
Part received and installed without difficulty.
Parts arrived quickly after being ordered, parts were correct and intact. Great Service!
Guest -
July 23, 2020
Verified Purchase
Filter fits
Hey the filter fits fine the hose broke and the can't order a tank.
Guest -
July 9, 2020
Verified Purchase
t
t
t -
t days ago
Verified Purchase
eReplacementParts Team
t
Questions & Answers ?
Our customer Service team is at the ready daily to answer your part and product questions.

Ask our Team
We have a dedicated staff with decades of collective experience in helping customers just like you purchase parts to repair their products.
Does this fit my product?Questions & Answers for Fuel Filter
No questions have been asked yet
Customer Repair Instructions ?
All our customer repair instructions are solicited directly from other customers just like you who have purchased and replaced this exact part.
Running rough
Scott - December 13, 2016
👍 2 of 2 people found this instruction helpful
Tool Type
Chain Saw
Difficulty
Easy
Time
30-60 minutes
Tools Used
Screwdriver, Socket set
Parts Used
1- Empty the fuel tank
2- Make a hook with a wire and fish the fuel line and fuel filter out
3- Remove the old fuel filter from the fuel line, then install the new one
4- Remove the top cover
5- Remove the old air filter and replace it with the new air filter
5- Runs great now
2- Make a hook with a wire and fish the fuel line and fuel filter out
3- Remove the old fuel filter from the fuel line, then install the new one
4- Remove the top cover
5- Remove the old air filter and replace it with the new air filter
5- Runs great now
Did you find this story helpful?
Thanks for voting and helping fellow customers!
Deteriorating fuel lines and cracked primer bulb
Sue - November 14, 2015
👍 2 of 2 people found this instruction helpful
Tool Type
Chain Saw
Difficulty
Medium
Time
1-2 hours
Tools Used
Screwdriver, Pliers, Power Drill
Remove and replace each fuel line one at a time so you don't confuse where each line goes. It helps to cut the end of the line at an angle to make it easier to push into the tank. I also replaced the fuel filter. Snap the primer bulb out of the housing and snap the new one in. Again make sure you get the lines mounted to the correct locations on the primer.
Did you find this story helpful?
Thanks for voting and helping fellow customers!
Old trimer leaked gas and would not start
Ernest - September 13, 2017
👍 1 of 1 people found this instruction helpful
Tool Type
Trimmer
Difficulty
Medium
Time
More than 2 hours
Tools Used
Screwdriver, Power Drill, Star Bit
Replace gas tank and all gaskets. Replace air filter and filter cover with mount. Replaced primer bulb. Replace trimmer hub. Trimmer starts and running well now.
This was my first time to tackle a gas trimmer so it was a learning experience. I could not have done it without the help and tips from Replacement Parts!
This was my first time to tackle a gas trimmer so it was a learning experience. I could not have done it without the help and tips from Replacement Parts!
Did you find this story helpful?
Thanks for voting and helping fellow customers!
Needed to replace gas pickup filter in tank.
thomas - September 6, 2017
👍 1 of 1 people found this instruction helpful
Tool Type
Trimmer
Difficulty
Easy
Time
Less than 15 minutes
Tools Used
, wire
Parts Used
Connected wire to old gas line and new line, Pulled into place with new filter installed on end of new line. Easy repair.
Did you find this story helpful?
Thanks for voting and helping fellow customers!
I fixed my chainsaw
Burnie - November 8, 2023
Tool Type
Chain Saw
Difficulty
Easy
Time
Less than 15 minutes
Tools Used
, Are you serious
Took it apart and replaced the items I purchased
Did you find this story helpful?
Thanks for voting and helping fellow customers!
Saw would only run on primer fuel. Found fuel line had broken just after it entered the tank
Douglas - November 11, 2020
Tool Type
Chain Saw
Difficulty
Medium
Time
30-60 minutes
Tools Used
Screwdriver, Pliers, Torx screwdriver, long needle nose pliers, finger, dish soap
1. Remove top engine cover (2 screws near handle) it fits over the brake handle & carry handle. (This is a good time to clean or replace the air filter- as long as you remember to put it back).
2. Remove starter cord assembly - the cord & reel stays with the housing (3 or 4 screws). You also have to remove the bolt & nut holding the left side of the brake handle and pull that side away from the housing to remove the housing. Pull housing off saw. Fuel line should now be accessible.
3. With needle nose, remove fuel line from tank and carburetor connection.
4. Soap new fuel line (I used dish soap) & insert funny cut end of line into tank.
5. Reach inside of tank with needle nose and GENTLY pull fuel line into tank. It is an interference fit so you have to stretch the fuel line to pull it through the tank. Pull SLOWLY and the line will slide thru the hole in tank.
6. Leave about an inch on the outside of the tank (top) to connect the carburetor nipple.
7. I replaced the fuel filter at this time because I had not changed it since original purchase (~ 10 years).
8. Reinstall pull cord assembly. I had to turn the saw on the tank side down to get the brake handle nut in position to re-engage the bolt. Pull slightly on starter cord to align the clutch pieces so housing will go on completley.
9. Reinstall top cover.
Did you find this story helpful?
Thanks for voting and helping fellow customers!
fuel lines needed to be replaced
Stevan - October 6, 2020
Tool Type
Chain Saw
Difficulty
Medium
Time
30-60 minutes
Tools Used
Screwdriver, Pliers
1. remove cover
2. unscrew bolts holding carberater
3.replace fuel lines to bulb
4. replace fuel line return
5. install fuel filter
6. Reassemble
2. unscrew bolts holding carberater
3.replace fuel lines to bulb
4. replace fuel line return
5. install fuel filter
6. Reassemble
Did you find this story helpful?
Thanks for voting and helping fellow customers!
Refuse to idle / poor spark
Robert - June 25, 2020
Tool Type
Chain Saw
Difficulty
Medium
Time
1-2 hours
Tools Used
Screwdriver, Power Drill, Socket set, Nutdriver, Voltage meter & special nut driver to adjust carb
Disassembled carb and reajusted
Did you find this story helpful?
Thanks for voting and helping fellow customers!
Carburetor malfunction
GEORGE - August 20, 2019
Tool Type
Trimmer
Difficulty
Easy
Time
15-30 minutes
Tools Used
Screwdriver
Parts Used
Replaced carburetor
Did you find this story helpful?
Thanks for voting and helping fellow customers!
needed fuel ines
john - April 21, 2019
Tool Type
Chain Saw
Difficulty
Easy
Time
30-60 minutes
Tools Used
Screwdriver, wire hook
Removed cover
Removed air filter.
Removed and replaced fuel lines.
Installed fuel filter.
Removed air filter.
Removed and replaced fuel lines.
Installed fuel filter.
Did you find this story helpful?
Thanks for voting and helping fellow customers!
Load More Install Stories
OEM stands for Original Equipment Manufacturer and means the part you’re buying is sourced directly from the manufacturer who made your product. At eReplacementParts, we sell only genuine OEM parts, guaranteeing the part you’re purchasing is of better design and of higher quality than aftermarket parts.
Our product descriptions are a combination of data sourced directly from the manufacturers who made your product as well as content researched and curated by our content & customer service teams. This content is edited and reviewed internally before being made public to customers.
Our customer service team are at the ready daily to answer your part and product questions. We have a dedicated staff with decades of collective experience in helping customers just like you purchase parts to repair their products.
All our part reviews are solicited directly from other customers who have purchased this exact part. While we moderate these reviews for profanity, offensive language or personally identifiable information, these reviews are posted exactly as submitted and no alterations are made by our team.
All our customer repair instructions are solicited directly from other customers just like you who have purchased and replaced this exact part. While we moderate these reviews for profanity, offensive language or personally identifiable information, these reviews are posted exactly as submitted and no alterations are made by our team.
Based on data from past customer purchasing behaviors, these parts are most commonly purchased together along with the part you are viewing. These parts may be necessary or helpful to replace to complete your current repair.
All our installation videos are created and produced in collaboration with our in-house repair technician, Mark Sodja, who has helped millions of eReplacementParts customers over the last 13 years repair their products. Mark has years of experience in selling and repairing both commercial and residential products with a specialty in gas-powered equipment.
This data is collected from customers who submitted a repair instruction after replacing this exact part. Customers can rate how easy the repair was to complete and how long it took. We aggregate this data to provide a repair rating that allows customers to quickly determine the difficulty and time needed to perform their own repair.