
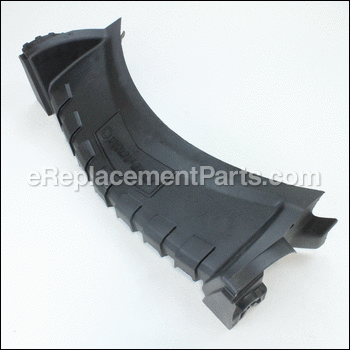
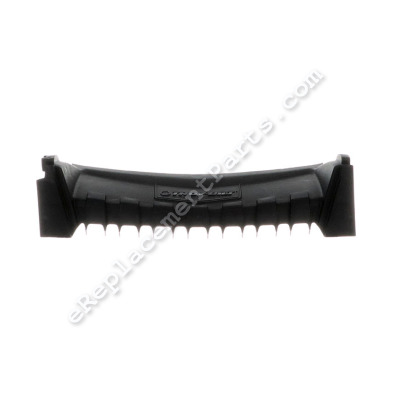

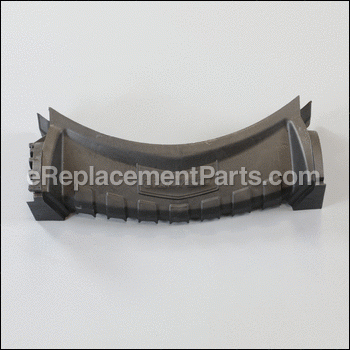

This high-quality cap is supplied by the original equipment manufacturer for use with Troy-Bilt walk-behind lawn mowers. It is an identical replacement for a damaged or a faulty front cover that was installed on a new unit. The purpose of this component is to protect the front axle. Check the owners manual and the diagrams of your model for the exact location and the correct application of this part. Keep in mind this high-quality front cover is made of durable plastic and is sold individually. Replacing it will require a wrench set to remove the old cover and attach the new one.
Front Axle Cover - T 731-11699
OEM part for: Troy-Bilt
Part Number: 731-11699
$31.95
In Stock
Jump To:
Frequently Purchased Together ?


Compatibility
This part will fit the following 120 machines
Troy-Bilt
11A-A26M011 (2010) Push Walk-Behind Mower View Diagrams & Manuals
11A-A26M066 (2010) Push Walk-Behind Mower View Diagrams & Manuals
11A-A26N211 (2010) Push Walk-Behind Mower View Diagrams & Manuals
11A-A26N266 (2010) Push Walk-Behind Mower View Diagrams & Manuals
11A-B29Q711 (2010) Push Walk-Behind Mower View Diagrams & Manuals
11A-B29Q766 (2010) Push Walk-Behind Mower View Diagrams & Manuals
TB110 (11A-A26M011) (2011) Push Walk-Behind Mower View Diagrams & Manuals
TB110 (11A-A26M066) (2011) Push Walk-Behind Mower View Diagrams & Manuals
TB110 (11A-A26N211) (2011) Push Walk-Behind Mower View Diagrams & Manuals
TB130 (11A-B29Q711) (2011) Push Walk-Behind Mower View Diagrams & Manuals
TB130 (11A-B29Q766) (2011) Push Walk-Behind Mower View Diagrams & Manuals
TB110 (11A-A23N011) (2012) Push Walk-Behind Mower View Diagrams & Manuals
TB110 (11A-A23N066) (2012) Push Walk-Behind Mower View Diagrams & Manuals
TB110 (11A-A23O211) (2012) Push Walk-Behind Mower View Diagrams & Manuals
TB130 (11A-B29Q711) (2012) Push Walk-Behind Mower View Diagrams & Manuals
TB130 (11A-B29Q766) (2012) Push Walk-Behind Mower View Diagrams & Manuals
11A-A23O711 (2012) Walk Behind Mower View Diagrams & Manuals
11A-A23O711 (2013) Walk Behind Mower View Diagrams & Manuals
TB1100 (11A-A23O766_2012) Lawn Mower View Diagrams & Manuals
TB1100 (11A-A23O766_2013) Lawn Mower View Diagrams & Manuals
TB110 (11A-A23O711)(2012) Lawn Mower View Diagrams & Manuals
TB110 (11A-A23O766)(2012) Lawn Mower View Diagrams & Manuals
TB110 (11A-A23O766)(2013) Lawn Mower View Diagrams & Manuals
TB110 (11A-A23O711)(2013) Lawn Mower View Diagrams & Manuals
TB130 (11A-B29Q711)(2013) Lawn Mower View Diagrams & Manuals
TB130 (11A-B29Q766)(2013) Lawn Mower View Diagrams & Manuals
TB110 (11A-A23O711)(2014) Lawn Mower View Diagrams & Manuals
TB110 (11A-A23O766)(2014) Lawn Mower View Diagrams & Manuals
TB110 (11A-A2BM711)(2014) Lawn Mower View Diagrams & Manuals
TB110 (11A-A2BM766)(2014) Lawn Mower View Diagrams & Manuals
TB115 (11A-B2BM766)(2014) Lawn Mower View Diagrams & Manuals
TB120 (11A-B22J766)(2014) Lawn Mower View Diagrams & Manuals
TB130 (11A-B2AQ711)(2014) Lawn Mower View Diagrams & Manuals
TB105 (11A-A22J766)(TB115)(2015) Lawn Mower View Diagrams & Manuals
TB110 (11A-A2BM711)(2015) Lawn Mower View Diagrams & Manuals
TB110 (11A-A2BM766)(2015) Lawn Mower View Diagrams & Manuals
TB115 (11A-B2BM766)(2015) Lawn Mower View Diagrams & Manuals
TB120 (11A-B22J766)(2015) Lawn Mower View Diagrams & Manuals
TB130 (11A-B2AQ711)(2015) Lawn Mower View Diagrams & Manuals
11A-A22J766 (TB 105)(2016) Lawn Mower View Diagrams & Manuals
11A-A2BM766 (TB 110)(2016) Lawn Mower View Diagrams & Manuals
11A-A2BM711 (TB 110)(2016) Lawn Mower View Diagrams & Manuals
11A-B22J766 (TB 120)(2016) Lawn Mower View Diagrams & Manuals
11A-B2A9711 (TB 130 XP)(2016) Lawn Mower View Diagrams & Manuals
11A-B2A9715 (TB 130 XP)(2016) Lawn Mower View Diagrams & Manuals
11A-B2AQ711 (TB 130)(2016) Lawn Mower View Diagrams & Manuals
11A-B2BM766 (TB 115)(2016) Lawn Mower View Diagrams & Manuals
11A-A2BM711 (TB 110)(2017) Lawn Mower View Diagrams & Manuals
11A-A2BM766 (TB 110)(2017) Lawn Mower View Diagrams & Manuals
11A-B2A9715 (TB 130 XP)(2017) Lawn Mower View Diagrams & Manuals
11A-B2BM766 (TB 115)(2017) Lawn Mower View Diagrams & Manuals
11A-B2M5766 (TB 120)(2017) Lawn Mower View Diagrams & Manuals
11A-B2RQ711 (TB 130 XP)(2017) Lawn Mower View Diagrams & Manuals
11A-B2RQ715 (TB 130 XP)(2017) Lawn Mower View Diagrams & Manuals
11A-B2RQ766 (TB 130 XP)(2017) Lawn Mower View Diagrams & Manuals
11A-A2BM711 (TB 110)(2018) Lawn Mower View Diagrams & Manuals
11A-A2BM766 (TB 110)(2018) Lawn Mower View Diagrams & Manuals
11A-A2M5766 (TB 105)(2018) Lawn Mower View Diagrams & Manuals
11A-B2BM766 (TB 115)(2018) Lawn Mower View Diagrams & Manuals
11A-B2RQ766 (TB 130 XP)(2018) Lawn Mower View Diagrams & Manuals
11A-B2RQ711 (TB 130 XP)(2018) Lawn Mower View Diagrams & Manuals
11A-B2M5766 (TB 120)(2018) Lawn Mower View Diagrams & Manuals
11A-B2SD766 (TB 125)(2018) Lawn Mower View Diagrams & Manuals
11A-A2BM766 (TB 120)(2019) Lawn Mower View Diagrams & Manuals
11A-B0BL723 (TB 100)(2019) Lawn Mower View Diagrams & Manuals
11A-A2SD766 (TB 115)(2019) Lawn Mower View Diagrams & Manuals
11A-B0SD766 (TB 105)(2019) Lawn Mower View Diagrams & Manuals
11A-B1BM723 (TB 110)(2019) Lawn Mower View Diagrams & Manuals
11A-B2AQ723 (TB 160)(2019) Lawn Mower View Diagrams & Manuals
11A-B2BM766 (TB 140)(2019) Lawn Mower View Diagrams & Manuals
11A-A2M5766 (TB 105)(2017) Lawn Mower View Diagrams & Manuals
11A-B2MR766 (TB 130)(2019) Lawn Mower View Diagrams & Manuals
11A-A2SD766 (TB115)(2020) Lawn Mower View Diagrams & Manuals
11A-B0BL723 (TB100)(2020) Lawn Mower View Diagrams & Manuals
11A-B2RQ766 (TB 160 XP)(2019) Lawn Mower View Diagrams & Manuals
11A-B0SD766 (TB105)(2020) Lawn Mower View Diagrams & Manuals
11A-B1BM723 (TB110)(2020) Lawn Mower View Diagrams & Manuals
11A-B2AQ723 (TB160)(2020) Lawn Mower View Diagrams & Manuals
11A-B2MR766 (TB130)(2020) Lawn Mower View Diagrams & Manuals
11A-B2RQ766 (TB160XP)(2020) Lawn Mower View Diagrams & Manuals
11A-A0BL766 (TB105B)(2022) Push Walk-Behind Mower View Diagrams & Manuals
11A-A22J766 (TB105)(TB115)(2015) Tb105 Tb115 Push Walk-Behind Mower View Diagrams & Manuals
11A-A23N011 (TB110)(2012) Push Walk-Behind Mower View Diagrams & Manuals
11A-A23N066 (TB110)(2012) Push Walk-Behind Mower View Diagrams & Manuals
11A-A23O211 (TB110)(2012) Push Walk-Behind Mower View Diagrams & Manuals
11A-A23O711 (TB110)(2014) Push Walk-Behind Mower View Diagrams & Manuals
11A-A23O766 (TB110)(2012) Push Walk-Behind Mower View Diagrams & Manuals
11A-A23O766 (TB110)(2013) Push Walk-Behind Mower View Diagrams & Manuals
11A-A23O766 (TB110)(2014) Push Walk-Behind Mower View Diagrams & Manuals
11A-A26M011 (TB110)(2011) Push Walk-Behind Mower View Diagrams & Manuals
11A-A26M066 (TB110)(2011) Push Walk-Behind Mower View Diagrams & Manuals
11A-A26N211 (TB110)(2011) Push Walk-Behind Mower View Diagrams & Manuals
11A-A2BM711 (TB110)(2014) Push Walk-Behind Mower View Diagrams & Manuals
11A-A2BM711 (TB110)(2015) Push Walk-Behind Mower View Diagrams & Manuals
11A-A2BM766 (TB110)(2014) Push Walk-Behind Mower View Diagrams & Manuals
11A-A2BM766 (TB110)(2015) Push Walk-Behind Mower View Diagrams & Manuals
11A-A2MR766 (TB115)(2021) Push Walk-Behind Mower View Diagrams & Manuals
11A-B0BL723 (TB100)(2021) Push Walk-Behind Mower View Diagrams & Manuals
11A-B0BL723 (TB100)(2022) Push Walk-Behind Mower View Diagrams & Manuals
11A-B0SD766 (TB105)(2021) Push Walk-Behind Mower View Diagrams & Manuals
11A-B1BM723 (TB110)(2021) Push Walk-Behind Mower View Diagrams & Manuals
11A-B1BM723 (TB110)(2022) Push Walk-Behind Mower View Diagrams & Manuals
11A-B22J766 (TB120)(2014) Push Walk-Behind Mower View Diagrams & Manuals
11A-B22J766 (TB120)(2015) Push Walk-Behind Mower View Diagrams & Manuals
11A-B29Q711 (TB130)(2011) Push Walk-Behind Mower View Diagrams & Manuals
11A-B29Q711 (TB130)(2012) Push Walk-Behind Mower View Diagrams & Manuals
11A-B29Q711 (TB130)(2013) Push Walk-Behind Mower View Diagrams & Manuals
11A-B29Q766 (TB130)(2011) Push Walk-Behind Mower View Diagrams & Manuals
11A-B29Q766 (TB130)(2012) Push Walk-Behind Mower View Diagrams & Manuals
11A-B29Q766 (TB130)(2013) Push Walk-Behind Mower View Diagrams & Manuals
11A-B2AQ711 (TB130)(2014) Push Walk-Behind Mower View Diagrams & Manuals
11A-B2AQ711 (TB130)(2015) Push Walk-Behind Mower View Diagrams & Manuals
11A-B2AQ723 (TB160)(2021) Push Walk-Behind Mower View Diagrams & Manuals
11A-B2BM766 (TB115)(2014) Push Walk-Behind Mower View Diagrams & Manuals
11A-B2BM766 (TB115)(2015) Push Walk-Behind Mower View Diagrams & Manuals
11A-B2BM766 (TB125B)(2022) Push Walk-Behind Mower View Diagrams & Manuals
11A-B2MR766 (TB130)(2021) Push Walk-Behind Mower View Diagrams & Manuals
11A-U2V2766 (TB170XP)(2020) Tb170 Xp Push Walk-Behind Mower View Diagrams & Manuals
11A-U2V2766 (TB170XP)(2021) Tb170 Xp Push Walk-Behind Mower View Diagrams & Manuals
11B-B2MR766 (TB130XP)(2021) Tb130 Xp Push Walk-Behind Mower View Diagrams & Manuals
Show More Compatible Models
This item works with the following types of products:
- Lawn Mower Parts
This part replaces obsolete part #: 731-07195A, 731-07195
Customer Part Reviews ?
Average Rating (out of 5):
Click to filter by ratings:
5 stars
5
4 stars
1
3 stars
0
2 stars
0
1 stars
0
< PREV
- 1
Piece of cake
It fit!!
Anonymous -
July 16, 2021
Verified Purchase
Great part. Easy replacement.
Front assembly fit perfectly. Save all old parts and hardware for repair.
Guest -
January 29, 2021
Verified Purchase
TB130 mower part
Great service and fast shipping!
Guest -
August 12, 2020
Verified Purchase
Wonderfully correct.
I found the right part on the easily navigable website. The competitively priced part was promptly sent, arrived in a short period of time and best of all....it fit. Very happy. Will use it again if the situation arises.
Guest -
June 1, 2020
Verified Purchase
Quality part, Fit perfectly, fast shipping!
Item exactly as described. Part was easy to install.
Guest -
November 19, 2019
Verified Purchase
No problems
The part came quickly, in a few days, and was an easy installation. Overall, a good experience
Guest -
April 21, 2020
Verified Purchase
t
t
t -
t days ago
Verified Purchase
eReplacementParts Team
t
Questions & Answers ?
Our customer Service team is at the ready daily to answer your part and product questions.

Ask our Team
We have a dedicated staff with decades of collective experience in helping customers just like you purchase parts to repair their products.
Does this fit my product?Questions & Answers for Front Axle Cover - T
No questions have been asked yet
Customer Repair Instructions ?
All our customer repair instructions are solicited directly from other customers just like you who have purchased and replaced this exact part.
Part of the plastic axle mount in the front cover failed, so the front wheels would not maintain a consistent cutting height. The adjuster plate and lever (part of the axle assembly) had become somewh
Matthew - August 13, 2016
👍 10 of 10 people found this instruction helpful
Tool Type
Lawn Mower
Difficulty
Easy
Time
15-30 minutes
Tools Used
Screwdriver, Socket set, impact wrench
1. The blade was a simple 1-bolt mount. Removed and replaced.
2. The front cover is held on by 5 or 6 self-tapping screws, easily removed once found.
3. Wheel covers pry of with any flat blade; wheels are single bolt, easily removed.
4. Old adjuster plate screws were removed to reuse in new assembly. Old adjuster lever knob pried off for reuse as well.
5. New adjuster plate screwed onto front cover.
6. Old wheels and wheel covers attached to new axle assembly.
7. Axle assembly 'snapped' into front cover.
8. Front cover reattached to mower deck using original screws.
9. Adjuster knob snapped on.
Everything aligned perfectly. No adjustments required.
Did you find this story helpful?
Thanks for voting and helping fellow customers!
The slot that holds the mower front axle was broken on my old front cover
doug - March 27, 2016
👍 9 of 9 people found this instruction helpful
Tool Type
Lawn Mower
Difficulty
Easy
Time
15-30 minutes
Tools Used
Socket set
Parts Used
It was very simple- two bolts on top of deck & I believe 4 under the mower deck- simply undo pull the old front cover, put the height adjustment slot piece on & tighten
Did you find this story helpful?
Thanks for voting and helping fellow customers!
Plastic bent where axil snaps in.
Kevin - May 21, 2017
👍 2 of 2 people found this instruction helpful
Tool Type
Lawn Mower
Difficulty
Easy
Time
Less than 15 minutes
Tools Used
Socket set
Parts Used
Replaced the front cover, then I fabricated the metal plates and screwed it to cover the axle. There were screw holes already there on the front cover, to prevent the problem from ever happening again.
Did you find this story helpful?
Thanks for voting and helping fellow customers!
Plastic broke at bolts that hold it on . Mowing height varied on front
Joseph - April 22, 2024
Tool Type
Lawn Mower
Difficulty
Easy
Time
15-30 minutes
Tools Used
Nutdriver
Parts Used
Elevated it to get to 4 bolts. Very simple.
Did you find this story helpful?
Thanks for voting and helping fellow customers!
Front cover was loose
Mike - July 31, 2023
Tool Type
Lawn Mower
Difficulty
Easy
Time
15-30 minutes
Tools Used
Screwdriver, Socket set, None
Parts Used
Remove the front Axel. Using a socket wrench remove the 5 or 6 screws that hold the front cover.
Screw on the new cover and snap the Axel back on.
Screw on the new cover and snap the Axel back on.
Did you find this story helpful?
Thanks for voting and helping fellow customers!
Front rubber/plastic cover broke.
Keith - May 19, 2023
Tool Type
Lawn Mower
Difficulty
Easy
Time
15-30 minutes
Tools Used
Socket set
Removed old cover with 5 screws
snapped axle/wheels into the new cover
reattached new cover with 5 screws.
Works great
snapped axle/wheels into the new cover
reattached new cover with 5 screws.
Works great
Did you find this story helpful?
Thanks for voting and helping fellow customers!
Front Cover Broken Where Wheel Goes
Juan - October 14, 2022
Tool Type
Lawn Mower
Difficulty
Easy
Time
30-60 minutes
Tools Used
Screwdriver, Socket set
Parts Used
Remove red the old front cover and replaced it with the new front cover. I used the Screwdriver to remove dirt and grass that were covering the screws. Then I remove the screws and old front cover and replaced it with the new front cover and replaced the screws.
Great fit and easy to install.
Great fit and easy to install.
Did you find this story helpful?
Thanks for voting and helping fellow customers!
lawn mower height adjustment for the front wheels did not work.
George - October 28, 2021
Tool Type
Lawn Mower
Difficulty
Medium
Time
1-2 hours
Tools Used
Pliers, Socket set, Wrench Set, Adjustable Wrench
After replacing both front wheels, which were badly worn out, I replaced the adjustment piece thinking this would solve my problem. That was very simple, just 2 bolts.
The root cause of my problem was a worn out front deck, which resulted in the front axle not staying in place. While this sounds like a huge repair job, it's not. Only 4 bolts hold the deck on, the new placement deck fit like a glove, now my mower works fine. I also replaced the front axle, just to be sure, so my "front end" job cost me a lot less than a new mower!
The root cause of my problem was a worn out front deck, which resulted in the front axle not staying in place. While this sounds like a huge repair job, it's not. Only 4 bolts hold the deck on, the new placement deck fit like a glove, now my mower works fine. I also replaced the front axle, just to be sure, so my "front end" job cost me a lot less than a new mower!
Did you find this story helpful?
Thanks for voting and helping fellow customers!
Front cover was damaged causing the front of the mower to drop all the way to the ground which made mowing impossible.
Tyler - June 10, 2021
Tool Type
Lawn Mower
Difficulty
Easy
Time
30-60 minutes
Tools Used
Pliers, Socket set
Parts Used
First, unhooked the spark plug and took off the front wheels. Then removed the height adjuster plate and removed the front axle with retaining ring pliers. Lastly, removed the damaged front cover with the new part, and then put everything back together.
Did you find this story helpful?
Thanks for voting and helping fellow customers!
Front end is plastic and wore out.
Greg - May 9, 2020
Tool Type
Lawn Mower
Difficulty
Easy
Time
15-30 minutes
Tools Used
Screwdriver, Socket set
Undo the five 10mm bolts holding the front end. Remove the front end. Undo the two 10mm bolts securing the height adjustment plate. Pry the front axle out of its retaining clips with a flat head screwdriver.
Reuse bolts to fasten new height adjustment plate to new front end. Reuse five bolts to fasten front end onto lawnmower housing. Align and slap axle into retaining clips.
Reuse bolts to fasten new height adjustment plate to new front end. Reuse five bolts to fasten front end onto lawnmower housing. Align and slap axle into retaining clips.
Did you find this story helpful?
Thanks for voting and helping fellow customers!
Load More Install Stories
OEM stands for Original Equipment Manufacturer and means the part you’re buying is sourced directly from the manufacturer who made your product. At eReplacementParts, we sell only genuine OEM parts, guaranteeing the part you’re purchasing is of better design and of higher quality than aftermarket parts.
Our product descriptions are a combination of data sourced directly from the manufacturers who made your product as well as content researched and curated by our content & customer service teams. This content is edited and reviewed internally before being made public to customers.
Our customer service team are at the ready daily to answer your part and product questions. We have a dedicated staff with decades of collective experience in helping customers just like you purchase parts to repair their products.
All our part reviews are solicited directly from other customers who have purchased this exact part. While we moderate these reviews for profanity, offensive language or personally identifiable information, these reviews are posted exactly as submitted and no alterations are made by our team.
All our customer repair instructions are solicited directly from other customers just like you who have purchased and replaced this exact part. While we moderate these reviews for profanity, offensive language or personally identifiable information, these reviews are posted exactly as submitted and no alterations are made by our team.
Based on data from past customer purchasing behaviors, these parts are most commonly purchased together along with the part you are viewing. These parts may be necessary or helpful to replace to complete your current repair.
All our installation videos are created and produced in collaboration with our in-house repair technician, Mark Sodja, who has helped millions of eReplacementParts customers over the last 13 years repair their products. Mark has years of experience in selling and repairing both commercial and residential products with a specialty in gas-powered equipment.
This data is collected from customers who submitted a repair instruction after replacing this exact part. Customers can rate how easy the repair was to complete and how long it took. We aggregate this data to provide a repair rating that allows customers to quickly determine the difficulty and time needed to perform their own repair.