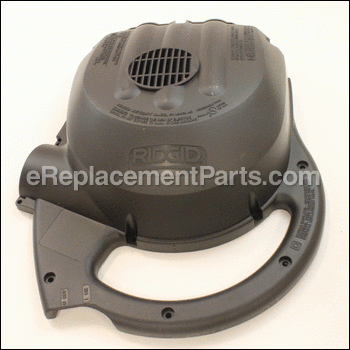

Cover Motor 83812
OEM part for: Ridgid
Part Number: 83812
$26.94
Usually ships in 7 - 12 business days
7 - 12 business days
Compatibility
This part will fit the following 3 machines
Ridgid
WD16650 16 Gallon Wet/Dry Vac View Diagrams & Manuals
WD1665M Wet/Dry Vacuum View Diagrams & Manuals
WD1660 Wet/Dry Vacuum View Diagrams & Manuals
This item works with the following types of products:
- Vacuum Parts
Questions & Answers ?
Our customer Service team is at the ready daily to answer your part and product questions.

Ask our Team
We have a dedicated staff with decades of collective experience in helping customers just like you purchase parts to repair their products.
Does this fit my product?Questions & Answers for Cover Motor
No questions have been asked yet
Customer Repair Instructions ?
All our customer repair instructions are solicited directly from other customers just like you who have purchased and replaced this exact part.
The motor had burned out in my Ridgid shop vacuum after 12+ years of intense usage.
Dave - January 23, 2016
👍 1 of 1 people found this instruction helpful
Tool Type
Vacuum
Difficulty
Easy
Time
30-60 minutes
Tools Used
Screwdriver, Pliers, Power Drill
Use a phillips screw driver or power drill with phillips bit to remove all the motor cover screws. Once the cover is off, take a few minutes to examine the wiring inside the cover. The replacement motor has to attach to the power lead from the on/off switch and to the ground wire. It's pretty basic electrical circuitry. Unclip the leads from the old motor using needle-nose pliers. The leads have clips that slide off the metal tabs. Remove the old motor, then be sure to clean out the bottom cover [mine had sawdust residue and other grime]. Position the new motor in the same spot, put the motor screws back in and connect the electrical leads.
Before replacing the motor cover, make sure the on/off switch is seated property in the handle and that the incoming electrical cord is seated in its special notch on the base cover. Put the motor cover on and replace the screws, making sure to press the two halves of the cover together as you go (this is part of your dust protection). If the halves of the cover don't mate snugly, then take off the top cover and make sure there's nothing impeding the reassembly.
My replacement motor fired up instantly when I plugged it in and I am a happy camper. Thanks, eReplacementparts. Ya done good.
Dave H.
Did you find this story helpful?
Thanks for voting and helping fellow customers!
OEM stands for Original Equipment Manufacturer and means the part you’re buying is sourced directly from the manufacturer who made your product. At eReplacementParts, we sell only genuine OEM parts, guaranteeing the part you’re purchasing is of better design and of higher quality than aftermarket parts.
Our product descriptions are a combination of data sourced directly from the manufacturers who made your product as well as content researched and curated by our content & customer service teams. This content is edited and reviewed internally before being made public to customers.
Our customer service team are at the ready daily to answer your part and product questions. We have a dedicated staff with decades of collective experience in helping customers just like you purchase parts to repair their products.
All our part reviews are solicited directly from other customers who have purchased this exact part. While we moderate these reviews for profanity, offensive language or personally identifiable information, these reviews are posted exactly as submitted and no alterations are made by our team.
All our customer repair instructions are solicited directly from other customers just like you who have purchased and replaced this exact part. While we moderate these reviews for profanity, offensive language or personally identifiable information, these reviews are posted exactly as submitted and no alterations are made by our team.
Based on data from past customer purchasing behaviors, these parts are most commonly purchased together along with the part you are viewing. These parts may be necessary or helpful to replace to complete your current repair.
All our installation videos are created and produced in collaboration with our in-house repair technician, Mark Sodja, who has helped millions of eReplacementParts customers over the last 13 years repair their products. Mark has years of experience in selling and repairing both commercial and residential products with a specialty in gas-powered equipment.
This data is collected from customers who submitted a repair instruction after replacing this exact part. Customers can rate how easy the repair was to complete and how long it took. We aggregate this data to provide a repair rating that allows customers to quickly determine the difficulty and time needed to perform their own repair.