
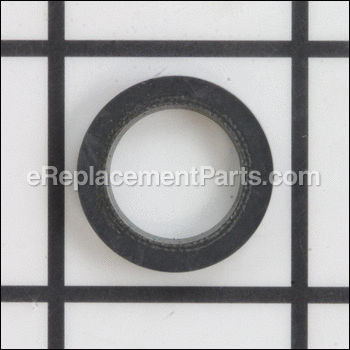
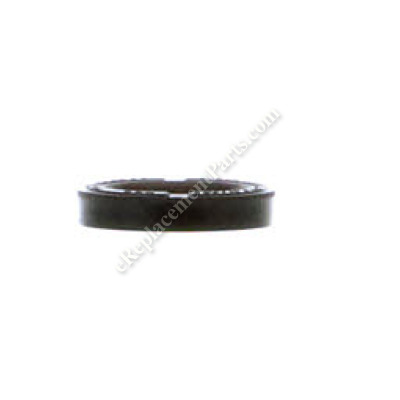


This is a genuine Karcher part. The plastic, compact seal is compatible with many pressure washer machines. The seal is often fitted between the housing low pressure seal and the back ring low pressure seal. Please refer to specific manual and diagrams for repair instructions. This item is used to help prevent lubricant leakage, protect bearings and rotating shafts. The compact seal is sold individually, and a screwdriver is often needed to make the replacement.
Compact Seal 6.365-438.0
OEM part for: Karcher
Part Number: 6.365-438.0
$10.53
In Stock
Jump To:
Frequently Purchased Together ?


Compatibility
This part will fit the following 16 machines
Karcher
HD 2500 G (1.194-112.0) Pressure Washer View Diagrams & Manuals
HD 3000 G (1.187-111.0) Pressure Washer View Diagrams & Manuals
HD 3000 MTD (1.187-114.0) Pressure Washer View Diagrams & Manuals
HD 2700 DB (1.194-116.0) Pressure Washer View Diagrams & Manuals
HD 2700 DH (1.194-117.0) Pressure Washer View Diagrams & Manuals
HD 2700 DH (1.194-118.0) Pressure Washer View Diagrams & Manuals
HD 2701 DR (1.194-200.0) Pressure Washer View Diagrams & Manuals
HD 2500 MTD (1.194-114.0) Pressure Washer View Diagrams & Manuals
HD 3000 DH (1.187-115.0) Pressure Washer View Diagrams & Manuals
HD 3000 DH (1.187-116.0) Pressure Washer View Diagrams & Manuals
HD 2600 DK (1.194-122.0) Pressure Washer View Diagrams & Manuals
HD 2700 DH (1.194-123.0) Pressure Washer View Diagrams & Manuals
G 3000 OH (1.194-509.0) Pressure Washer View Diagrams & Manuals
G 2800 OH (1.194-510.0) Pressure Washer View Diagrams & Manuals
G 4000 RH (18104010) Pressure Washer View Diagrams & Manuals
G 4000 OH (11948010) Pressure Washer View Diagrams & Manuals
Show More Compatible Models
This item works with the following types of products:
- Pressure Washer Parts
This part replaces obsolete part #: 6.365-434.0, 63654340
Customer Part Reviews ?
Average Rating (out of 5):
Click to filter by ratings:
5 stars
2
4 stars
0
3 stars
0
2 stars
0
1 stars
0
< PREV
- 1
Correct parts every time.
Confident leaking power washer will be fixed when I put it to use this spring.
Anonymous -
January 19, 2022
Verified Purchase
Easy repair,great parts
Arrived quickly,exactly parts thanks
Guest -
September 23, 2019
Verified Purchase
t
t
t -
t days ago
Verified Purchase
eReplacementParts Team
t
Questions & Answers ?
Our customer Service team is at the ready daily to answer your part and product questions.

Ask our Team
We have a dedicated staff with decades of collective experience in helping customers just like you purchase parts to repair their products.
Does this fit my product?Questions & Answers for Compact Seal
No questions have been asked yet
Customer Repair Instructions ?
All our customer repair instructions are solicited directly from other customers just like you who have purchased and replaced this exact part.
pressure washer leaking
EVERETTE - March 1, 2024
Tool Type
Pressure Washer
Difficulty
Medium
Time
1-2 hours
Tools Used
Screwdriver, Pliers, Socket set, Nutdriver
Parts Used
- Grooved Ring 14x22x5/7 - 6.365-340.0
- Washer - 5.115-465.0
- Drain Plug Only For Replacemen - 4.132-007.0
- O-ring Seal 14,0 X 1,5-nbr 70 - 6.362-533.0
- Coupling Element 3/4-inch - 9.154-009.0
- O-ring Seal 24,0 X 1,5 - 6.362-376.0
- Grooved Ring 14x22x5.3 - 6.365-432.0
- Compact Seal - 6.365-438.0
- Valve (3 St Ck) - 2.884-916.0
watched and followed youtube videos for the repairs.
Did you find this story helpful?
Thanks for voting and helping fellow customers!
the water seals in the pump head were leaking
Kendall - July 10, 2021
Tool Type
Pressure Washer
Difficulty
Medium
Time
30-60 minutes
Tools Used
Pliers, Wrench Set, metric allen wrenches
Parts Used
removed the pump head. took the seals out of the head and the second set is inside the brass rings in the pump body. pay attention to the lip of the seal to make sure you install the new seals the same way.the The new seals I got for the brass rings, were difficult to tell which way to install. They were a different style, but they worked. I also ordered new o rings for the brass rings and made sure the cooling/lube holes were open in the brass rings as well, It does take a bit of work to get the seals down into the holes of the pump head. Just don't damage the fine outside lip of the seal. Be sure to turn the water on to the pump before starting it up, don't want to run it dry on first start up. Worked good and did not leak.
Did you find this story helpful?
Thanks for voting and helping fellow customers!
leaking water into oil
ab - August 2, 2020
Tool Type
Pressure Washer
Difficulty
Expert
Time
1-2 hours
Tools Used
Screwdriver, Pliers, Wrench Set, Allen wrench-starsocket-spacers to collapse spring with bolt
Drain oil Removed pump and pump head, separated the two, removed old seals and grooved washers from pump and pump head-installed new ones,careful to not force anything, select proper sized socket use to seat seals and washers, use bolts and spacers to collapse pumd springs, install short star screws,work pump shafts into pressure head seals and reassemble. Add oil /finish.
Did you find this story helpful?
Thanks for voting and helping fellow customers!
OEM stands for Original Equipment Manufacturer and means the part you’re buying is sourced directly from the manufacturer who made your product. At eReplacementParts, we sell only genuine OEM parts, guaranteeing the part you’re purchasing is of better design and of higher quality than aftermarket parts.
Our product descriptions are a combination of data sourced directly from the manufacturers who made your product as well as content researched and curated by our content & customer service teams. This content is edited and reviewed internally before being made public to customers.
Our customer service team are at the ready daily to answer your part and product questions. We have a dedicated staff with decades of collective experience in helping customers just like you purchase parts to repair their products.
All our part reviews are solicited directly from other customers who have purchased this exact part. While we moderate these reviews for profanity, offensive language or personally identifiable information, these reviews are posted exactly as submitted and no alterations are made by our team.
All our customer repair instructions are solicited directly from other customers just like you who have purchased and replaced this exact part. While we moderate these reviews for profanity, offensive language or personally identifiable information, these reviews are posted exactly as submitted and no alterations are made by our team.
Based on data from past customer purchasing behaviors, these parts are most commonly purchased together along with the part you are viewing. These parts may be necessary or helpful to replace to complete your current repair.
All our installation videos are created and produced in collaboration with our in-house repair technician, Mark Sodja, who has helped millions of eReplacementParts customers over the last 13 years repair their products. Mark has years of experience in selling and repairing both commercial and residential products with a specialty in gas-powered equipment.
This data is collected from customers who submitted a repair instruction after replacing this exact part. Customers can rate how easy the repair was to complete and how long it took. We aggregate this data to provide a repair rating that allows customers to quickly determine the difficulty and time needed to perform their own repair.