
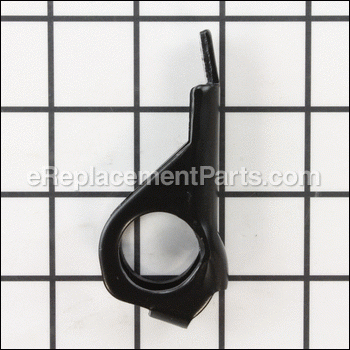

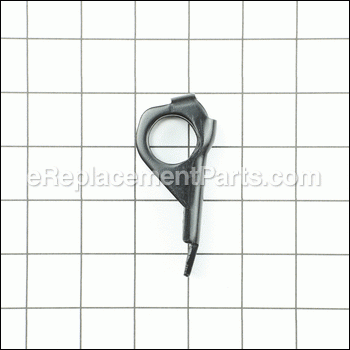

The clamper attaches to the pin and the rubber plug. This item is an OEM from Ryobi for use in table saws. This is available as an individual replacement part. A set of pliers might be needed during the installation process. It is made of metal and will need to be replaced if it breaks.
Clamper-a Bt3000 969252001
OEM part for: Ryobi
Part Number: 969252001
$4.99
Usually ships in 7 - 12 business days
7 - 12 business days
Compatibility
This part will fit the following 3 machines
Ryobi
BT3000 10" Table Saw View Diagrams & Manuals
BT3100 10" Precision Woodcutting Table Saw View Diagrams & Manuals
BT3100-1 10" Table Saw View Diagrams & Manuals
This item works with the following types of products:
- Saw Parts
- Table Saw Parts
Questions & Answers ?
Our customer Service team is at the ready daily to answer your part and product questions.

Ask our Team
We have a dedicated staff with decades of collective experience in helping customers just like you purchase parts to repair their products.
Does this fit my product?Questions & Answers for Clamper-a Bt3000
No questions have been asked yet
Customer Repair Instructions ?
All our customer repair instructions are solicited directly from other customers just like you who have purchased and replaced this exact part.
The handle on the fence of the table saw had stripped
Gerard - May 2, 2018
Tool Type
Table Saw
Difficulty
Easy
Time
15-30 minutes
Tools Used
Screwdriver
I ordered what I needed...even had to call about an hour after ordering. I thought I'd grind one part, but the parts were so reasonably priced , I called a very nice woman who took care of it for me. The repair was just swapping parts.
Did you find this story helpful?
Thanks for voting and helping fellow customers!
Missing set screw, broken quick stop, and discovery of incorrectly installed SS shims were replaced or corrected.
David - April 18, 2018
Tool Type
Table Saw
Difficulty
Easy
Time
More than 2 hours
Tools Used
Screwdriver, Socket set, Wrench Set
Parts Used
One set screw was missing from the Miter table cam latches over the last 14 years of use by the original owner (he and I used this saw beginning in 2004 when he purchased it for a house renovation project). The second owner was my son who upgraded in 2015 after replacing the drive belts. I bought it back from my son and have used it since as a traveling construction quality saw. The parts I have bought have been to keep it serviceable as long as possible. Too many critical parts are no longer available. I will part this out unless I can find someone who has the same feeling. The Ryobi BT3000 is a good quality construction saw, used in conjunction with my 50yo Delta Cabinet saw.
1 Slide B broke, rendering the mitre table useless. It has been replaced and re adjusted.
The quick stop mitre stop broke many years ago.
What was significant and corrected was the mis installation of the SS shims that caused the Blade raise system to lock up. That required 3 total hours of investigation and correction without replacement parts, but the SS shims (Fig 59, parts 86 had to removed, hammered, and correctly reinstalled.
Did you find this story helpful?
Thanks for voting and helping fellow customers!
Table saw fence wouldn't lock in place reliably. It was a safety hazard.
Mike - January 1, 2018
Tool Type
Table Saw
Difficulty
Easy
Time
Less than 15 minutes
Tools Used
Screwdriver
1. Flipped the fence over and removed 2 phillips head screws from the plastic piece behind the cam grip point.
2. Then I slid the pin out with a couple of gentle taps.
3. I pulled out the clamper, roller and handle assembly, and disassembled it to compare old parts to new parts. They matched!
4. I assembled all of the new parts in the same orientation as the old parts.
5. I used a flat screwdriver tip to push back the the tail lock push pin and dropped the new assembly in place, and replaced the plastic piece and 2 screws.
6. I pressed the new pin in place with my fingers.
7. I tightened the handle to secure the pin in place about 1/8th of a turn after contact.
I tested operation and everything worked like new.
Did you find this story helpful?
Thanks for voting and helping fellow customers!
OEM stands for Original Equipment Manufacturer and means the part you’re buying is sourced directly from the manufacturer who made your product. At eReplacementParts, we sell only genuine OEM parts, guaranteeing the part you’re purchasing is of better design and of higher quality than aftermarket parts.
Our product descriptions are a combination of data sourced directly from the manufacturers who made your product as well as content researched and curated by our content & customer service teams. This content is edited and reviewed internally before being made public to customers.
Our customer service team are at the ready daily to answer your part and product questions. We have a dedicated staff with decades of collective experience in helping customers just like you purchase parts to repair their products.
All our part reviews are solicited directly from other customers who have purchased this exact part. While we moderate these reviews for profanity, offensive language or personally identifiable information, these reviews are posted exactly as submitted and no alterations are made by our team.
All our customer repair instructions are solicited directly from other customers just like you who have purchased and replaced this exact part. While we moderate these reviews for profanity, offensive language or personally identifiable information, these reviews are posted exactly as submitted and no alterations are made by our team.
Based on data from past customer purchasing behaviors, these parts are most commonly purchased together along with the part you are viewing. These parts may be necessary or helpful to replace to complete your current repair.
All our installation videos are created and produced in collaboration with our in-house repair technician, Mark Sodja, who has helped millions of eReplacementParts customers over the last 13 years repair their products. Mark has years of experience in selling and repairing both commercial and residential products with a specialty in gas-powered equipment.
This data is collected from customers who submitted a repair instruction after replacing this exact part. Customers can rate how easy the repair was to complete and how long it took. We aggregate this data to provide a repair rating that allows customers to quickly determine the difficulty and time needed to perform their own repair.