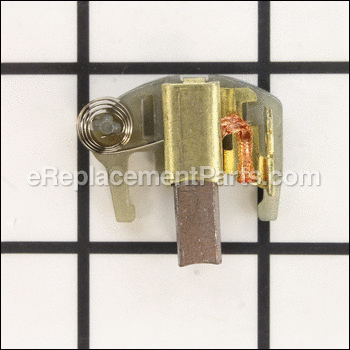

This genuine OEM sourced replacement part is made for use with DeWALT power tools. The purpose of a cabon brush is to conduct the current in an electric motor. Unfortunately, over time it will wear out and it may begin to fail eventually requiring a replacement to ensure peak performance. This high-quality brush box is sold individually, keep in mind it includes the metal holder, the brush and the spring. Please make sure to refer to the appropriate diagrams of your model for the correct location and application of this component.
Not sure if your carbon brush is causing your motor problems? See our power tool repair article: Whodunnit? The brushes or the switch? Whodunnit? The brushes or the switch?" />Brush Box 603754-01
OEM part for: DeWALT
Part Number: 603754-01
$9.49
In Stock
Jump To:
Product Description ?
- Classification: Part
- Weight: 0.01 lbs.
- Also Known As: Carbon Brush, Motor Brush
- Shipping: Ships Worldwide
Frequently Purchased Together ?


Compatibility
This Brush Box will fit the following 139 machines. Confirm this part works with your model, and view the detailed model diagrams and repair help we have to offer.
DeWALT
Show More Compatible ModelsThis item works with the following types of products:
- Cordless Drill Parts
- Drill Parts
- Hammer Drill Parts
- Rotary Hammer Parts
- Screwdriver Parts
- Shear Parts
- Electric Drill Parts
- Jig saw Parts
- Saw Parts
Repair Videos ?
Watch the Repair Video for
Brush Box

Articles:
|
Drill losing power? Learn to quickly remove and replace the motor brushes and holders on your DeWALT drill. Simple instr...
January 20, 2016
|

Customer Part Reviews ?
Average Rating (out of 5):
Click to filter by ratings:
5 stars
34
4 stars
2
3 stars
0
2 stars
0
1 stars
0
< PREV
- 1
- 2
- 3
Perfect fit, as advertised
Arrived as promised, in perfect condition
Ed -
March 19, 2024
Verified Purchase
easy to replace
I needed to get new brushes for my drill so went on line seen how easy it was so order the parts. Anytime a need a part I check out Replacement parts first. Great business to deal with, never an issue and I have order from them many of times.
James -
April 7, 2023
Verified Purchase
correct part for the drill
arrived ad promised.
Guest -
March 15, 2022
Verified Purchase
Easy repair
Exact replacement parts for my drill! Thanks!
Guest -
February 9, 2022
Verified Purchase
Brush replacement
Process to get the replacement brushes for my dewalt xrp drill went flawlessly.
Darrell -
February 1, 2022
Verified Purchase
Fit perfect and easy to replace.
liked the part
Guest -
October 16, 2021
Verified Purchase
satisfied customer-unhappy with your web site
ordering on your website was problematic. Could NOT finalize the order. Called your order center and the order was promptly and efficiently handled by a lady whose name is, I believe, Mona. Your instructional videos are great and eliminate the guess work in making a repair that I have not done before.
Guest -
August 24, 2021
Verified Purchase
Works perfectly.
Part fits great and works well. Drill runs like new.
G -
May 12, 2021
Verified Purchase
dewalt brushs
fast and quick, worked great.
Guest -
May 11, 2021
Verified Purchase
Replacement Brushes for Dewalt Drill
Easy to order. Arrived quickly. Fit perfectly. My old drill runs like new. Spent $16 and saved hundreds.
Guest -
January 30, 2021
Verified Purchase
Questions & Answers ?
Our customer Service team is at the ready daily to answer your part and product questions.

Ask our Team
We have a dedicated staff with decades of collective experience in helping customers just like you purchase parts to repair their products.
Does this fit my product?Questions & Answers for Brush Box
No questions have been asked yet
Customer Repair Instructions ?
All our customer repair instructions are solicited directly from other customers just like you who have purchased and replaced this exact part.
Extreme loss of power
Ronald - November 30, 2015
👍 21 of 21 people found this instruction helpful
Tool Type
Cordless Drill
Difficulty
Easy
Time
Less than 15 minutes
Tools Used
Screwdriver
Parts Used
Remove the 4 screws in the end cover over the handle. The brush boxes are completely exposed. Disconnect the electrical contact, and gently slide the brush box up and out. Just reverse for easy installation.
Did you find this story helpful?
Thanks for voting and helping fellow customers!
Smoking and sparking drill
Jim - May 22, 2016
👍 13 of 15 people found this instruction helpful
Tool Type
Cordless Drill
Difficulty
Medium
Time
15-30 minutes
Tools Used
Screwdriver, Pliers
Easy fix. I did not know the new motor already has the brush set in place ( I also ordered a set of brushes). Now I have a back up set of brushes. After taking the drill casing 1/2 off, I used my cell to take pictures just in case I had problems getting the drill back together. I will say this as a piece of advice for all: Any time you remove any screws from a plastic case, when you are putting the tool back together you should always first turn the screw backwards until you feel a slight click from the screw trying to seat itself. Then change direction to clockwise to drive the screw in. This will keep you from striping the plastic case screw hole.
Did you find this story helpful?
Thanks for voting and helping fellow customers!
Brushes were worn to nothing.
Wilbert - June 14, 2016
👍 7 of 7 people found this instruction helpful
Tool Type
Cordless Drill
Difficulty
Medium
Time
15-30 minutes
Tools Used
Screwdriver, Star pattern screwdriver set
Parts Used
Just remove the 4 rear screws on the Dewalt drill remove the electrical connectors. Brushes are tough getting out and back in but you need that to be the case. Use needle nose pliers and keep firm pressure. Ensure to keep the guides lined up. I smashed one of mine and had to fix the guide so the brush kit slid back into the guide. Easy repair that saves a lot of money. Runs like new again.
Did you find this story helpful?
Thanks for voting and helping fellow customers!
The drill would not always start when I actuated the trigger.
Gregory - April 4, 2016
👍 7 of 7 people found this instruction helpful
Tool Type
Cordless Drill
Difficulty
Easy
Time
15-30 minutes
Tools Used
Screwdriver, hex key
Parts Used
It was simple. I removed the 4 rear drill housing screws using a hex key. I then removed the two wires that clip to the brush boxes. I then used a screw driver to pry out the 2 old brush box assemblies. I cleaned the commutator with a narrow strip of emery cloth and put in the 2 new brush box assemblies. I reconnected the wires, put the rear drill housing back on and fastened it in place with the 4 hex screws.
Look at the new brush boxes before you try prying out the old brush boxes so you can see how the new boxes clip in. It will help you to understand how to pry out the old boxes.
Look at the new brush boxes before you try prying out the old brush boxes so you can see how the new boxes clip in. It will help you to understand how to pry out the old boxes.
Did you find this story helpful?
Thanks for voting and helping fellow customers!
drill motor with worn brushes was smoking - required new brushes.
Robert - November 25, 2015
👍 7 of 7 people found this instruction helpful
Tool Type
Cordless Drill
Difficulty
Easy
Time
Less than 15 minutes
Tools Used
Screwdriver
Parts Used
Removed 4 screws from end cap to reveal brushes.
Unplugged wire leads.
Replaced brushes.
Re-attached wires and replaced end cap.
Tested with no smoke repair successful.
Unplugged wire leads.
Replaced brushes.
Re-attached wires and replaced end cap.
Tested with no smoke repair successful.
Did you find this story helpful?
Thanks for voting and helping fellow customers!
DeWalt drill had loss of power and would not run for long.
Steve - January 6, 2016
👍 6 of 7 people found this instruction helpful
Tool Type
Cordless Drill
Difficulty
Easy
Time
Less than 15 minutes
Tools Used
, Torx key
Parts Used
Attempted the lease expensive repair (new brushes) to resolve the problem, which it did. Opening the drill side was easy with proper Torx key, and brush replacement was straight forward, simply put back as they were. Reassembling was easy if you assure the tabs on the motor (one on each side) are aligned with the pockets in the housing covers. When you first open verify the position of the transmission switch and the forward / reverse switch as these items need to be in same alignment for the housing covers to seat properly.
Did you find this story helpful?
Thanks for voting and helping fellow customers!
Motor in Drill was throwing sparks and smoking
Rick - January 10, 2016
👍 4 of 4 people found this instruction helpful
Tool Type
Cordless Drill
Difficulty
Easy
Time
Less than 15 minutes
Tools Used
Screwdriver, none
Parts Used
Removed back of drill, unplugged wires, pulled old part out, pushed new part in, connected wires, put back of drill back on. Easy, quick and VERY economical !!
THANK YOU, you saved the DeWalt Cordless Drill
Rick
THANK YOU, you saved the DeWalt Cordless Drill
Rick
Did you find this story helpful?
Thanks for voting and helping fellow customers!
Started smoking, then would not power on.
John - September 27, 2016
👍 3 of 3 people found this instruction helpful
Tool Type
Cordless Drill
Difficulty
Medium
Time
15-30 minutes
Tools Used
Screwdriver, Pliers, Torx drivers
Parts Used
1. Removed the torx screw that held the back housing in place
2. Removed the back housing to expose the brushes
3. used pliers to disconnect the brush connections to the commutator
4. Used a flat tip screwdriver to pry up the brush housings
5. Used some electrical solvent to clean the connections and the rotor
6. Blew the system dry with compressed air
7. Slid the new brushes into the housing
8. Reconnected the conductors to the brushes
9. Replaced the housing and the screws
10. Tested the drill with a newly charged battery, works like new.
Did you find this story helpful?
Thanks for voting and helping fellow customers!
Brushes were disintegrating, sparking and throwing chips of graphite out of the vents
Daniel - September 26, 2016
👍 3 of 3 people found this instruction helpful
Tool Type
Cordless Drill
Difficulty
Easy
Time
Less than 15 minutes
Tools Used
Screwdriver, Pliers, Light Hammer with nylon head. torx bit
Parts Used
1.Removed rear cover using torx bit.
2.Remove wire from brush box assemblies (2) with needle nose pliers.
3.Carefully pry the old brush box assemblies straight toward the rear with a small screwdriver. they snap-in and snap out.
4.I wiped the graphite (black powdery substance) off of the contact area on the motor with a paper towel.
5.Insert new brush boxes into the drill. Mine had a tendency to not line up easily so I lined them up and GENTLY tapped them into place with a very light hammer.
6. Reattach the wires to the brush boxes. Reattach the rear cover (do not over tighten the torx screws) and you are as good as new.
Did you find this story helpful?
Thanks for voting and helping fellow customers!
DeWalt drill just stopped
William - February 5, 2016
👍 4 of 5 people found this instruction helpful
Tool Type
Cordless Drill
Difficulty
Easy
Time
Less than 15 minutes
Tools Used
, Allen wrenches
Parts Used
Remove rear cover to motor, use needle nose pliers to remove electrical connections, I used a small flat blade screw driver as a lever to pop out old brushes. I utilized a bent nose needle nose plier to insert new brushes then applied pressure with my thumb to seat them, reattached wire clips, replaced cover and pressed trigger - it worked. Vey easy fix
Did you find this story helpful?
Thanks for voting and helping fellow customers!
Load More Install Stories
OEM stands for Original Equipment Manufacturer and means the part you’re buying is sourced directly from the manufacturer who made your product. At eReplacementParts, we sell only genuine OEM parts, guaranteeing the part you’re purchasing is of better design and of higher quality than aftermarket parts.
Our product descriptions are a combination of data sourced directly from the manufacturers who made your product as well as content researched and curated by our content & customer service teams. This content is edited and reviewed internally before being made public to customers.
Our customer service team are at the ready daily to answer your part and product questions. We have a dedicated staff with decades of collective experience in helping customers just like you purchase parts to repair their products.
All our part reviews are solicited directly from other customers who have purchased this exact part. While we moderate these reviews for profanity, offensive language or personally identifiable information, these reviews are posted exactly as submitted and no alterations are made by our team.
All our customer repair instructions are solicited directly from other customers just like you who have purchased and replaced this exact part. While we moderate these reviews for profanity, offensive language or personally identifiable information, these reviews are posted exactly as submitted and no alterations are made by our team.
Based on data from past customer purchasing behaviors, these parts are most commonly purchased together along with the part you are viewing. These parts may be necessary or helpful to replace to complete your current repair.
All our installation videos are created and produced in collaboration with our in-house repair technician, Mark Sodja, who has helped millions of eReplacementParts customers over the last 13 years repair their products. Mark has years of experience in selling and repairing both commercial and residential products with a specialty in gas-powered equipment.
This data is collected from customers who submitted a repair instruction after replacing this exact part. Customers can rate how easy the repair was to complete and how long it took. We aggregate this data to provide a repair rating that allows customers to quickly determine the difficulty and time needed to perform their own repair.