

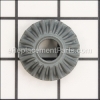
This is a genuine OEM sourced replacement part designed to work with KitchenAid stand mixers. This item houses the transmission gears. It is made out of metal and it includes a compound material gasket. Please note gears, hardware and grease are sold separately. Requires a screwdriver to remove and install the housing.
Housing 8212396
OEM part for: Whirlpool, KitchenAid
Part Number: 8212396
$63.45
In Stock
Jump To:
Frequently Purchased Together ?


Compatibility
This part will fit the following 224 machines
KitchenAid
KP26M1XMR5 (Meringue) Professional 6 Qt. Stand Mixer View Diagrams & Manuals
KP26M1XBS5 (Blue Steel) Professional 6 Qt. Stand Mixer View Diagrams & Manuals
KP26M1XCM5 (Cinnamon) Professional 6 Qt. Stand Mixer View Diagrams & Manuals
KP26M1XDP5 (Dark Pewter) Professional 6 Qt. Stand Mixer View Diagrams & Manuals
KP26M1XLC5 (Licorice) Professional 6 Qt. Stand Mixer View Diagrams & Manuals
KP26M1XMC5 (Metallic Chrome) Professional 6 Qt. Stand Mixer View Diagrams & Manuals
KP26M1XNP5 (Nickel Pearl) Professional 6 Qt. Stand Mixer View Diagrams & Manuals
KP26M1XPM5 (Pearl Metallic) Professional 6 Qt. Stand Mixer View Diagrams & Manuals
KP26M1XBP5 (Brass Pearl) Professional 6 Qt. Stand Mixer View Diagrams & Manuals
KP26M1XBR5 (Bronze Peal) Professional 6 Qt. Stand Mixer View Diagrams & Manuals
KP26M1XCE5 (Copper Pearl) Professional 6 Qt. Stand Mixer View Diagrams & Manuals
KP26M1XRC5 (Cayenne) Professional 6 Qt. Stand Mixer View Diagrams & Manuals
KP26M1XSV5 (Silver Sage) Professional 6 Qt. Stand Mixer View Diagrams & Manuals
KP26M1XSE5 (Seashell) Professional 6 Qt. Stand Mixer View Diagrams & Manuals
KP26M1XAZ5 (Azure Blue) Professional 6 Qt. Stand Mixer View Diagrams & Manuals
KP26M1XER5 (Empire Red) Professional 6 Qt. Stand Mixer View Diagrams & Manuals
KP26M1XWG5 (Williams Sonoma Green) Professional 6 Qt. Stand Mixer View Diagrams & Manuals
KP26M1XOB5 (Onyx Black) Professional 6 Qt. Stand Mixer View Diagrams & Manuals
KP26M1XWH5 (White) Professional 6 Qt. Stand Mixer View Diagrams & Manuals
KP26M1XCV5 (Caviar) Professional 6 Qt. Stand Mixer View Diagrams & Manuals
4KP26M1XMR5 (Meringue) Professional 6 Qt. Stand Mixer View Diagrams & Manuals
4KP26M1XBS5 (Blue Steel) Professional 6 Qt. Stand Mixer View Diagrams & Manuals
4KP26M1XDP5 (Dark Pewter) Professional 6 Qt. Stand Mixer View Diagrams & Manuals
4KP26M1XLC5 (Licorice) Professional 6 Qt. Stand Mixer View Diagrams & Manuals
4KP26M1XMC5 (Metallic Chrome) Professional 6 Qt. Stand Mixer View Diagrams & Manuals
4KP26M1XNP5 (Nickel Pearl) Professional 6 Qt. Stand Mixer View Diagrams & Manuals
4KP26M1XPM5 (Pearl Metallic) Professional 6 Qt. Stand Mixer View Diagrams & Manuals
KP26M1XQBF5 (Buttercup) Professional 6 Qt. Stand Mixer View Diagrams & Manuals
KP26M1XQBW5 (Blue Willow) Professional 6 Qt. Stand Mixer View Diagrams & Manuals
KP26M1XQCV5 (Caviar) Professional 6 Qt. Stand Mixer View Diagrams & Manuals
KP26M1XQER5 (Empire Red) Professional 6 Qt. Stand Mixer View Diagrams & Manuals
KP26M1XQGC5 (Gloss Cinnamon) Professional 6 Qt. Stand Mixer View Diagrams & Manuals
KP26M1XQNP5 (Nickel Pearl) Professional 6 Qt. Stand Mixer View Diagrams & Manuals
KP26M1XQOB5 (Onyx Black) Professional 6 Qt. Stand Mixer View Diagrams & Manuals
KP26M1XQPM5 (Pearl Metallic) Professional 6 Qt. Stand Mixer View Diagrams & Manuals
KP26M1XQPT5 (Pistachio) Professional 6 Qt. Stand Mixer View Diagrams & Manuals
KP26M1XQWH5 (White) Professional 6 Qt. Stand Mixer View Diagrams & Manuals
KP26M1XQCE5 (Copper Pearl) Professional 6 Qt. Stand Mixer View Diagrams & Manuals
KL26M8XOB5 Proline 6 Qt. Bowl Lift Stand Mixer View Diagrams & Manuals
KM25G0XWH5 Commercial 5 Qt. Stand Bowl Lift Mixer View Diagrams & Manuals
KP26M1XMR4 Professional 6 Qt. Stand Mixer View Diagrams & Manuals
KP26M1XBS4 Professional 6 Qt. Stand Mixer View Diagrams & Manuals
KP26M1XCM4 Professional 6 Qt. Stand Mixer View Diagrams & Manuals
KP26M1XDP4 Professional 6 Qt. Stand Mixer View Diagrams & Manuals
KP26M1XLC4 Professional 6 Qt. Stand Mixer View Diagrams & Manuals
KP26M1XMC4 Professional 6 Qt. Stand Mixer View Diagrams & Manuals
KP26M1XNP4 Professional 6 Qt. Stand Mixer View Diagrams & Manuals
KP26M1XPM4 Professional 6 Qt. Stand Mixer View Diagrams & Manuals
KP26M1XBP4 Professional 6 Qt. Stand Mixer View Diagrams & Manuals
KP26M1XBR4 Professional 6 Qt. Stand Mixer View Diagrams & Manuals
KP26M1XCE4 Professional 6 Qt. Stand Mixer View Diagrams & Manuals
KP26M1XRC4 Professional 6 Qt. Stand Mixer View Diagrams & Manuals
KP26M1XSV4 Professional 6 Qt. Stand Mixer View Diagrams & Manuals
KP26M1XSE4 Professional 6 Qt. Stand Mixer View Diagrams & Manuals
KP26M1XAZ4 Professional 6 Qt. Stand Mixer View Diagrams & Manuals
4KP26M1XMR4 Professional 6 Qt. Stand Mixer View Diagrams & Manuals
4KP26M1XBS4 Professional 6 Qt. Stand Mixer View Diagrams & Manuals
4KP26M1XDP4 Professional 6 Qt. Stand Mixer View Diagrams & Manuals
4KP26M1XLC4 Professional 6 Qt. Stand Mixer View Diagrams & Manuals
4KP26M1XMC4 Professional 6 Qt. Stand Mixer View Diagrams & Manuals
4KP26M1XNP4 Professional 6 Qt. Stand Mixer View Diagrams & Manuals
4KP26M1XPM4 Professional 6 Qt. Stand Mixer View Diagrams & Manuals
KV25G0XWW4 Professional 5 Qt. Stand Mixer View Diagrams & Manuals
KV25G0XWH4 Professional 5 Qt. Stand Mixer View Diagrams & Manuals
KV25G0XBU4 Professional 5 Qt. Stand Mixer View Diagrams & Manuals
KV25G0XCV4 Professional 5 Qt. Stand Mixer View Diagrams & Manuals
KV25G0XCY4 Professional 5 Qt. Stand Mixer View Diagrams & Manuals
KV25G0XER4 Professional 5 Qt. Stand Mixer View Diagrams & Manuals
KV25G0XGR4 Professional 5 Qt. Stand Mixer View Diagrams & Manuals
KV25G0XMC4 Professional 5 Qt. Stand Mixer View Diagrams & Manuals
KV25G0XOB4 Professional 5 Qt. Stand Mixer View Diagrams & Manuals
KV25G0XBW4 Professional 5 Qt. Stand Mixer View Diagrams & Manuals
KV25G0XGC4 Professional 5 Qt. Stand Mixer View Diagrams & Manuals
KV25G0XWW5 Professional 5 Qt. Stand Mixer View Diagrams & Manuals
KV25G0XWH5 Professional 5 Qt. Stand Mixer View Diagrams & Manuals
KV25G0XBU5 Professional 5 Qt. Stand Mixer View Diagrams & Manuals
KV25G0XCV5 Professional 5 Qt. Stand Mixer View Diagrams & Manuals
KV25G0XCY5 Professional 5 Qt. Stand Mixer View Diagrams & Manuals
KV25G0XER5 Professional 5 Qt. Stand Mixer View Diagrams & Manuals
KV25G0XGR5 Professional 5 Qt. Stand Mixer View Diagrams & Manuals
KV25G0XMC5 Professional 5 Qt. Stand Mixer View Diagrams & Manuals
KV25G0XOB5 Professional 5 Qt. Stand Mixer View Diagrams & Manuals
KV25G0XBW5 Professional 5 Qt. Stand Mixer View Diagrams & Manuals
KB26G1X (Series 3) 6 QT. Stand Mixer View Diagrams & Manuals
KB26G1X (Series 5) 6 QT. Stand Mixer View Diagrams & Manuals
KG25H0X (Series 4) 5 QT. Professional Stand Mixer View Diagrams & Manuals
KG25H7X (Series 4) 5 QT. Professional Stand Mixer View Diagrams & Manuals
KG25H0X (Series 5) 5 QT. Professional Stand Mixer View Diagrams & Manuals
KG25H7X (Series 5) 5 QT. Professional Stand Mixer View Diagrams & Manuals
KG25H3X (Series 5) 5 QT. Professional Stand Mixer View Diagrams & Manuals
4KG25H3X (Series 5) 5 QT. Professional Stand Mixer View Diagrams & Manuals
KM25G0XWH4 Commercial Mixer View Diagrams & Manuals
KD2661 6 QT. Stand Mixer View Diagrams & Manuals
KT2651 6 QT. Stand Mixer View Diagrams & Manuals
KP2671 6 QT. Stand Mixer View Diagrams & Manuals
KT2651XWW3 6 QT. Stand Mixer View Diagrams & Manuals
KV25G0XQ (Series) Professional 5 Qt. Stand Mixer View Diagrams & Manuals
4KV25H0XMC5 Metallic Chrome 5 Quart Professional 5 Plus Bowl Lift Stand Mixer View Diagrams & Manuals
4KV25H0XWH5 White 5 Quart Professional 5 Plus Bowl Lift Stand Mixer View Diagrams & Manuals
4KV25H0XBK5 Imperial Black 5 Quart Professional 5 Plus Bowl Lift Stand Mixer View Diagrams & Manuals
4KV25H0XER5 Empire Red 5 Quart Professional 5 Plus Bowl Lift Stand Mixer View Diagrams & Manuals
kg25h7xsl (Silver) 5 QT. Stand Mixer View Diagrams & Manuals
kg25h3xwh 5 Qt. Stand Mixer View Diagrams & Manuals
KD2661X 6 Qt. Stand Mixer View Diagrams & Manuals
KT2651X 6 Qt. Stand Mixer View Diagrams & Manuals
KP2671X 6 Qt. Stand Mixer View Diagrams & Manuals
KP2671-3 6 QT. Stand Mixer View Diagrams & Manuals
KT2651?3 6 QT. Stand Mixer View Diagrams & Manuals
KD2661?3 6 QT. Stand Mixer View Diagrams & Manuals
KP2671XWH1 6 Quart Stand Mixer View Diagrams & Manuals
KP2671XWH2 6 Quart Stand Mixer View Diagrams & Manuals
KP2671XWH3 6 Quart Stand Mixer View Diagrams & Manuals
KB26G1XWW3 (White) 6 Qt. Stand Mixer View Diagrams & Manuals
KB26G1XGR3 (Imperial Grey) 6 Qt. Stand Mixer View Diagrams & Manuals
KB26G1XPT3 (Pistachio) 6 Qt. Stand Mixer View Diagrams & Manuals
KB26G1XTG3 (Tangerine) 6 Qt. Stand Mixer View Diagrams & Manuals
KB26G1XOB3 (Onyx Black) 6 Qt. Stand Mixer View Diagrams & Manuals
KB26G1XAC3 (Almond Creme) 6 Qt. Stand Mixer View Diagrams & Manuals
KB26G1XER3 (Empire Red) 6 Qt. Stand Mixer View Diagrams & Manuals
KB26G1XMY3 (Majestic Yellow) 6 Qt. Stand Mixer View Diagrams & Manuals
KB26G1XBU3 (Cobalt Blue) 6 Qt. Stand Mixer View Diagrams & Manuals
KB26G1XGN3 (Empire Green) 6 Qt. Stand Mixer View Diagrams & Manuals
KB26G1XMC3 (Metallic Chrome) 6 Qt. Stand Mixer View Diagrams & Manuals
KB26G1XWW5 (White) 6 Qt. Stand Mixer View Diagrams & Manuals
KB26G1XGR5 (Imperial Grey) 6 Qt. Stand Mixer View Diagrams & Manuals
KB26G1XPT5 (Pistachio) 6 Qt. Stand Mixer View Diagrams & Manuals
KB26G1XTG5 (Tangerine) 6 Qt. Stand Mixer View Diagrams & Manuals
KB26G1XOB5 (Onyx Black) 6 Qt. Stand Mixer View Diagrams & Manuals
KB26G1XAC5 (Almond Creme) 6 Qt. Stand Mixer View Diagrams & Manuals
KB26G1XER5 (Empire Red) 6 Qt. Stand Mixer View Diagrams & Manuals
KB26G1XMY5 (Majestic Yellow) 6 Qt. Stand Mixer View Diagrams & Manuals
KB26G1XBU5 (Cobalt Blue) 6 Qt. Stand Mixer View Diagrams & Manuals
KB26G1XMC5 (Metallic Chrome) 6 Qt. Stand Mixer View Diagrams & Manuals
KP26M8XMC4 6 Qt. Stand Mixer (Metallic Chrome) View Diagrams & Manuals
KP26M8XMC5 6 Qt. Stand Mixer (Metallic Chrome) View Diagrams & Manuals
KP26M8XCP5 6 Qt. Stand Mixer (Satin Copper) View Diagrams & Manuals
KP26M8XNK5 6 Qt. Stand Mixer (Brushed Nickel) View Diagrams & Manuals
KP26M1XACS5 (Cocoa Silver) 6-Qt. Stand Mixer View Diagrams & Manuals
KV25MCXCU Contour Silver Stand Mixer View Diagrams & Manuals
KT2651XAC 6 Qt. Stand Mixer View Diagrams & Manuals
KT2651XBU 6 Qt. Stand Mixer View Diagrams & Manuals
KV25MCXWH5 (White) 5 And 5.5 Qt. Stand Mixer View Diagrams & Manuals
KV25MCXOB5 (Onyx_Black) 5 And 5.5 Qt. Stand Mixer View Diagrams & Manuals
KV25MCXER5 (Empire_Red) 5 And 5.5 Qt. Stand Mixer View Diagrams & Manuals
KV25MCXCU5 (Contour_Silver) 5 And 5.5 Qt. Stand Mixer View Diagrams & Manuals
KV25MCXSL5 (Silver) 5 And 5.5 Qt. Stand Mixer View Diagrams & Manuals
KV25MEXWH5 (White) 5 And 5.5 Qt. Stand Mixer View Diagrams & Manuals
KV25MEXOB5 (Onyx_Black) 5 And 5.5 Qt. Stand Mixer View Diagrams & Manuals
KV25MEXER5 (Empire_Red) 5 And 5.5 Qt. Stand Mixer View Diagrams & Manuals
KV25MEXCU5 (Contour_Silver) 5 And 5.5 Qt. Stand Mixer View Diagrams & Manuals
KV25MEXBU5 (Cobalt_Blue) 5 And 5.5 Qt. Stand Mixer View Diagrams & Manuals
KV25MEXGA5 (Green_Apple) 5 And 5.5 Qt. Stand Mixer View Diagrams & Manuals
KV25MEXGC5 (Gloss_Cinnamon) 5 And 5.5 Qt. Stand Mixer View Diagrams & Manuals
KV25MEXMY5 (Majestic_Yellow) 5 And 5.5 Qt. Stand Mixer View Diagrams & Manuals
KV25MEXPM5 (Pearl_Metallic) 5 And 5.5 Qt. Stand Mixer View Diagrams & Manuals
KV25MEXTG5 (Tangerine) 5 And 5.5 Qt. Stand Mixer View Diagrams & Manuals
KP26M1XBU5 (Cobalt Blue) Professional 6 Qt. Stand Mixer View Diagrams & Manuals
KP26M1XES5 (Espresso) Professional 6 Qt. Stand Mixer View Diagrams & Manuals
KP26M1XGA5 (Green Apple) Professional 6 Qt. Stand Mixer View Diagrams & Manuals
KP26M1XGC5 (Gloss Cinnamon) Professional 6 Qt. Stand Mixer View Diagrams & Manuals
KP26M1XMY5 (Majestic Yellow) Professional 6 Qt. Stand Mixer View Diagrams & Manuals
KP26M1XPK5 (Pink) Professional 6 Qt. Stand Mixer View Diagrams & Manuals
KP26M1XTG5 (Tangerine) Professional 6 Qt. Stand Mixer View Diagrams & Manuals
KP26M1XQG5 (Liquid Graphite) Professional 6 Qt. Stand Mixer View Diagrams & Manuals
KP26M1XAQ5 (Aqua Sky) Professional 6 Qt. Stand Mixer View Diagrams & Manuals
KP26M1XPB5 (Plumberry) Professional 6 Qt. Stand Mixer View Diagrams & Manuals
KP26M1XSL5 (Silver) Professional 6 Qt. Stand Mixer View Diagrams & Manuals
4KP26M1XBY5 (Boysenberry) Professional 6 Qt. Stand Mixer View Diagrams & Manuals
4KP26M1XGA5 (Green Apple) Professional 6 Qt. Stand Mixer View Diagrams & Manuals
4KP26M1XES5 (Espresso) Professional 6 Qt. Stand Mixer View Diagrams & Manuals
KP26M1PGC5 (Gloss Cinnamon) Professional 6 Qt. Stand Mixer View Diagrams & Manuals
KP26M1PSL5 (Silver) Professional 6 Qt. Stand Mixer View Diagrams & Manuals
KP26M1XEPPM5 (Pearl Metallic) Professional 6 Qt. Stand Mixer View Diagrams & Manuals
KP26M1XEPNP5 (Nickel Pearl) Professional 6 Qt. Stand Mixer View Diagrams & Manuals
KP26M1XEPER5 (Empire Red) Professional 6 Qt. Stand Mixer View Diagrams & Manuals
KV25G0XGC5 5 Quart Stand Mixer View Diagrams & Manuals
KP26M1XQBS5 (Blue Steel) Professional 6 Qt. Stand Mixer View Diagrams & Manuals
KV25G0XIC5 Cooktop View Diagrams & Manuals
KP26M1XTZ5 Cooktop View Diagrams & Manuals
KP26M1XFL5 Cooktop View Diagrams & Manuals
KG25H0XDR5 Cooktop View Diagrams & Manuals
KL26M2XER5 Cooktop View Diagrams & Manuals
KP26M1XVB5 Cooktop View Diagrams & Manuals
KP26M1XTZ5 Cooktop View Diagrams & Manuals
KP26M1XFL5 Cooktop View Diagrams & Manuals
KG25H0XDR5 Cooktop View Diagrams & Manuals
KL26M2XER5 Cooktop View Diagrams & Manuals
KP26M1XVB5 Cooktop View Diagrams & Manuals
KP26M9PCER5 Cooktop View Diagrams & Manuals
KP26M9PCCU5 Cooktop View Diagrams & Manuals
KP26M9PCER5 Cooktop View Diagrams & Manuals
KP26M9PCCU5 Cooktop View Diagrams & Manuals
KP26M9PCBM5 Cooktop View Diagrams & Manuals
KP26M1XIC5 Cooktop View Diagrams & Manuals
KV25G0XMH5 Cooktop View Diagrams & Manuals
KP26M1XQ2MY5 Cooktop View Diagrams & Manuals
KP25M0XER5 Cooktop View Diagrams & Manuals
KP26M1XQ2GC5 Cooktop View Diagrams & Manuals
KP26M1XQ2ON5 Cooktop View Diagrams & Manuals
KP26M1XQ2CE5 Cooktop View Diagrams & Manuals
KP26M1XQ2BW5 Cooktop View Diagrams & Manuals
KP26M1XQ2ER5 Cooktop View Diagrams & Manuals
KP26M1XQ2OB5 Cooktop View Diagrams & Manuals
KP25M0XMC5 Cooktop View Diagrams & Manuals
KP26M1XQ2GU5 Cooktop View Diagrams & Manuals
KP26M1XQ2CM5 Cooktop View Diagrams & Manuals
KP26M1XQ2GA5 Cooktop View Diagrams & Manuals
KP26M1XQ2PH5 Cooktop View Diagrams & Manuals
KP25M0XBM5 Cooktop View Diagrams & Manuals
KP26M1XQ2FL5 Cooktop View Diagrams & Manuals
KG25H1XMC5 Cooktop View Diagrams & Manuals
KG25H1XER5 Cooktop View Diagrams & Manuals
KL26M2XSL5 Cooktop View Diagrams & Manuals
KG25H0XCM5 Cooktop View Diagrams & Manuals
KD2661XMC3 Mixer View Diagrams & Manuals
KP26M1XGU5 Mixer View Diagrams & Manuals
KP26M1XMH5 Mixer View Diagrams & Manuals
KP26M1XQ3PT5 Mixer View Diagrams & Manuals
KP26M1XQ3VB5 Mixer View Diagrams & Manuals
Whirlpool
KP25M0XAQ5 Cooktop View Diagrams & Manuals
KP26M1XQ2CU5 Cooktop View Diagrams & Manuals
KP26M1XQ2TZ5 Cooktop View Diagrams & Manuals
KP26M1XQ2VB5 Cooktop View Diagrams & Manuals
KL26M2XOB5 Cooktop View Diagrams & Manuals
Show More Compatible Models
This item works with the following types of products:
- Mixer Parts
This part replaces obsolete part #: W10193480, 9703381, 8211779, 9703671, 9709125, 9707425
Customer Part Reviews ?
Questions & Answers ?
Our customer Service team is at the ready daily to answer your part and product questions.

Ask our Team
We have a dedicated staff with decades of collective experience in helping customers just like you purchase parts to repair their products.
Does this fit my product?Questions & Answers for Housing
No questions have been asked yet
Customer Repair Instructions ?
All our customer repair instructions are solicited directly from other customers just like you who have purchased and replaced this exact part.
Gears grinding
Charlie - August 6, 2017
👍 1 of 1 people found this instruction helpful
Tool Type
Mixer
Difficulty
Medium
Time
1-2 hours
Tools Used
Screwdriver, Ring clip pliers
Replaced all worn parts. Found YouTube video that helped a bunch.
https://www.youtube.com/watch?v=VeCiivPt7hk
https://www.youtube.com/watch?v=VeCiivPt7hk
Did you find this story helpful?
Thanks for voting and helping fellow customers!
Gears head housing broke
Capt - May 3, 2017
Tool Type
Mixer
Difficulty
Medium
Time
15-30 minutes
Tools Used
Screwdriver, Pliers
I watched your you tube video on how to accomplish this repair. It was a great help, Thanks
https://www.youtube.com/watch?v=lsbgUHAGWX4
https://www.youtube.com/watch?v=lsbgUHAGWX4
Did you find this story helpful?
Thanks for voting and helping fellow customers!
Drive gear stripped due to cracked transmission housing
Michael - March 31, 2017
Tool Type
Mixer
Difficulty
Easy
Time
15-30 minutes
Tools Used
Screwdriver, Socket set
Removed broken gears from inside housing. Cleaned out all old grease to remove any metal pieces. I also used an earth magnet all around here I couldn't get all the grease to pick up remaining metal shavings. And there was quite a few on the magnet. Then greased all new gears and bearings and packed grease around the newly assembled transmission. Then I attached new gasket and fastened it down securely. Then replaced cover and trim and back in business!
Did you find this story helpful?
Thanks for voting and helping fellow customers!
Gear was stripped after I tried to use the mixer for more than it was rated ...my mistake!!
Kathleen - March 27, 2017
Tool Type
Mixer
Difficulty
Easy
Time
15-30 minutes
Tools Used
Screwdriver, Pliers, ALOT OF PAPER TOWELS TO REMOVE GREASE
1. Followed the on line directions...Which is more than I did on my mixer!!
2. Opened the housing, removed parts, found my problem.
3. Ordered parts .
4. When parts arrived I set my computer next to the mixer and followed your instructions...Easy!!!
5. Felt good that the job was sooo easy that I used my mixer to make a cake and ate it to celebrate!!!!.
Didn't outline what I did because all I really did was follow your great video.... Thanks!.
Did you find this story helpful?
Thanks for voting and helping fellow customers!
Gears were slipping
gary - February 28, 2017
Tool Type
Mixer
Difficulty
Easy
Time
15-30 minutes
Tools Used
Screwdriver, Pliers, Hammer
Parts Used
Replaced the gears and housing.
Did you find this story helpful?
Thanks for voting and helping fellow customers!
Mixer broke
Daniel - January 16, 2017
Tool Type
Mixer
Difficulty
Expert
Time
30-60 minutes
Tools Used
Screwdriver, lathe
Parts Used
The planetary wheel kept falling off, along with the ring gear. After disassembling the outer housing, it was apparent that the gearbox had a crack with grease leaking out. Ordered a new gearbox upper cover and a can of grease. The gearbox came apart without too much trouble but it took some time to get the old grease out since it was too cold to use the parts washer in garage. To keep the planetary on, I mounted the main vertical shaft in the lathe and drilled and tapped a centered 1/4-28 hole in the lower end. I pushed the disk on the shaft and drilled the clearance hole for the allen cap screw. It was not as nice as a carefully painted white bolt would have been but it held the beater mount back on. The ring gear had fallen out as well so I hammered it back in with a piece of wood and glued it with red loctite. The transmission lid and new gasket went on easily after digging out the broken piece of plastic that had stuck in the alignment hole. It works fine and does not show signs of self disassembly. All is well.
Did you find this story helpful?
Thanks for voting and helping fellow customers!
Transmission Housing cracked along attachment hub gear (prevented attachment operation)
Dariusz - January 15, 2017
Tool Type
Mixer
Difficulty
Easy
Time
Less than 15 minutes
Tools Used
Screwdriver, Very thin putty knife or butter knife and a rubber glove
Parts Used
5qt KitchenAid Professional
1. Removed Exterior cover ( 1 rear screw to remove steel band, 4 screws to remove exterior cover)
2. Remove Transmission Housing ( 4 screws to remove housing)
3. Inspect for any broken gears
4. Apply new gasket onto new Transmission Housing
5. Remove attachment hub gear from old Transmission Housing (pushes out with screwdriver)
6. Place attachment hub gear into new Transmission Housing (with gloved hand)
7. Scrape grease off interior of old Transmission Housing into the new Transmission Housing
8. Use gloved finger coat the new gasket with grease
9. Place new Transmission Housing on. Might need to wiggle attachment hub gear side to side with clean finger.
10. 4 screws to secure housing (you'll see the gap close between the base and housing as your secure the screws)
11. Plug in power and activate to see if any grease is coming out and if everything is moving like it should.
12. Unplug power and install Exterior cover (4 screws to secure exterior cover, 1 rear screw to install steel band)
13. Completed repair
Did you find this story helpful?
Thanks for voting and helping fellow customers!
Mixer making grinding noises and dropping metal shavings into bowl
Michael - January 2, 2017
Tool Type
Mixer
Difficulty
Easy
Time
30-60 minutes
Tools Used
Screwdriver, Putty knife
Parts Used
1. Opened mixer and opened gear box.
2. Removed gears and grease.
3, Determined which parts were worn and needed replacing.
4. Noticed KitchenAid factory had put no grease on planetary gears.
5. Ordered parts.
6. Greased parts with new grease and installed them.
7. Filled gear box and planetary gears with new grease.
8. Closed up gear box and mixer.
9. Mixer now sounds and works great.
Did you find this story helpful?
Thanks for voting and helping fellow customers!
Worn gears
Jim - January 20, 2016
Tool Type
Mixer
Difficulty
Medium
Time
30-60 minutes
Tools Used
Pliers
Used the you tube from your site and followed it step by step. Great video instruction. Thanks.
https://www.youtube.com/watch?v=VeCiivPt7hk
https://www.youtube.com/watch?v=VeCiivPt7hk
Did you find this story helpful?
Thanks for voting and helping fellow customers!
Replacing the transmission housing and shaft Bearing front
Lance - January 13, 2016
Tool Type
Mixer
Difficulty
Easy
Time
15-30 minutes
Tools Used
Screwdriver
Parts Used
This repair is really simple.
1. Remove the label band around the head of the mixer by removing the one screw holding it in place.
2. Remove the 4 screw holding the cover for the head of the mixer in place.
3. Remove the mixer head.
4. Remove 4-5 screws holding the transmission housing in place.
5. Remove old transmission housing.
6. If the gasket is still good, apply some grease to the gasket to form a seal. Replace the gasket.
7. Replace the transmission housing.
8. Replace screws to secure transmission housing.
9. Replace the cover for the head of the mixer.
10. Replace screws to secure the cover.
11. Replace the label band and screw to secure it in place.
Did you find this story helpful?
Thanks for voting and helping fellow customers!
OEM stands for Original Equipment Manufacturer and means the part you’re buying is sourced directly from the manufacturer who made your product. At eReplacementParts, we sell only genuine OEM parts, guaranteeing the part you’re purchasing is of better design and of higher quality than aftermarket parts.
Our product descriptions are a combination of data sourced directly from the manufacturers who made your product as well as content researched and curated by our content & customer service teams. This content is edited and reviewed internally before being made public to customers.
Our customer service team are at the ready daily to answer your part and product questions. We have a dedicated staff with decades of collective experience in helping customers just like you purchase parts to repair their products.
All our part reviews are solicited directly from other customers who have purchased this exact part. While we moderate these reviews for profanity, offensive language or personally identifiable information, these reviews are posted exactly as submitted and no alterations are made by our team.
All our customer repair instructions are solicited directly from other customers just like you who have purchased and replaced this exact part. While we moderate these reviews for profanity, offensive language or personally identifiable information, these reviews are posted exactly as submitted and no alterations are made by our team.
Based on data from past customer purchasing behaviors, these parts are most commonly purchased together along with the part you are viewing. These parts may be necessary or helpful to replace to complete your current repair.
All our installation videos are created and produced in collaboration with our in-house repair technician, Mark Sodja, who has helped millions of eReplacementParts customers over the last 13 years repair their products. Mark has years of experience in selling and repairing both commercial and residential products with a specialty in gas-powered equipment.
This data is collected from customers who submitted a repair instruction after replacing this exact part. Customers can rate how easy the repair was to complete and how long it took. We aggregate this data to provide a repair rating that allows customers to quickly determine the difficulty and time needed to perform their own repair.