


Genuine Ridgid replacement part, this item is sold individually.
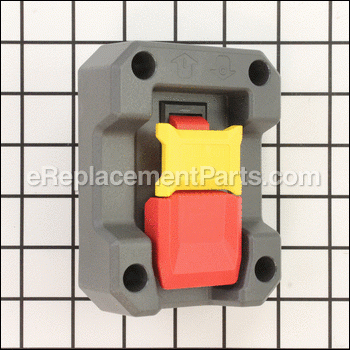
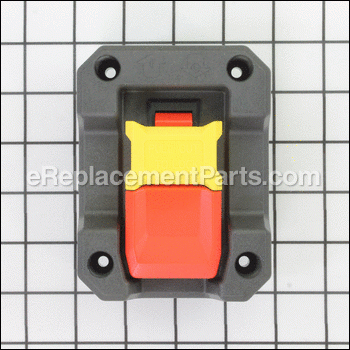
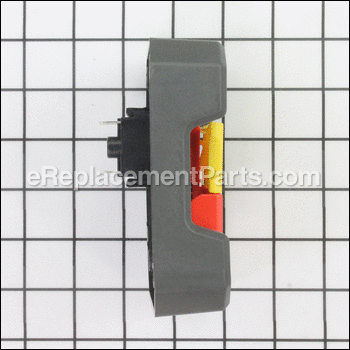
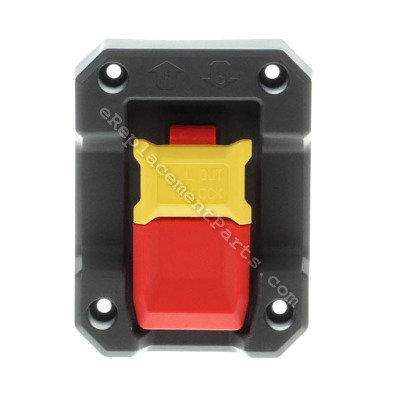
This is the power switch for the Ridgid Table Saws shown below.
It is attached to the saw by using four of the part number 089037006048 Screw.
For unauthorized use of the saw, you can remove the 089037006045 Switch Key.
It is advised to have an extra Switch Key on hand, as they have a tendency to get lost.
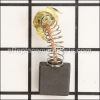
Switch Assembly 089037006705
OEM part for: Ridgid
Part Number: 089037006705
$36.52
In Stock
Jump To:
Product Description ?
- Classification: Part
- Weight: 0.27 lbs.
- Shipping: Ships Worldwide
Frequently Purchased Together ?
Compatibility
This part will fit the following 4 machines
Ridgid
R4510 Portable Table Saw View Diagrams & Manuals
R4516 Table Saw View Diagrams & Manuals
R45101 Table Saw View Diagrams & Manuals
R4517 Table Saw 4-28-18 (Rev:02) View Diagrams & Manuals
This item works with the following types of products:
- Saw Parts
- Table Saw Parts
This part replaces obsolete part #: 089037006704, 089037006009
Customer Part Reviews ?
Average Rating (out of 5):
Click to filter by ratings:
5 stars
7
4 stars
0
3 stars
0
2 stars
0
1 stars
0
< PREV
- 1
Smooth transaction
Easy repair. my bench saw is like new
iGlobal -
February 2, 2023
Verified Purchase
Repair Rigid table saw soft start switch
Part arrived in good condition and repair went smoothly. Table saw works well with new switch.
Guest -
July 18, 2022
Verified Purchase
replacement part.
Exact fit for a replacement part. Quick service and delivery. Original part broke in the middle of a project. Thank you!
Michael -
August 27, 2021
Verified Purchase
Fast delivery - Easy fix
My tablesaw has been giving me issues starting for a while. Was guessing it was the switch so I ordered one from ereplacementparts.com
Part was easy to find on their website, price was great, shipping was fast. Easy install my my saw is now working like new! I HIGHLY recommend buying parts from here. A+ is my book. Thanks.
Guest -
December 29, 2020
Verified Purchase
great job
GREAT JOB ALL AROUND
Thanks
REL
Guest -
July 10, 2020
Verified Purchase
Quick shipping
You had a switch that interchanged with my original which is no longer available
Guest -
November 9, 2019
Verified Purchase
Rigid table saw, model R4510, switch assembly
I received it correctly and delay was Ok
iGlobal -
July 18, 2019
Verified Purchase
t
t
t -
t days ago
Verified Purchase
eReplacementParts Team
t
Questions & Answers ?
Our customer Service team is at the ready daily to answer your part and product questions.

Ask our Team
We have a dedicated staff with decades of collective experience in helping customers just like you purchase parts to repair their products.
Does this fit my product?Questions & Answers for Switch Assembly
On-Off switch vs Soft Start circuit board...my old saw has cut literally miles of lumber, now it has begun to fail at start up with intermittent power surges like a bad connection somewhere in the line. latest issue was it started up made one cut where it barely had RPM to finish and then it just quit! I let it rest a bit, it restarted with same issue and quit without even touching a board to blade. I know On-Off switches do get worn and eventually fail, but I also know the soft start circuit board can be a culprit as well! Trying which to replace!
Dan
for model number R4510
asked on 2022-03-10
Hello Dan, thank you for your question. We do have the Soft Start Switch Assembly part 089037004024 as well as the Switch Assembly 089037006705. If you need help placing an order, customer service is open 7 days a week. Please feel free to give us a call. We look forward to hearing from you.
eReplacementParts Team March 10, 2022
Customer Repair Instructions ?
All our customer repair instructions are solicited directly from other customers just like you who have purchased and replaced this exact part.
The ON/OFF switch burned out.
James - January 27, 2016
👍 19 of 20 people found this instruction helpful
Tool Type
Table Saw
Difficulty
Hard
Time
30-60 minutes
Tools Used
Screwdriver
Parts Used
I removed the four screws holdling the switch to the box with the wires and unplugged the four wires from the ear tabs on back of the switch. Then, I re-connected the wires and re-attached the switch to the box. The hardest part of the repair was aligning the holes in the box to the new switch. The box was inside the saw while the switch was on the outside. It was very difficult to hold the box while putting the screws through the switch holes and aligning them with the plate inside the box. The plate inside the box moves around and must be aligned just right to get the screws and there is no way to directly hole the plate while placing the screws and tightening them.
Did you find this story helpful?
Thanks for voting and helping fellow customers!
Switch was bad. Saw would not come on.
John - May 2, 2018
👍 5 of 5 people found this instruction helpful
Tool Type
Table Saw
Difficulty
Hard
Time
30-60 minutes
Tools Used
Screwdriver
Parts Used
Removed old switch.
Connected wires to new switch.
Attempted to install new switch.
Discovered that screws that hold the switch also hold an electrical box inside saw case. It is nearly impossible to hold box in position inside the case and install new switch. Used switch screws to hold box in place without switch in place. Removed one screw and then put that screw through switch and in place through the case and into electrical box leaving screw very loose. Removed second screw and put screw through switch and case and electrical box. With great difficulty, removed two remaining screws working behind the switch. Finally installed last two screws and tightened all screws.
Did you find this story helpful?
Thanks for voting and helping fellow customers!
Brushes and switch
Kennedy - August 22, 2017
👍 2 of 2 people found this instruction helpful
Tool Type
Table Saw
Difficulty
Easy
Time
15-30 minutes
Tools Used
Screwdriver, Pliers
Removed the screws from the switch housing
Removed the terminals one by one from the old switch to the new switch
Screwed the switch housing back on
Removed the brush caps
Removed the old brushes
Installed the new brushes, then the brush caps
Removed the terminals one by one from the old switch to the new switch
Screwed the switch housing back on
Removed the brush caps
Removed the old brushes
Installed the new brushes, then the brush caps
Did you find this story helpful?
Thanks for voting and helping fellow customers!
Power switch stopped working.
Danial - March 20, 2017
👍 2 of 2 people found this instruction helpful
Tool Type
Table Saw
Difficulty
Easy
Time
15-30 minutes
Tools Used
Screwdriver
Parts Used
Removed switch, tested circuit, replaced switch. The only issue is that the screws holding the switch plate on the saw are to large and the original screws will not tighten the cover to the saw. I feel the original holes were drilled to large a diameter. I have to get larger size, # 12 or 14 screws. That's not a big deal except those size screws commonly come with larger heads that won't fit in the molded well around the hole.
Did you find this story helpful?
Thanks for voting and helping fellow customers!
switch burnt up
bernard - January 30, 2019
👍 1 of 1 people found this instruction helpful
Tool Type
Table Saw
Difficulty
Hard
Time
30-60 minutes
Tools Used
Screwdriver, Pliers
Parts Used
reattached 4 wires on new switch align with inside plastic plate 4 holes put one screw in new switch and in plastic plate reach inside plastic and try to align plastic back wiring box good luck try to hold every thing in place while screwing it together good luck after about 20 tries finally got it the other 3 screws went in fine you really need 2 people to put it together yes it does work
Did you find this story helpful?
Thanks for voting and helping fellow customers!
saw would not start
Danny - January 18, 2019
👍 1 of 1 people found this instruction helpful
Tool Type
Table Saw
Difficulty
Easy
Time
30-60 minutes
Tools Used
Screwdriver, Pliers, Socket set, awl, metric hex wrench set, metric socket set
Parts Used
1. Remove the 4 mounting screws holding the switch assembly to the saw front.
Note which terminals the wires are attach to. Recommend taking a picture of the wires before removing them from the terminals for future reference.
2. You will then discover a metal mounting plate and electrical connection box behind the front of the saw cabinet.
3. Remove the 4 bolts that secure the saw to the mobile base.
4. Lift the saw from mobile base and move to a workbench and lay it on it's back. This gives you access to the mounting plate and electrical box mentioned in step 2.
5. After attaching the wires removed in step one to the replacement switch, use an awl, align the mounting holes of the replacement switch one at a time thru the saw base with the mounting plate and electrical connection box and carefully install the screws that were removed in step one.
6. At this time I recommend you set the saw upright and test to make sure it's operational.
7. Mount the saw back onto the mobile base making sure that you reattach the ground wire to the mounting bolt it came off of.
Did you find this story helpful?
Thanks for voting and helping fellow customers!
Switch needed replacement
Doug - February 1, 2017
👍 1 of 1 people found this instruction helpful
Tool Type
Table Saw
Difficulty
Easy
Time
15-30 minutes
Tools Used
Screwdriver
1. Removed four screws from the old switch and removed it
2. Exchanged the wires from the old switch to the new one
2. Installed new switch
3. Brushes were fine, bought new brushes as spares
2. Exchanged the wires from the old switch to the new one
2. Installed new switch
3. Brushes were fine, bought new brushes as spares
Did you find this story helpful?
Thanks for voting and helping fellow customers!
Switch Failed. Table saw would not start
Tom - July 23, 2023
Tool Type
Table Saw
Difficulty
Medium
Time
30-60 minutes
Tools Used
Screwdriver, Pliers
Parts Used
1. Removed defective switch from Table saw
2. Ordered new switch.
3. Compared wiring.
4. Reconnected new switch.
5. Tested operation.
2. Ordered new switch.
3. Compared wiring.
4. Reconnected new switch.
5. Tested operation.
Did you find this story helpful?
Thanks for voting and helping fellow customers!
Table Saw would not start
Donald - January 13, 2022
Tool Type
Table Saw
Difficulty
Easy
Time
Less than 15 minutes
Tools Used
Screwdriver
Parts Used
Removed the old switch
Put in the new switch
Put in the new switch
Did you find this story helpful?
Thanks for voting and helping fellow customers!
Thought it was a switch problem
McDowell - December 19, 2020
Tool Type
Table Saw
Difficulty
Easy
Time
Less than 15 minutes
Tools Used
Parts Used
It turned out not to be the switch that was bad, it was the motor itself. I had to take it in for repair. I did decide to use the new switch anyway.
Did you find this story helpful?
Thanks for voting and helping fellow customers!
Load More Install Stories
OEM stands for Original Equipment Manufacturer and means the part you’re buying is sourced directly from the manufacturer who made your product. At eReplacementParts, we sell only genuine OEM parts, guaranteeing the part you’re purchasing is of better design and of higher quality than aftermarket parts.
Our product descriptions are a combination of data sourced directly from the manufacturers who made your product as well as content researched and curated by our content & customer service teams. This content is edited and reviewed internally before being made public to customers.
Our customer service team are at the ready daily to answer your part and product questions. We have a dedicated staff with decades of collective experience in helping customers just like you purchase parts to repair their products.
All our part reviews are solicited directly from other customers who have purchased this exact part. While we moderate these reviews for profanity, offensive language or personally identifiable information, these reviews are posted exactly as submitted and no alterations are made by our team.
All our customer repair instructions are solicited directly from other customers just like you who have purchased and replaced this exact part. While we moderate these reviews for profanity, offensive language or personally identifiable information, these reviews are posted exactly as submitted and no alterations are made by our team.
Based on data from past customer purchasing behaviors, these parts are most commonly purchased together along with the part you are viewing. These parts may be necessary or helpful to replace to complete your current repair.
All our installation videos are created and produced in collaboration with our in-house repair technician, Mark Sodja, who has helped millions of eReplacementParts customers over the last 13 years repair their products. Mark has years of experience in selling and repairing both commercial and residential products with a specialty in gas-powered equipment.
This data is collected from customers who submitted a repair instruction after replacing this exact part. Customers can rate how easy the repair was to complete and how long it took. We aggregate this data to provide a repair rating that allows customers to quickly determine the difficulty and time needed to perform their own repair.