
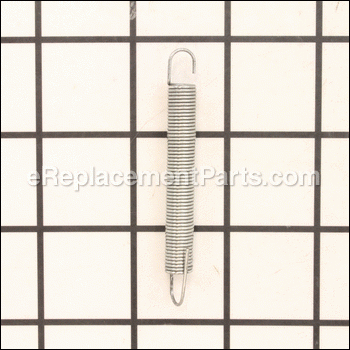
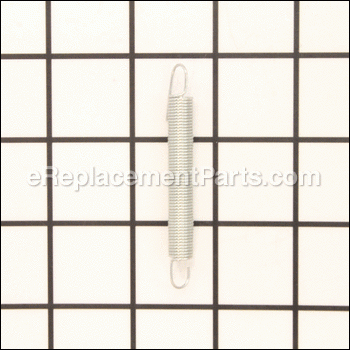
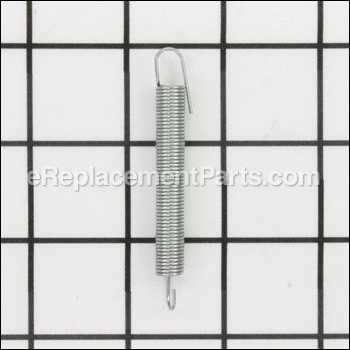
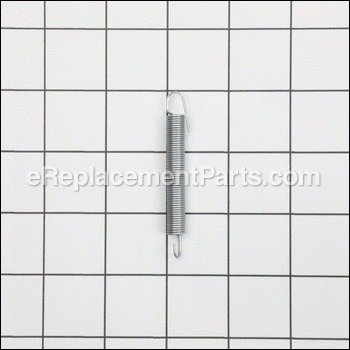
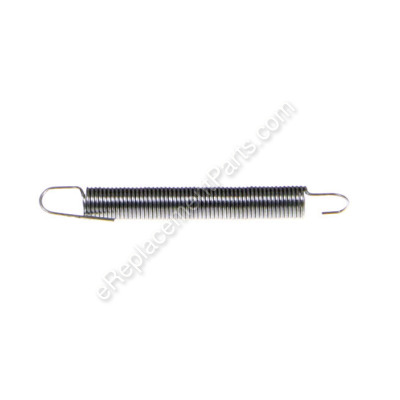


This is a genuine Craftsman Part for use with Line Trimmers. The idler arm return spring returns the idler arm into position, releasing tension on the belt. The most common reason for replacing the spring is if the blades won’t turn. This part is sold individually. The tool that you will need to replace the Idler return spring is Pliers.
Spring 532173811
OEM part for: Husqvarna, Poulan, Weed Eater, Craftsman, Jonsered
Part Number: 532173811
$7.46
In Stock
Jump To:
Frequently Purchased Together ?


Compatibility
This part will fit the following 66 machines
Poulan
PPWT60022 (431477) High Wheeled Trimmer View Diagrams & Manuals
PPWT60022 (412266) High Wheeled Trimmer View Diagrams & Manuals
PPWT60022X (412267) High Wheeled Trimmer View Diagrams & Manuals
PPWT60022X (431476) High Wheeled Trimmer View Diagrams & Manuals
PPWT62522 High Wheeled Trimmer View Diagrams & Manuals
PPWT62522 (96172000401) Wheeled Weedtrimmer View Diagrams & Manuals
Weed Eater
WT4000 Wheeled Weedtrimmer View Diagrams & Manuals
WT420 Wheeled Weedtrimmer View Diagrams & Manuals
PWT420A Wheeled Weedtrimmer View Diagrams & Manuals
WT6000 Wheeled Weedtrimmer View Diagrams & Manuals
Craftsman
917773708 Weed Trimmer View Diagrams & Manuals
917773710 Wheeled Weed Trimmer View Diagrams & Manuals
917773410 Trimmer View Diagrams & Manuals
917.773706 High Wheel Weed Trimmer View Diagrams & Manuals
917773741 Trimmer View Diagrams & Manuals
917773420 Trimmer View Diagrams & Manuals
917773421 Trimmer View Diagrams & Manuals
917773422 Trimmer View Diagrams & Manuals
917773423 Trimmer View Diagrams & Manuals
917773700 Trimmer View Diagrams & Manuals
917773701 Trimmer View Diagrams & Manuals
917773702 Trimmer View Diagrams & Manuals
917773703 Trimmer View Diagrams & Manuals
917773704 Trimmer View Diagrams & Manuals
917773705 Trimmer View Diagrams & Manuals
917773706 Trimmer View Diagrams & Manuals
917773707 Trimmer View Diagrams & Manuals
917773711 Trimmer View Diagrams & Manuals
917773720 Trimmer View Diagrams & Manuals
917773730 Trimmer View Diagrams & Manuals
917773740 Trimmer View Diagrams & Manuals
917773742 Trimmer View Diagrams & Manuals
917773743 Trimmer View Diagrams & Manuals
917773744 Trimmer View Diagrams & Manuals
917773745 Trimmer View Diagrams & Manuals
917773746 Trimmer View Diagrams & Manuals
917773750 Trimmer View Diagrams & Manuals
917773751 Trimmer View Diagrams & Manuals
917773752 Trimmer View Diagrams & Manuals
917773753 Trimmer View Diagrams & Manuals
917773754 Trimmer View Diagrams & Manuals
917773760 Trimmer View Diagrams & Manuals
917773761 Trimmer View Diagrams & Manuals
917773762 Trimmer View Diagrams & Manuals
917773763 Trimmer View Diagrams & Manuals
917773764 Trimmer View Diagrams & Manuals
944360050 Trimmer View Diagrams & Manuals
Husqvarna
HU625HWT (2011-10)(96173000202) Trimmer View Diagrams & Manuals
HU625HWT (2012-01)(96173000203) Trimmer View Diagrams & Manuals
HU625HWT (2011-11)(96173000300) Trimmer View Diagrams & Manuals
HU625HWT (2012-01)(96173000301) Trimmer View Diagrams & Manuals
HU625HWT (2012-10)(96173000302) Trimmer View Diagrams & Manuals
HU625HWT (2013-03)(96173000400) Trimmer View Diagrams & Manuals
HU625HWT (2013-10)(96173000500) Wheeled Weed Trimmer View Diagrams & Manuals
PPWT60022 (96172000600) (2009-11) Handheld Trimmer View Diagrams & Manuals
PPWT60022X (96172000700) (2010-04) Lawn Mower: Consumer Walk Behind View Diagrams & Manuals
HU625WT (96173000101) (2010-11) Trimmer View Diagrams & Manuals
HU625WT (96173000100) (2009-11) Trimmer View Diagrams & Manuals
HU625WTX (96173000201) (2011-09) Trimmer View Diagrams & Manuals
HU625WTX (96173000200) (2010-12) Trimmer View Diagrams & Manuals
HU675HWT (96175000202) (2017-01) Trimmer View Diagrams & Manuals
HU675HWT (96175000201) (2016-08) Trimmer View Diagrams & Manuals
HU675HWT (96175000200) (2015-12) Trimmer View Diagrams & Manuals
HU675HWT (96173000601) (2017-01) Trimmer View Diagrams & Manuals
HU675HWT (96173000600) (2015-10) Trimmer View Diagrams & Manuals
Jonsered
J625HWT - 96172001400 (2014-02) Zero Turn: Consumer View Diagrams & Manuals
Show More Compatible Models
This item works with the following types of products:
- Trimmer Parts
This part replaces obsolete part #: 173811
Customer Part Reviews ?
Average Rating (out of 5):
Click to filter by ratings:
5 stars
6
4 stars
0
3 stars
0
2 stars
0
1 stars
0
< PREV
- 1
quick delivery and worked as advertised.
quick delivery and was in great condition and worked as advertised
Guest -
April 15, 2023
Verified Purchase
Quick and reliable!
We received the parts quick and they were exactly what we needed at a good price.
Guest -
October 22, 2021
Verified Purchase
Easy replacement part. Paid extra for expedited shipping but that did not happen. Blame the post office.
Correct part
Guest -
October 7, 2020
Verified Purchase
Worked as expected.
The part was new it arrived when they said.
Guest -
September 14, 2019
Verified Purchase
Easy repair
Guest -
July 12, 2019
Verified Purchase
parts
easy to order,
Guest -
May 14, 2019
Verified Purchase
t
t
t -
t days ago
Verified Purchase
eReplacementParts Team
t
Questions & Answers ?
Our customer Service team is at the ready daily to answer your part and product questions.

Ask our Team
We have a dedicated staff with decades of collective experience in helping customers just like you purchase parts to repair their products.
Does this fit my product?Questions & Answers for Spring
No questions have been asked yet
Customer Repair Instructions ?
All our customer repair instructions are solicited directly from other customers just like you who have purchased and replaced this exact part.
bad return spring
Kenny - August 10, 2023
Tool Type
Trimmer
Difficulty
Medium
Time
30-60 minutes
Tools Used
Screwdriver, Pliers, Power Drill, Socket set, Wrench Set
Parts Used
followed manual and obvious steps
Did you find this story helpful?
Thanks for voting and helping fellow customers!
Drive control cable broke
Danny - April 16, 2023
Tool Type
Trimmer
Difficulty
Easy
Time
30-60 minutes
Tools Used
Screwdriver, Pliers
I just removed the broken cable and replaced it with the new one. It took a little while to hook the new spring on the control
Did you find this story helpful?
Thanks for voting and helping fellow customers!
The two main bearings for the trimmer shaft we're worn.
Norman - September 26, 2019
Tool Type
Trimmer
Difficulty
Medium
Time
1-2 hours
Tools Used
Screwdriver, Pliers, Socket set
Used the part blowup diagram to take apart and put back together again. Took a little bit of trial and error...but not terribly difficult. You will need a retaining ring plier. A cheap pair from harbor freight will be fine.
Did you find this story helpful?
Thanks for voting and helping fellow customers!
Replaced a couple of spring/cable assemblies.
Kenneth - May 23, 2021
👍 0 of 1 people found this instruction helpful
Tool Type
Trimmer
Difficulty
Medium
Time
30-60 minutes
Tools Used
Screwdriver, Pliers
Pretty straight forward. The smaller spring was a little difficult because of the size of my hands.
Did you find this story helpful?
Thanks for voting and helping fellow customers!
Drive control and return spring broke. The drive control cable got tangled up in the V-belt and motor. The trimmer was not able to spin.
Timothy - May 24, 2019
👍 0 of 1 people found this instruction helpful
Tool Type
Trimmer
Difficulty
Easy
Time
30-60 minutes
Tools Used
Screwdriver, Pliers, Socket set, Wrench Set
1. Disconnect the old drive control cable from the trimmer head control bar.
2. Use a screwdriver to remove the plastic clip holding the drive control cable on the upper handle.
3. Use pliers to pinch plastic clip on drive control cable connected to the chassis.
4. Remove control cable from unit.
5. Follow 1-4 in reverse to install new drive control cable.
6. Tilt the trimmer at a 45 degree angle so I could access below the chassis where the return spring and drive control connects to the idler assembly.
7. Connect the drive control spring to the idler assembly.
8. Remove damaged return spring (idler spring) from the idler assembly.
9. Install new idler spring to the idler assembly.
10. I had a missing chassis cover screw that I added as well.
11. I referred to online instruction manuals for reference.
12. Current V-belt was still good, ordered new one as backup.
Did you find this story helpful?
Thanks for voting and helping fellow customers!
22" two wheels trimmer - if the return spring fails as mine, the trimmer behaves same as if the belt fails, the engine turns but the trimmer head don't.
JESUS - May 21, 2016
👍 1 of 3 people found this instruction helpful
Tool Type
Trimmer
Difficulty
Medium
Time
15-30 minutes
Tools Used
Pliers, Socket set, Wrench Set
Parts Used
For a 22" Craftsman trimmer..
1. Remove the front trimmer head plastic cover by removing a torx bolt located in the front upper side of head. Unclip the back side by pulling up the cover. A flat screwdriver may help.
2. Remove the lower plastic cover ( two side 8mm + two 10mm under the cover).
3. Remove the trimmer head by removing four 10mm side bolts.
4. Remove the two idler pulleys just if you will replace the belt by a new one as in my case. Sockets and open wrench should be used.
5. Remove the failed return spring from the idlers assy and/or from the side body opening hook.
6. Install the new return spring.
7. Reinstall belt, pulleys, trimmer head and remaining parts...
God bless you...
Did you find this story helpful?
Thanks for voting and helping fellow customers!
OEM stands for Original Equipment Manufacturer and means the part you’re buying is sourced directly from the manufacturer who made your product. At eReplacementParts, we sell only genuine OEM parts, guaranteeing the part you’re purchasing is of better design and of higher quality than aftermarket parts.
Our product descriptions are a combination of data sourced directly from the manufacturers who made your product as well as content researched and curated by our content & customer service teams. This content is edited and reviewed internally before being made public to customers.
Our customer service team are at the ready daily to answer your part and product questions. We have a dedicated staff with decades of collective experience in helping customers just like you purchase parts to repair their products.
All our part reviews are solicited directly from other customers who have purchased this exact part. While we moderate these reviews for profanity, offensive language or personally identifiable information, these reviews are posted exactly as submitted and no alterations are made by our team.
All our customer repair instructions are solicited directly from other customers just like you who have purchased and replaced this exact part. While we moderate these reviews for profanity, offensive language or personally identifiable information, these reviews are posted exactly as submitted and no alterations are made by our team.
Based on data from past customer purchasing behaviors, these parts are most commonly purchased together along with the part you are viewing. These parts may be necessary or helpful to replace to complete your current repair.
All our installation videos are created and produced in collaboration with our in-house repair technician, Mark Sodja, who has helped millions of eReplacementParts customers over the last 13 years repair their products. Mark has years of experience in selling and repairing both commercial and residential products with a specialty in gas-powered equipment.
This data is collected from customers who submitted a repair instruction after replacing this exact part. Customers can rate how easy the repair was to complete and how long it took. We aggregate this data to provide a repair rating that allows customers to quickly determine the difficulty and time needed to perform their own repair.