

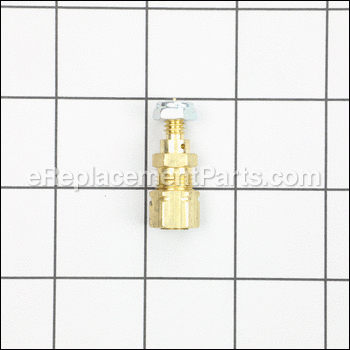

This is a genuine Rolair replacement part for use in compressors. The relief valve attaches to the pressure switch. A wrench set may be necessary during the installation of this part. It will require replacing if it becomes broken. This is made of metal and is sold individually.
Relief Valve PS2020RV
OEM part for: Rolair
Part Number: PS2020RV
$33.00
In Stock
Jump To:
Frequently Purchased Together ?
Compatibility
This part will fit the following 28 machines
Rolair
V5180K30 Electric Stationary Compressor View Diagrams & Manuals
D075HPV5 Hand Carry Compressor View Diagrams & Manuals
D100LPV5 Hand Carry Compressor View Diagrams & Manuals
D075HS3 Hand Carry Compressor View Diagrams & Manuals
D075LPV5 Hand Carry Compressor View Diagrams & Manuals
D075LS3 Hand Carry Compressor View Diagrams & Manuals
D1500HS3 Hand Carry Compressor View Diagrams & Manuals
D2002HPV5 Hand Carry Compressor View Diagrams & Manuals
D2002HSSV5 Hand Carry Compressor View Diagrams & Manuals
OD1500HS3 Hand Carry Compressor View Diagrams & Manuals
3095K18 Wheel Electric Compressor View Diagrams & Manuals
5520K17 Wheel Electric Compressor View Diagrams & Manuals
5715K17 Wheel Electric Compressor View Diagrams & Manuals
6820K17 Wheel Electric Compressor View Diagrams & Manuals
D1000LPV5 Hand Carry Compressor View Diagrams & Manuals
D1500HPV5 Hand Carry Compressor View Diagrams & Manuals
D2000HPV5 Hand Carry Compressor View Diagrams & Manuals
OD1500LPV5 Hand Carry Compressor View Diagrams & Manuals
OD1500HPV5 Hand Carry Compressor View Diagrams & Manuals
5520K17A Model 5520k17a Is The Step Up From Our Classic 1.5 Hp Twin-Tank Wheelbarrow Design. Featuring A Single 20 Gallon Tank Assembly, The 5520k17a Sustains 7.3 Cfm 90 Psi Longer Than The Traditional 9 Gallon Twin Tank Design. The Low-Rpm Pump And Motor Combine View Diagrams & Manuals
5715MK103 Model 5715mk103 Is The Entry-Level Choice When The Job Calls For More Air Than A Direct Drive Can Offer. Capable Of Running On A 20 Amp Breaker, This Model Will Deliver 7.3 Cfm, Doubling The Output Of Many Direct-Drive Units. Additionally, The Low-Rpm Pump View Diagrams & Manuals
6715K17 Air Compressor View Diagrams & Manuals
6820K17D Model 6820k17d Includes A Dual-Control Feature, Which Allows It To Run Start/Stop Or Constant-Speed Operation. This Model Provides The Most Air Available On A 110 Volt Electric Compressor, Yet Is Equipped With A Dual-Voltage Switch Allowing You To Run Off View Diagrams & Manuals
V5112K30 Air Compressor View Diagrams & Manuals
V5160K30 Air Compressor View Diagrams & Manuals
V5312K30 Air Compressor View Diagrams & Manuals
V5360K30 Air Compressor View Diagrams & Manuals
V5380K30 Air Compressor View Diagrams & Manuals
Show More Compatible Models
This item works with the following types of products:
- Compressor Parts
Questions & Answers ?
Our customer Service team is at the ready daily to answer your part and product questions.

Ask our Team
We have a dedicated staff with decades of collective experience in helping customers just like you purchase parts to repair their products.
Does this fit my product?Questions & Answers for Relief Valve
No questions have been asked yet
Customer Repair Instructions ?
All our customer repair instructions are solicited directly from other customers just like you who have purchased and replaced this exact part.
Tank took too long to fill as the relief valve bled off air during fill cycle. Replacing relief valve fixed the problem.
Jerry - March 28, 2016
👍 0 of 1 people found this instruction helpful
Tool Type
Compressor
Difficulty
Easy
Time
Less than 15 minutes
Tools Used
Wrench Set
Parts Used
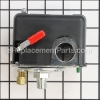
Unplug compressor, release air and drain tank by loosening petcock. Unscrew solenoid cover, remove cover and set aside. Using a 9/16" wrench, remove compression fitting at bottom of relief valve. Using a 1/2" wrench and a 3/8" deep socket, remove old relief valve from mount under solenoid cover. Discard old valve.
Install new relief, being careful that you do not over tighten. (Valve is soft brass and will snap if installed too tightly) Reconnect compression fitting at bottom of valve, reinstall solenoid cover, tighten petcock and start compressor and check for leaks.
Install new relief, being careful that you do not over tighten. (Valve is soft brass and will snap if installed too tightly) Reconnect compression fitting at bottom of valve, reinstall solenoid cover, tighten petcock and start compressor and check for leaks.
Did you find this story helpful?
Thanks for voting and helping fellow customers!
OEM stands for Original Equipment Manufacturer and means the part you’re buying is sourced directly from the manufacturer who made your product. At eReplacementParts, we sell only genuine OEM parts, guaranteeing the part you’re purchasing is of better design and of higher quality than aftermarket parts.
Our product descriptions are a combination of data sourced directly from the manufacturers who made your product as well as content researched and curated by our content & customer service teams. This content is edited and reviewed internally before being made public to customers.
Our customer service team are at the ready daily to answer your part and product questions. We have a dedicated staff with decades of collective experience in helping customers just like you purchase parts to repair their products.
All our part reviews are solicited directly from other customers who have purchased this exact part. While we moderate these reviews for profanity, offensive language or personally identifiable information, these reviews are posted exactly as submitted and no alterations are made by our team.
All our customer repair instructions are solicited directly from other customers just like you who have purchased and replaced this exact part. While we moderate these reviews for profanity, offensive language or personally identifiable information, these reviews are posted exactly as submitted and no alterations are made by our team.
Based on data from past customer purchasing behaviors, these parts are most commonly purchased together along with the part you are viewing. These parts may be necessary or helpful to replace to complete your current repair.
All our installation videos are created and produced in collaboration with our in-house repair technician, Mark Sodja, who has helped millions of eReplacementParts customers over the last 13 years repair their products. Mark has years of experience in selling and repairing both commercial and residential products with a specialty in gas-powered equipment.
This data is collected from customers who submitted a repair instruction after replacing this exact part. Customers can rate how easy the repair was to complete and how long it took. We aggregate this data to provide a repair rating that allows customers to quickly determine the difficulty and time needed to perform their own repair.