
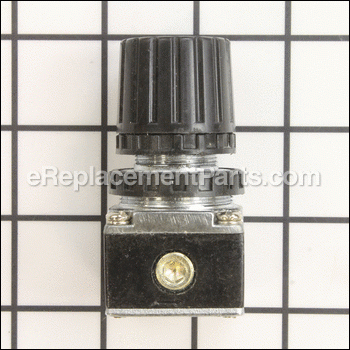
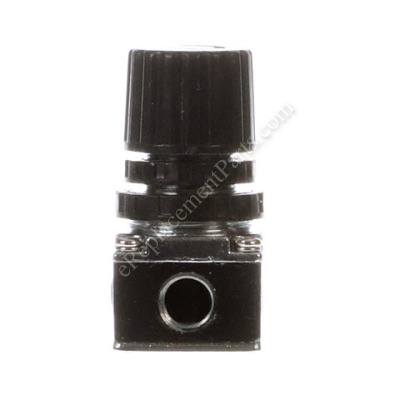


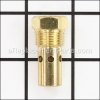
Genuine Senco replacement part used on specific Air Compressor, this item is sold individually. This compressor Regulator is used to regulate the air pressure in the compressor tank. It is also used to regulate the air pressure of the air exiting the tank. In some instances you will need to lower or higher the air pressure of the tank and the air coming from the tank.
Regulator 2408008RNX
OEM part for: Senco
Part Number: 2408008RNX
$24.33
In Stock
Jump To:
Frequently Purchased Together ?
Compatibility
This part will fit the following 1 machine
Senco
PC1010 1/2 HP Electric Air Compressor View Diagrams & Manuals
This item works with the following types of products:
- Compressor Parts
This part replaces obsolete part #: 2408008RN
Customer Part Reviews ?
Average Rating (out of 5):
Click to filter by ratings:
5 stars
3
4 stars
0
3 stars
0
2 stars
0
1 stars
0
< PREV
- 1
Great
Ditto
Guest -
March 16, 2022
Verified Purchase
Just right
Part works great, the only issue is with my compressor model in order to replace you have to disassemble the regulator to make the turns on the pipe otherwise it will hit compressor tank. Not too big a deal
Walter -
January 26, 2022
Verified Purchase
easy search for the part, fast shipping and great price. Compressor works perfectly
compressor part fit pefectlly and works like it should
Guest -
November 25, 2019
Verified Purchase
t
t
t -
t days ago
Verified Purchase
eReplacementParts Team
t
Questions & Answers ?
Our customer Service team is at the ready daily to answer your part and product questions.

Ask our Team
We have a dedicated staff with decades of collective experience in helping customers just like you purchase parts to repair their products.
Does this fit my product?Questions & Answers for Regulator
No questions have been asked yet
Customer Repair Instructions ?
All our customer repair instructions are solicited directly from other customers just like you who have purchased and replaced this exact part.
Pressure regulator was leaking air when it reach 90 psi . it didn't want it to go over 95 psi.
fermin - January 18, 2017
👍 12 of 12 people found this instruction helpful
Tool Type
Compressor
Difficulty
Medium
Time
15-30 minutes
Tools Used
Screwdriver, Pliers, Adjustable Wrench, Teflon tape .
Parts Used
I rated the repair medium difficult because you have to take the old and new regulator apart in order to removed it and install it . Its a pain and if your not use to it its very easy to screw it up and damage the rubber gasket or reassemble it the wrong way . So be careful and take your time.
Did you find this story helpful?
Thanks for voting and helping fellow customers!
Defective regulator
doug - December 26, 2015
👍 10 of 12 people found this instruction helpful
Tool Type
Compressor
Difficulty
Easy
Time
Less than 15 minutes
Tools Used
Wrench Set
Parts Used
Remove the parts that are not included with the new regulator. Then just turn old regulator off and install the new one and the parts that were on the old one. Too easy
Did you find this story helpful?
Thanks for voting and helping fellow customers!
Regulator was leaking air.
Eric - December 3, 2016
👍 7 of 7 people found this instruction helpful
Tool Type
Compressor
Difficulty
Easy
Time
15-30 minutes
Tools Used
Wrench Set
Parts Used
Removed pressure gauge from regulator.
Removed air chuck from regulator.
Removed four screws from front of regulator to partially disassemble regulator. Remove front adjusting knob and assembly along with the back plate and the spring assembly as well. You need to do this in order to unscrew regulator from pressure switch due to lack of clearance with the air tank.
Partially disassemble new regulator and install everything in reverse order.
A little pipe dope or teflon tape is recommended at the joints between the pressure gauge, pressure switch, air chuck and the new regulator.
I would check the tightness of the head bolts on the compressor if you comfortable with that. The bolts on mine were a little loose which could/would have caused a problem down the road.
Did you find this story helpful?
Thanks for voting and helping fellow customers!
Regulator knob broke off resulting a full regulator replacememt.
William - August 6, 2017
👍 3 of 3 people found this instruction helpful
Tool Type
Compressor
Difficulty
Medium
Time
1-2 hours
Tools Used
Screwdriver, Socket set
Parts Used
1. Removed old regulator.
2. Removed air tank from base unit
3. Spun parts in circle pattern to loosen regulator
4. Screw in new regulator
5. Spun tank around to tighten regulator connection.
6. Tighten all connections, done...
2. Removed air tank from base unit
3. Spun parts in circle pattern to loosen regulator
4. Screw in new regulator
5. Spun tank around to tighten regulator connection.
6. Tighten all connections, done...
Did you find this story helpful?
Thanks for voting and helping fellow customers!
Regulator not working
Gary - June 4, 2016
👍 4 of 6 people found this instruction helpful
Tool Type
Compressor
Difficulty
Easy
Time
Less than 15 minutes
Tools Used
Wrench Set
Parts Used
Remove the coupler and pressure gauge from the defective regulator. Remove the regulator from the pipe nipple connected to the pressure switch. Install the new coupler and the two other parts. And you're done.
Did you find this story helpful?
Thanks for voting and helping fellow customers!
Compressor would not build pressure.
Robert - November 5, 2017
👍 1 of 1 people found this instruction helpful
Tool Type
Compressor
Difficulty
Easy
Time
15-30 minutes
Tools Used
Wrench Set
Parts Used
Replaced the regulator.
Did you find this story helpful?
Thanks for voting and helping fellow customers!
Broke the adjustment knob
Richard - April 24, 2024
Tool Type
Compressor
Difficulty
Easy
Time
15-30 minutes
Tools Used
Adjustable Wrench, None
Parts Used
Took the old one off and put the new one on.
Did you find this story helpful?
Thanks for voting and helping fellow customers!
Pressure regulator and maybe pressure gauge not working. Rusted.
Curtis - December 1, 2022
Tool Type
Compressor
Difficulty
Medium
Time
15-30 minutes
Tools Used
Screwdriver, Wrench Set
Parts Used
1. Read another person’s review as to how to remove and replace the regulator.
2. Disassembled the old regulator to get necessary clearance from tank to unscrew it from the compressor fitting.
3. Disassembled the new regulator, again to have necessary clearance to screw it on. The disassembly required removing the adjustment knob and the back plate held on by 4 small machine screws. Care was taken to lift out the spring-loaded valve before it shot across the room.
4. Screwed the body of the regulator onto the fitting.
5. Reassembled the regulator, taking care not to damage the front and back O rings.
6. Screwed on the new guage.
7. Tested and smiled
Did you find this story helpful?
Thanks for voting and helping fellow customers!
pressure gauge leaked
Felix - May 28, 2021
Tool Type
Compressor
Difficulty
Easy
Time
Less than 15 minutes
Tools Used
Wrench Set
Parts Used
Removed and replaced with new gauge.
Did you find this story helpful?
Thanks for voting and helping fellow customers!
regulator leaked, would not built pressure
James - August 31, 2020
Tool Type
Compressor
Difficulty
Medium
Time
15-30 minutes
Tools Used
Wrench Set, Teflon tape
Parts Used
Checked all possible connections on compressor to isolate leak. Last possible source was regulator. Removed regulator and replaced hose coupler. Turned on compressor, it held pressure which indicated regulator was source of leak. Relaced regulator, good togo.
Did you find this story helpful?
Thanks for voting and helping fellow customers!
Load More Install Stories
OEM stands for Original Equipment Manufacturer and means the part you’re buying is sourced directly from the manufacturer who made your product. At eReplacementParts, we sell only genuine OEM parts, guaranteeing the part you’re purchasing is of better design and of higher quality than aftermarket parts.
Our product descriptions are a combination of data sourced directly from the manufacturers who made your product as well as content researched and curated by our content & customer service teams. This content is edited and reviewed internally before being made public to customers.
Our customer service team are at the ready daily to answer your part and product questions. We have a dedicated staff with decades of collective experience in helping customers just like you purchase parts to repair their products.
All our part reviews are solicited directly from other customers who have purchased this exact part. While we moderate these reviews for profanity, offensive language or personally identifiable information, these reviews are posted exactly as submitted and no alterations are made by our team.
All our customer repair instructions are solicited directly from other customers just like you who have purchased and replaced this exact part. While we moderate these reviews for profanity, offensive language or personally identifiable information, these reviews are posted exactly as submitted and no alterations are made by our team.
Based on data from past customer purchasing behaviors, these parts are most commonly purchased together along with the part you are viewing. These parts may be necessary or helpful to replace to complete your current repair.
All our installation videos are created and produced in collaboration with our in-house repair technician, Mark Sodja, who has helped millions of eReplacementParts customers over the last 13 years repair their products. Mark has years of experience in selling and repairing both commercial and residential products with a specialty in gas-powered equipment.
This data is collected from customers who submitted a repair instruction after replacing this exact part. Customers can rate how easy the repair was to complete and how long it took. We aggregate this data to provide a repair rating that allows customers to quickly determine the difficulty and time needed to perform their own repair.