
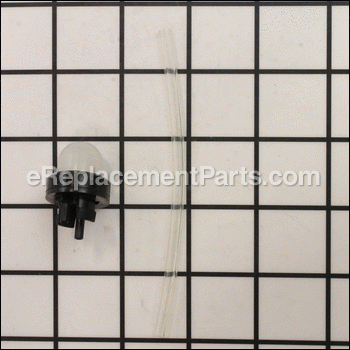
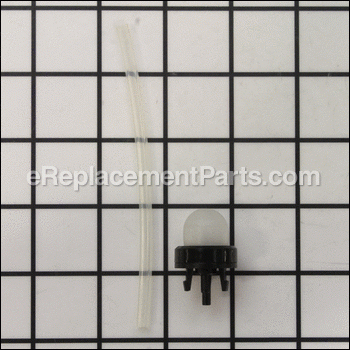
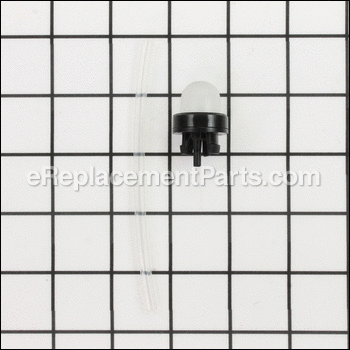

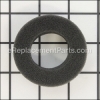
This is a genuine OEM approved replacement part, it is specially designed for use with Craftsman gas powered lawn and garden equipment. By pressing on the purge bulb, it will force fuel into the fuel line from the fuel tank into the carburetor. Once the carburetor is full of fuel, the excess fuel will be purged back into the tank in the fuel return line. Over time the material may begin to deteriorate and crack eventually requiring replacement. It is a high-quality assembly which consists of a durable rubber primer bulb with a flexible hose and it is sold individually.
Primer And Hose Assembly 791-683974B
OEM part for: Ryobi, Troy-Bilt, Bolens, Yard Man, MTD, Yard Machines, Craftsman, Cub Cadet, Husky, Murray
Part Number: 791-683974B
$22.96
In Stock
Jump To:
Product Description ?
- Classification: Part
- Weight: 0.01 lbs.
- Also Known As: Purge Bulb, Carb Primer, Carburetor Primer, Fuel Primer, Primer Bubble
- Shipping: Ships Worldwide
Frequently Purchased Together ?


Compatibility
This Primer And Hose Assembly will fit the following 589 machines. Confirm this part works with your model, and view the detailed model diagrams and repair help we have to offer.
Ryobi
Troy-Bilt
Bolens
Yard Man
MTD
Yard Machines
Craftsman
Cub Cadet
Husky
Murray
Show More Compatible ModelsThis item works with the following types of products:
- Cultivator Parts
- Blower Parts
- Vacuum Parts
- Trimmer Parts
- Edger Parts
- Pruner Parts
This part replaces obsolete part #: 791-181801, 791-181558, 791-683974
Repair Videos ?
Watch the Repair Video for
Primer And Hose Assembly

Articles:
|
Replacing primer bulbs in small engines is one of the most common types of tool repairs, and this article explains profe...
June 25, 2010
|

|
Primer past its prime? Remove and install the primer and hose assembly on your Ryobi string trimmer. Simple instructions...
September 08, 2015
|

Customer Part Reviews ?
Average Rating (out of 5):
Click to filter by ratings:
5 stars
39
4 stars
5
3 stars
2
2 stars
0
1 stars
2
< PREV
- 1
- 2
- 3
It worked
The primer worked just as hoped.
Guest -
15 days ago
Verified Purchase
Easy repair!! Great company!!
Got part very fast. Fit perfectly. Great company. Had a problem and they were right there to correct it!!
Guest -
September 22, 2023
Verified Purchase
Was happy to find the part I needed .
The [art came fast. I was amazed. Was just what I needed.
Guest -
August 12, 2023
Verified Purchase
Worked great.
Well packaged arrived in a reasonable time.
Guest -
July 30, 2023
Verified Purchase
problem solved!
The parts solved my problem! My weed whip runs better than ever!
Randal -
June 7, 2023
Verified Purchase
Correct part delivered
Correct part delivered
Erik Askeland -
May 8, 2023
Verified Purchase
TroyBilt tb320bv fuel piping rebuild.
Piping and priming bulb, going to get a few more years out of the blower.
Guest -
November 9, 2022
Verified Purchase
perfect
exactly what i wanted and needed, thanks again!
Guest -
November 4, 2022
Verified Purchase
Purge bulb
Part and price reSonablye but the s&h cost more than the part need to ejlminabfe shipping cost for small parts
HARLEY -
September 26, 2022
Verified Purchase
Replace Primer & Hose Assembly on Mini-Rototiller
Replacement part came quickly, fit perfectly and was simple to replace.
Frank -
August 16, 2022
Verified Purchase
Questions & Answers ?
Our customer Service team is at the ready daily to answer your part and product questions.

Ask our Team
We have a dedicated staff with decades of collective experience in helping customers just like you purchase parts to repair their products.
Does this fit my product?Questions & Answers for Primer And Hose Assembly
No questions have been asked yet
Customer Repair Instructions ?
All our customer repair instructions are solicited directly from other customers just like you who have purchased and replaced this exact part.
Fuel Leak
Chris - March 5, 2016
👍 38 of 46 people found this instruction helpful
Tool Type
Cultivator
Difficulty
Easy
Time
15-30 minutes
Tools Used
Screwdriver
The fuel line and filter, primer and hose assembly, and the fuel return line had deteriorated over time and were leaking fuel. I found the parts here and ordered them. When the parts arrived, I removed four screws from the rear cover on the engine, pulled off the old hoses and put the new ones on. I screwed the rear cover in place and was done in about 30 minutes or less.
Did you find this story helpful?
Thanks for voting and helping fellow customers!
Bulb disintegrated because of ethanol in gas. (Use premium gas in small motors )
William - November 12, 2015
👍 29 of 33 people found this instruction helpful
Tool Type
Trimmer
Difficulty
Easy
Time
Less than 15 minutes
Tools Used
Pliers
Parts Used
The priming bulb has disintegrated in this trimmer. Unit came with one gas line, simple swap. Website had great tools to ID the part, match it to model of trimmer. Just mind what hose goes where. Note the replacement hose will need an angle cut to go into the gas tank easier.
Did you find this story helpful?
Thanks for voting and helping fellow customers!
The old primer bulb had cracked and the was a hole where the top of the bulb is normally plugged shut in the mfg mold. Couldn't prime the carburetor.
Harlan - May 24, 2016
👍 22 of 24 people found this instruction helpful
Tool Type
Trimmer
Difficulty
Easy
Time
Less than 15 minutes
Tools Used
, Bristol tip screwdriver , sharp knife, needle nose pliers
Parts Used
1,removed the muffler and air filter housing four mount screws with the screwdriver
2,removed the center fuel tube leads from carburetor to the primer bulb outer connecting tube (make sure the fuel tank is empty of any fuel)
3,remove only the tube leading from the outer primer bulb connection to the inner hole in the fuel tank.
4,unsnap the old primer bulb from the mount by squeezing the lock arms and pull the bulb assembly rearward.
Install the new tube to the longer outer connection port. Then cut a 45 degree angle on the loose end of the tube.
2,install the new primer bulb and tube into the mount bracket *you may have to squeeze the mount locks inward slightly bending them towards each other to get them in through the mount bracket hole. They fit tight.
3,put a drop of oil on the 45 degree end of the tube. Using needle nose pliers force the 45°end through the inner hole of the fuel tank. Look through the fuel cap opening of the tank to be sure all the 45°end is inside the tank.
Reinstall the muffler and air filter housing. Fuel up and go.
Did you find this story helpful?
Thanks for voting and helping fellow customers!
Primer bulb split , unable to prime engine to start
Gary - December 4, 2016
👍 6 of 6 people found this instruction helpful
Tool Type
Cultivator
Difficulty
Easy
Time
15-30 minutes
Tools Used
Pliers, Nutdriver
Parts Used
Removed old primer bulb and hose and replace with new primer bulb and hose, started up just fine. Ryobi gas engine , with extensions.
Did you find this story helpful?
Thanks for voting and helping fellow customers!
Bad primer bulb
Dan - March 27, 2017
👍 6 of 7 people found this instruction helpful
Tool Type
Cultivator
Difficulty
Easy
Time
Less than 15 minutes
Tools Used
Screwdriver, Pliers
Parts Used
No instructions were included with the replacement part so I watched ereplacementparts video on youtube. This made repair really easy.
Did you find this story helpful?
Thanks for voting and helping fellow customers!
Trimmer hadn't been started in 8 yrs. Fuel lines and carburetor were deteriorated.
Paul - August 17, 2016
👍 4 of 5 people found this instruction helpful
Tool Type
Trimmer
Difficulty
Medium
Time
30-60 minutes
Tools Used
Screwdriver, Pliers
Removed carburetor and cleaned all internal parts. replaced all full lines, primer bulb and gas filter. Replaced spark plug. Started on 2nd pull and runs like a champ.
Did you find this story helpful?
Thanks for voting and helping fellow customers!
The primer bulb fell apart on my machine
ROB - July 5, 2016
👍 4 of 5 people found this instruction helpful
Tool Type
Trimmer
Difficulty
Easy
Time
Less than 15 minutes
Tools Used
, Needle nose pliers
Parts Used
Since it was half apart the replacement was simple:
1. I used the pliers to pull the fuel lines off the bulb.
2. Squeezed the tabs in to release the bulb.
3. Inserted new bulb until it snapped in.
4. Slid fuel lines on.
1. I used the pliers to pull the fuel lines off the bulb.
2. Squeezed the tabs in to release the bulb.
3. Inserted new bulb until it snapped in.
4. Slid fuel lines on.
Did you find this story helpful?
Thanks for voting and helping fellow customers!
Hoses were brittle and primer was cracked
Brandon - September 1, 2016
👍 3 of 4 people found this instruction helpful
Tool Type
Cultivator
Difficulty
Medium
Time
15-30 minutes
Tools Used
Screwdriver, Pliers
Remove cover, loosen carburetor, pull up to get gas tank out, put new hoses in, ran from gas tank to carburetor. Needed 3 new hoses and primer, reconnected them, snapped new primer in place and put back together.
Did you find this story helpful?
Thanks for voting and helping fellow customers!
Fuel hoses were fell apart.
Lloyd - October 10, 2018
👍 1 of 1 people found this instruction helpful
Tool Type
Cultivator
Difficulty
Easy
Time
30-60 minutes
Tools Used
Screwdriver, Pliers, Socket set, Nutdriver
1. Removed cover over carburetor, four screws.
2. Removed carburetor, two screws.
3.Inserted hoses and primer. Used sockets and a nut driver to get filter and fuel line into tank. This was the innovative part if the installation.
4 .Reassembled carburetor and cover.
5. Gassed it up and it ran..
2. Removed carburetor, two screws.
3.Inserted hoses and primer. Used sockets and a nut driver to get filter and fuel line into tank. This was the innovative part if the installation.
4 .Reassembled carburetor and cover.
5. Gassed it up and it ran..
Did you find this story helpful?
Thanks for voting and helping fellow customers!
Fuel lines were old, cracked, brittle and disconnected
Dino - July 28, 2016
👍 2 of 3 people found this instruction helpful
Tool Type
Trimmer
Difficulty
Medium
Time
15-30 minutes
Tools Used
Pliers
Replaced each fuel line one at a time. Very easy except for the fuel tank line that had the filter already installed. Needed to go from inside the tank and then push it in place from the inside. An "L" shaped tool helped. Otherwise very easy and did not need to purchase a new trimmer.
Did you find this story helpful?
Thanks for voting and helping fellow customers!
Load More Install Stories
OEM stands for Original Equipment Manufacturer and means the part you’re buying is sourced directly from the manufacturer who made your product. At eReplacementParts, we sell only genuine OEM parts, guaranteeing the part you’re purchasing is of better design and of higher quality than aftermarket parts.
Our product descriptions are a combination of data sourced directly from the manufacturers who made your product as well as content researched and curated by our content & customer service teams. This content is edited and reviewed internally before being made public to customers.
Our customer service team are at the ready daily to answer your part and product questions. We have a dedicated staff with decades of collective experience in helping customers just like you purchase parts to repair their products.
All our part reviews are solicited directly from other customers who have purchased this exact part. While we moderate these reviews for profanity, offensive language or personally identifiable information, these reviews are posted exactly as submitted and no alterations are made by our team.
All our customer repair instructions are solicited directly from other customers just like you who have purchased and replaced this exact part. While we moderate these reviews for profanity, offensive language or personally identifiable information, these reviews are posted exactly as submitted and no alterations are made by our team.
Based on data from past customer purchasing behaviors, these parts are most commonly purchased together along with the part you are viewing. These parts may be necessary or helpful to replace to complete your current repair.
All our installation videos are created and produced in collaboration with our in-house repair technician, Mark Sodja, who has helped millions of eReplacementParts customers over the last 13 years repair their products. Mark has years of experience in selling and repairing both commercial and residential products with a specialty in gas-powered equipment.
This data is collected from customers who submitted a repair instruction after replacing this exact part. Customers can rate how easy the repair was to complete and how long it took. We aggregate this data to provide a repair rating that allows customers to quickly determine the difficulty and time needed to perform their own repair.