
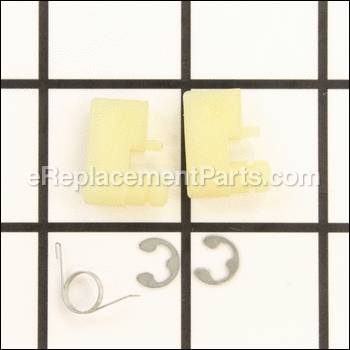
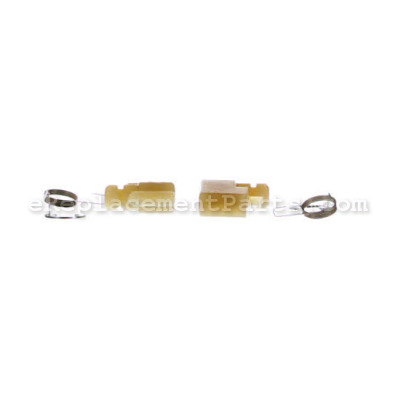


This pawl kit is an OEM direct from Craftsman. Composed of metal and plastic items, the kit is made for use with lawn and garden trimming devices. The pawl kit is designed to rotate the flywheel, activating the device's engine when the operator pulls the rope starter. The kit is sold individually. E-clips and pawl springs are included. A screwdriver and a pair of pliers are required for the removal and repair.
Pawl Kit 753-08159
OEM part for: Craftsman
Part Number: 753-08159
$5.52
In Stock
Jump To:
Frequently Purchased Together ?


Compatibility
This part will fit the following 3 machines
Craftsman
316731700 Gas Trimmer View Diagrams & Manuals
316731930 Trimmer View Diagrams & Manuals
316731970 Trimmer View Diagrams & Manuals
This item works with the following types of products:
- Trimmer Parts
Customer Part Reviews ?
Average Rating (out of 5):
Click to filter by ratings:
5 stars
6
4 stars
1
3 stars
0
2 stars
0
1 stars
0
< PREV
- 1
Great product
Correct item and fit great
Guest -
September 28, 2022
Verified Purchase
Great part, that worked just find.
The new part worked as expected, even though it looked a little different.
Guest -
July 18, 2020
Verified Purchase
Better than OEM
The parts arrived quickly and fit better than OEM parts! The fit is less sloppy and move smoothly. Great website. Delivers to Puerto Rico! Unbelievable! Most companies don’t! Thanks!
Guest -
January 6, 2020
Verified Purchase
Weed wacker
Parts arrived on time, thanks
Guest -
October 17, 2019
Verified Purchase
as described, worked good
Paid extra for faster shipping and it didn't get to me when it was supposed to.
Guest -
October 2, 2019
Verified Purchase
Very easy, saved me from buying a new trimmer
Fast delivery, easy to install
Guest -
September 2, 2019
Verified Purchase
Pawl Kit
Kit arrived just days after the order. Parts were all correct and the repair was without much trouble. Will use this company again
Guest -
June 28, 2019
Verified Purchase
t
t
t -
t days ago
Verified Purchase
eReplacementParts Team
t
Questions & Answers ?
Our customer Service team is at the ready daily to answer your part and product questions.

Ask our Team
We have a dedicated staff with decades of collective experience in helping customers just like you purchase parts to repair their products.
Does this fit my product?Questions & Answers for Pawl Kit
No questions have been asked yet
Customer Repair Instructions ?
All our customer repair instructions are solicited directly from other customers just like you who have purchased and replaced this exact part.
Broken springs for the pawls
Robert - May 4, 2017
👍 6 of 10 people found this instruction helpful
Tool Type
Trimmer
Difficulty
Easy
Time
15-30 minutes
Tools Used
Screwdriver, Pliers, TORX screwdriver, needle nose pliers, vise-grips
Parts Used
1) Remove five TORX head screws for the pull cord cover. Note: the middle screw was so tight that the head stripped out and I had to use vise-grips to get it removed. I replaced that one with a standard phillips head screw.
2) Remove one C-clip for each pawl.
3) Remove the old pawls and springs.
3) Install the new pawls and springs, making sure that the springs are engaged against the stops.
4) Install the new C-clips.
5) Replace the pull cord cover.
2) Remove one C-clip for each pawl.
3) Remove the old pawls and springs.
3) Install the new pawls and springs, making sure that the springs are engaged against the stops.
4) Install the new C-clips.
5) Replace the pull cord cover.
Did you find this story helpful?
Thanks for voting and helping fellow customers!
Could not start weedwacker when pulling rope.
Tony - August 18, 2016
👍 4 of 6 people found this instruction helpful
Tool Type
Trimmer
Difficulty
Easy
Time
15-30 minutes
Tools Used
Screwdriver, Needle Nose Pliers
Parts Used
Ordered and installed new Pawl kit. Which consist of 2 plastic Pawls and 2 springs.
Easy to install, weedwacker started 1st pull.
Easy to install, weedwacker started 1st pull.
Did you find this story helpful?
Thanks for voting and helping fellow customers!
Recoil starter pawl broke.
William - September 16, 2016
👍 6 of 11 people found this instruction helpful
Tool Type
Trimmer
Difficulty
Easy
Time
15-30 minutes
Tools Used
Screwdriver, Pliers
Parts Used
Replaced the old pawl with the new one.
Did you find this story helpful?
Thanks for voting and helping fellow customers!
The Pawl had broken off and it would not recoil or turn the motor over
Jacob - July 8, 2016
👍 5 of 9 people found this instruction helpful
Tool Type
Trimmer
Difficulty
Easy
Time
Less than 15 minutes
Tools Used
Screwdriver, Pliers
Parts Used
Just removed the starter motor rope housing and it is really easy to replace
Did you find this story helpful?
Thanks for voting and helping fellow customers!
Paul's broke
David - August 19, 2023
Tool Type
Trimmer
Difficulty
Medium
Time
30-60 minutes
Tools Used
Socket set, Special allen wrench
Parts Used
Removed recoil cover to exposed fan blade and removed it with allen wrench and open end wrench
Did you find this story helpful?
Thanks for voting and helping fellow customers!
broken pull cord
john - October 2, 2019
Tool Type
Trimmer
Difficulty
Easy
Time
15-30 minutes
Tools Used
Screwdriver, Pliers, tork bits
Parts Used
(1) removed the top cover 3 bolts 1 in front and 2 in back (2) 3 bolts to remove the starter housing assembly (all bolts T25,27, or T30 (3) removed C clip on pawls on back of fly wheel with pliers, installed new pawls, springs, and C clips using needle nose pliers. (4) installed new housing assy. using new bolts and reinstalled top cover.
Did you find this story helpful?
Thanks for voting and helping fellow customers!
Paw kit broken
Don - September 15, 2019
Tool Type
Trimmer
Difficulty
Easy
Time
15-30 minutes
Tools Used
Screwdriver, Pliers
Parts Used
Put in new paw kit
Did you find this story helpful?
Thanks for voting and helping fellow customers!
dog ears one was broke
mike - June 22, 2017
👍 1 of 3 people found this instruction helpful
Tool Type
Trimmer
Difficulty
Easy
Time
15-30 minutes
Tools Used
Pliers, needle nose
Parts Used
just replaced both of the dog ears
Did you find this story helpful?
Thanks for voting and helping fellow customers!
OEM stands for Original Equipment Manufacturer and means the part you’re buying is sourced directly from the manufacturer who made your product. At eReplacementParts, we sell only genuine OEM parts, guaranteeing the part you’re purchasing is of better design and of higher quality than aftermarket parts.
Our product descriptions are a combination of data sourced directly from the manufacturers who made your product as well as content researched and curated by our content & customer service teams. This content is edited and reviewed internally before being made public to customers.
Our customer service team are at the ready daily to answer your part and product questions. We have a dedicated staff with decades of collective experience in helping customers just like you purchase parts to repair their products.
All our part reviews are solicited directly from other customers who have purchased this exact part. While we moderate these reviews for profanity, offensive language or personally identifiable information, these reviews are posted exactly as submitted and no alterations are made by our team.
All our customer repair instructions are solicited directly from other customers just like you who have purchased and replaced this exact part. While we moderate these reviews for profanity, offensive language or personally identifiable information, these reviews are posted exactly as submitted and no alterations are made by our team.
Based on data from past customer purchasing behaviors, these parts are most commonly purchased together along with the part you are viewing. These parts may be necessary or helpful to replace to complete your current repair.
All our installation videos are created and produced in collaboration with our in-house repair technician, Mark Sodja, who has helped millions of eReplacementParts customers over the last 13 years repair their products. Mark has years of experience in selling and repairing both commercial and residential products with a specialty in gas-powered equipment.
This data is collected from customers who submitted a repair instruction after replacing this exact part. Customers can rate how easy the repair was to complete and how long it took. We aggregate this data to provide a repair rating that allows customers to quickly determine the difficulty and time needed to perform their own repair.