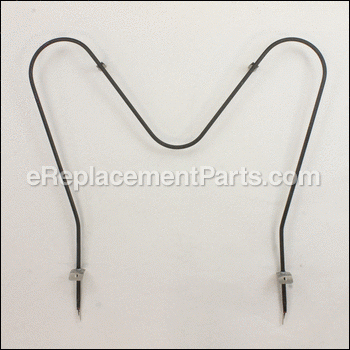
The Oven Bake Element is a black, metal part which supplies heat to the oven. This element is 19-1/2" wide x 18-1/2" long and has 3-1/2" inserts. It is rated as "Easy" to install by users, and attaches to the bottom of the oven. If you notice visible damage, or that your oven is not receiving heat properly then it may be a problem with this part. Check your model number and user manual to see if this is the right part for you. It is important for you to disconnect your appliance from the power source before performing this repair. After disconnecting your appliance, remove the two screws/nuts connecting the old element, pull it out, and discard if faulty. Simply connect the new element prongs where the old element fit, and screw it back in.
Oven Heating Element 316075103
OEM part for: Frigidaire, Tappan, Gibson, Kelvinator, Westinghouse, Uni, Crosley
Part Number: 316075103
Jump To:
Product Description ?
- For use with spade style terminals for your electric range.
- Classification: Part
- Weight: 1.35 lbs.
- Shipping: Ships Worldwide
Frequently Purchased Together ?
Compatibility
This part will fit the following 2680 machines
Frigidaire
Tappan
Gibson
Kelvinator
Westinghouse
Uni
Crosley
This item works with the following types of products:
- Range Parts
- Microwave Parts
- Refrigerator Parts
This part replaces obsolete part #: 316282600, 316075104
Customer Part Reviews ?
- 1
Questions & Answers ?
Our customer Service team is at the ready daily to answer your part and product questions.

Ask our Team
We have a dedicated staff with decades of collective experience in helping customers just like you purchase parts to repair their products.
Does this fit my product?Questions & Answers for Oven Heating Element
Customer Repair Instructions ?
All our customer repair instructions are solicited directly from other customers just like you who have purchased and replaced this exact part.
The oven element burned out
Tool Type
Range
Difficulty
Easy
Time
15-30 minutes
Tools Used
Screwdriver, Pliers
Parts Used
Element burned up
Tool Type
Range
Difficulty
Easy
Time
Less than 15 minutes
Tools Used
Screwdriver
Parts Used
element burned in too
Tool Type
Range
Difficulty
Easy
Time
15-30 minutes
Tools Used
Nutdriver
Parts Used
range oven lower bake element broke in two.piecs
Tool Type
Range
Difficulty
Easy
Time
Less than 15 minutes
Tools Used
Nutdriver
Parts Used
2 Leaned inside oven and removed two hex screws holding element to rear panel of oven.
3 Pulled element pieces through holes until wires with push on connectors were accessible.
4 Removed wires from old element and pushed connectors onto new element.
5 Pushed wires and ends of element back through holes until mounting brackets were
against rear of oven.
6 Screwed two screws through brackets and into holes in rear of oven, and tightened.
7 Replaced racks, and tested by turning on oven. new element heated up. shut off oven. done.
8 Range circuit breaker should be turned off prior to repair for safety.
Oven quit
Tool Type
Range
Difficulty
Easy
Time
30-60 minutes
Tools Used
Screwdriver, Nutdriver
Parts Used
Ordered the part.
Took the back off of the stove, unplugged 2 wires, removed 2 screws inside the oven and pulled out the old element.
Reversed the above procedure to install.
Baked Swedish rye bread.
the oven temp element broke due to age
Tool Type
Range
Difficulty
Easy
Time
Less than 15 minutes
Tools Used
Nutdriver
Parts Used
burned out oven element
Tool Type
Range
Difficulty
Easy
Time
15-30 minutes
Tools Used
Screwdriver
Parts Used
Heating element broken in three pieces
Tool Type
Range
Difficulty
Easy
Time
Less than 15 minutes
Tools Used
Screwdriver
Parts Used
Pull out old part
Unplug each side from oven wiring
Plug each side of element into oven wiring
Put each side of element into holes they came out of
Make sure element legs are towards the bottom of the oven
Screw in two screws you took out of the oven
Close door and turn on oven to check element
Job done
bake element burnt out and control panel no good.
Tool Type
Range
Difficulty
Easy
Time
15-30 minutes
Tools Used
Socket set
Oven element became brittle and shorted out, burner switch would not turn on
Tool Type
Range
Difficulty
Easy
Time
Less than 15 minutes
Tools Used
Screwdriver
1. Unplugged stove
2. Unscrewed oven element
3. Unplugged 2 female spade connectors
4. Plugged in new oven element
5. Installed screws back on oven element
Burner switch:
1. Unscrewed back of switch panel
2. Removed control knob
3. Unscrewed burner switch
4. Unplugged burner switch
5. Installed connectors on new switch
6. Installed screws on new switch
7. Installed knob
8. Installed back of switch panel
OEM stands for Original Equipment Manufacturer and means the part you’re buying is sourced directly from the manufacturer who made your product. At eReplacementParts, we sell only genuine OEM parts, guaranteeing the part you’re purchasing is of better design and of higher quality than aftermarket parts.
Our product descriptions are a combination of data sourced directly from the manufacturers who made your product as well as content researched and curated by our content & customer service teams. This content is edited and reviewed internally before being made public to customers.
Our customer service team are at the ready daily to answer your part and product questions. We have a dedicated staff with decades of collective experience in helping customers just like you purchase parts to repair their products.
All our part reviews are solicited directly from other customers who have purchased this exact part. While we moderate these reviews for profanity, offensive language or personally identifiable information, these reviews are posted exactly as submitted and no alterations are made by our team.
All our customer repair instructions are solicited directly from other customers just like you who have purchased and replaced this exact part. While we moderate these reviews for profanity, offensive language or personally identifiable information, these reviews are posted exactly as submitted and no alterations are made by our team.
Based on data from past customer purchasing behaviors, these parts are most commonly purchased together along with the part you are viewing. These parts may be necessary or helpful to replace to complete your current repair.
All our installation videos are created and produced in collaboration with our in-house repair technician, Mark Sodja, who has helped millions of eReplacementParts customers over the last 13 years repair their products. Mark has years of experience in selling and repairing both commercial and residential products with a specialty in gas-powered equipment.
This data is collected from customers who submitted a repair instruction after replacing this exact part. Customers can rate how easy the repair was to complete and how long it took. We aggregate this data to provide a repair rating that allows customers to quickly determine the difficulty and time needed to perform their own repair.

