
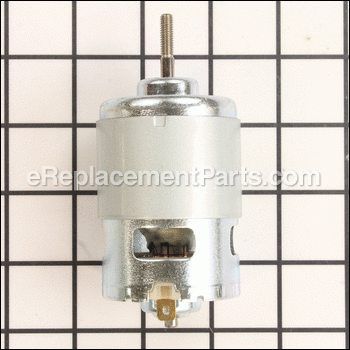


This is an authentic Ryobi replacement part that has been sourced from the original manufacturer to be used with string trimmers. The motor assembly is used to convert electric energy to kinetic energy to drive the cutter head assembly. This item is available as an individual replacement part.
Motor Assembly 741921003
OEM part for: Ryobi
Part Number: 741921003
$41.29
In Stock
Jump To:
Frequently Purchased Together ?


Compatibility
This part will fit the following 3 machines
Ryobi
RY40200 40 Volt String Trimmer View Diagrams & Manuals
RY40021 String Trimmer / Edger View Diagrams & Manuals
RY40022 String Trimmer/Edger Attachment View Diagrams & Manuals
This item works with the following types of products:
- Trimmer Parts
- Edger Parts
This part replaces obsolete part #: 741921002, 31103715G
Customer Part Reviews ?
Average Rating (out of 5):
Click to filter by ratings:
5 stars
17
4 stars
0
3 stars
1
2 stars
0
1 stars
0
< PREV
- 1
- 2
Ryobi String Trimmer
Replaced the motor and it works like new again.
Guest -
September 28, 2023
Verified Purchase
Perfect fit. Solved the problem
My wife loves her weed eater. Motor burned out. Been searching for a year for repair parts. Part fit perfectly, was easy to install and my wife is happy!
Guest -
September 11, 2023
Verified Purchase
Easy repair!!!
Easy install with help of youtube video.
Guest -
June 2, 2023
Verified Purchase
Right part. Right price.
Part was received as ordered. Fit and worked well. Carrier delayed a couple of times but then received. Overall happy with experience.
Guest -
May 17, 2023
Verified Purchase
Part was easy to install and correctly shipped
Part was easy to install and correctly shipped
Guest -
September 21, 2022
Verified Purchase
Exact replacement part, easy to install
This motor was the exact replacement part form my Ryobi trimmer. I received it earlier than i was told, which was a nice surprise. It was easy to install and it worked perfectly from the first pull of the trigger.
Guest -
August 17, 2022
Verified Purchase
Replaced burnt motor
Arrived quickly. Removed burnt motor and put in new one. My Ryobi trimmer/edger runs like new now.
Anonymous -
August 3, 2022
Verified Purchase
Easy but had a problem
New motor for my Ryobi battery powered string trimmer
The motor was a little bit different than the original. I didn’t notice it until I was installing it. It Had a bearing mounted past the front end of the motor. The old motor bearing was mounted inside of the motor front. In other words the front of the motor was flush. This created a problem because the old motor mount (a flat plate of hard plastic) would not work. My neighbor made me a new motor mount on his 3-D printer. It was able to receive the new motor and made a great motor mount. Also the new motor was 4mm bigger in diameter. I was still able to get it installed, there was just barely enough room for it to work. My string trimmer works better than before. More power! Thanks
Roe -
April 9, 2022
Verified Purchase
easy repair, great product and service
Installed moter works great.
Guest -
July 26, 2021
Verified Purchase
Exactly what I needed!
The part arrived sooner than I expected & it was perfect working order..highly recommend checking out eReplacementParts before anywhere else!
Guest -
August 23, 2020
Verified Purchase
t
t
t -
t days ago
Verified Purchase
eReplacementParts Team
t
Questions & Answers ?
Our customer Service team is at the ready daily to answer your part and product questions.

Ask our Team
We have a dedicated staff with decades of collective experience in helping customers just like you purchase parts to repair their products.
Does this fit my product?Questions & Answers for Motor Assembly
No questions have been asked yet
Customer Repair Instructions ?
All our customer repair instructions are solicited directly from other customers just like you who have purchased and replaced this exact part.
Motor assembly started smoking, then quit working altogether
Brian - October 31, 2016
👍 21 of 24 people found this instruction helpful
Tool Type
Trimmer
Difficulty
Easy
Time
15-30 minutes
Tools Used
Screwdriver, Pliers, Adjustable Wrench
Parts Used
1. Removed screws to the string guard.
2. Removed all screws to the motor housing and handle.
3. Slid down rubber trim piece to be able to separate the 2 halves of the motor housing.
4. Removed motor housing and pulled off the power clips on the back of the housing with pliers
5. Used an adjustable wrench to hold the back of the spindle while spinning off the trimmer head.
6. Unscrewed the trimmer head spindle trim with a Philips head screwdriver.
7. Screwed the trimmer spindle trim on the new motor assembly.
8. Spun the trimmer head onto the new motor assembly using the adjustable wrench to prevent turning.
9. Attached the power wire clips onto the back of the new motor assembly making sure to feed them through the rubber trim ring first.
10. Mounted motor assembly back into the housing. Don't forget to make sure spring for pivot head is installed correctly.
11. Screwed all screws back into housing.
12. Screwed trim head guard back on.
Did you find this story helpful?
Thanks for voting and helping fellow customers!
Motor had started to smoke. Burned out.
Philip - March 30, 2017
👍 6 of 7 people found this instruction helpful
Tool Type
Trimmer
Difficulty
Medium
Time
30-60 minutes
Tools Used
Screwdriver, Torx drive head.
Parts Used
1. Remove Handle (3 screws)
2. Remove trimmer guard.
3. Remove collar at the end of the straight shaft.
4. Remove motor housing.
5. Remove motor - Spool head unscrews from motor shaft. Clamp stub end and unscrew.
6. Most instructions said to wire black to red mark on motor. My trimmer had a black and a red wire. In my case it was red wire to read mark and black to the other pole.
7. Reassemble
Did you find this story helpful?
Thanks for voting and helping fellow customers!
Motor seized up.
Edward - May 26, 2017
👍 1 of 1 people found this instruction helpful
Tool Type
Trimmer
Difficulty
Medium
Time
30-60 minutes
Tools Used
Screwdriver
Parts Used
I carefully disassembled trimmer when it quit working and discovered the motor had seized up and was not repairable. Ordered a new motor which I received in a timely manner. I am a pretty good repairman but was not confident that I could reassemble trimmer properly but took my time it went back together rather easily with the new motor and now works just like it is supposed to.
Did you find this story helpful?
Thanks for voting and helping fellow customers!
Bearing seized on OEM motor, motor housing is not sealed, motor is not protected from water and grass clippings
Michael - May 18, 2017
👍 1 of 1 people found this instruction helpful
Tool Type
Trimmer
Difficulty
Easy
Time
15-30 minutes
Tools Used
Screwdriver, Torx drive
Parts Used
Remove striing guard with phillips screw driver
Opened housing with Torx driver
De-soldered motor terminal clips
Reconnected motor leads (red wire to red motor terminal)
Re-assembled; motor housing first, then spring loaded swivel housing
Opened housing with Torx driver
De-soldered motor terminal clips
Reconnected motor leads (red wire to red motor terminal)
Re-assembled; motor housing first, then spring loaded swivel housing
Did you find this story helpful?
Thanks for voting and helping fellow customers!
Motor was melted in roybi 40v weed trimmer
Daniel - August 3, 2016
👍 3 of 5 people found this instruction helpful
Tool Type
Trimmer
Difficulty
Medium
Time
1-2 hours
Tools Used
Screwdriver, Pliers, Dremel
Parts Used
1. Remove old motor
2. Remove motor mount off of motor
3. Used a Dremel tool to modify motor mount to fit new motor
4. Install spade terminals on wires
5. Hook wires to motor
6. Test with power for correct rotation
7. Reassemble and test.
2. Remove motor mount off of motor
3. Used a Dremel tool to modify motor mount to fit new motor
4. Install spade terminals on wires
5. Hook wires to motor
6. Test with power for correct rotation
7. Reassemble and test.
Did you find this story helpful?
Thanks for voting and helping fellow customers!
Electric trimmer motor seized.
HUGH - October 18, 2023
Tool Type
Trimmer
Difficulty
Easy
Time
15-30 minutes
Tools Used
Screwdriver, Torx T drivers
Parts Used
Took apart the motor housing , removed all torx screws and string guard. Removed motor, installed the new one from e replacement parts. This was a replacement for this motor. Old motor had ears for spade wire attachments. New motor had wire attached to were the ears would have been. I used wire crimp tubes to attach positive and negative wires.When puting housing back together screw the weed string controller back on the motor use blue locktite make sure you have the position spring in place and the small tooth on the left side of the housing their is a plastic housing trim ring also that goes over the Motorhead housing too. After the trim ring is on the housing will be snapped together, put the torx screws and string guard back on. I also have a swivel head on my model. Spring and tooth must be in in exact position.
Did you find this story helpful?
Thanks for voting and helping fellow customers!
The motor lost its power.
Frances - August 12, 2023
Tool Type
Trimmer
Difficulty
Easy
Time
30-60 minutes
Tools Used
Screwdriver, Pliers, Adjustable Wrench
Parts Used
I removed the motor housing witch was approximately 9 screws. Took out the old motor and rewired the new motor to my Ryobi weedeater and reassembled. Very easy.
Did you find this story helpful?
Thanks for voting and helping fellow customers!
motor
TIMOTHY - November 2, 2021
Tool Type
Trimmer
Difficulty
Easy
Time
15-30 minutes
Tools Used
Screwdriver, Socket set, electrical connections
Parts Used
1. Took apart case around motor.
2. Disconnect motor.
3. Put new motor in.
4. Had to put new connectors on motor wirers.
5. Put case back together.
6. Put battery in and test.
2. Disconnect motor.
3. Put new motor in.
4. Had to put new connectors on motor wirers.
5. Put case back together.
6. Put battery in and test.
Did you find this story helpful?
Thanks for voting and helping fellow customers!
The motor in it started smoking and quit working.
Paul - June 1, 2020
Tool Type
Trimmer
Difficulty
Medium
Time
15-30 minutes
Tools Used
Screwdriver, Wire cutters and strippers
Parts Used
1. Took all the screws out of the trimmer end. 2.pulled the old motor out by cutting the wires.
3. Stripped the wires and attached the new motor.
4. Put it back together. Holding the parts in the correct position while putting the two halves together was the hardest part.
5. Put the battery in and it worked like new.
3. Stripped the wires and attached the new motor.
4. Put it back together. Holding the parts in the correct position while putting the two halves together was the hardest part.
5. Put the battery in and it worked like new.
Did you find this story helpful?
Thanks for voting and helping fellow customers!
motor burnt out
Gerald - November 3, 2019
Tool Type
Trimmer
Difficulty
Easy
Time
Less than 15 minutes
Tools Used
Screwdriver, Pliers, Wrench Set
Parts Used
replaced motor
Did you find this story helpful?
Thanks for voting and helping fellow customers!
Load More Install Stories
OEM stands for Original Equipment Manufacturer and means the part you’re buying is sourced directly from the manufacturer who made your product. At eReplacementParts, we sell only genuine OEM parts, guaranteeing the part you’re purchasing is of better design and of higher quality than aftermarket parts.
Our product descriptions are a combination of data sourced directly from the manufacturers who made your product as well as content researched and curated by our content & customer service teams. This content is edited and reviewed internally before being made public to customers.
Our customer service team are at the ready daily to answer your part and product questions. We have a dedicated staff with decades of collective experience in helping customers just like you purchase parts to repair their products.
All our part reviews are solicited directly from other customers who have purchased this exact part. While we moderate these reviews for profanity, offensive language or personally identifiable information, these reviews are posted exactly as submitted and no alterations are made by our team.
All our customer repair instructions are solicited directly from other customers just like you who have purchased and replaced this exact part. While we moderate these reviews for profanity, offensive language or personally identifiable information, these reviews are posted exactly as submitted and no alterations are made by our team.
Based on data from past customer purchasing behaviors, these parts are most commonly purchased together along with the part you are viewing. These parts may be necessary or helpful to replace to complete your current repair.
All our installation videos are created and produced in collaboration with our in-house repair technician, Mark Sodja, who has helped millions of eReplacementParts customers over the last 13 years repair their products. Mark has years of experience in selling and repairing both commercial and residential products with a specialty in gas-powered equipment.
This data is collected from customers who submitted a repair instruction after replacing this exact part. Customers can rate how easy the repair was to complete and how long it took. We aggregate this data to provide a repair rating that allows customers to quickly determine the difficulty and time needed to perform their own repair.