
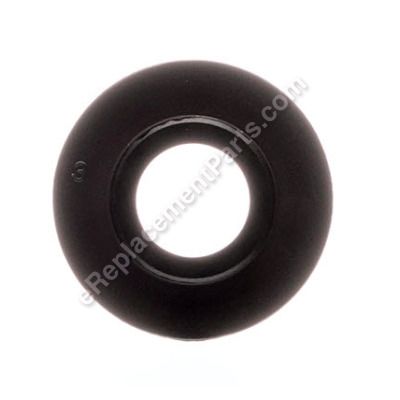


The manufacturer states that, "The magnet ring must be installed with three (3) drops of Loctite 680 in the pattern of a triangle on the armature shaft, position the ring, install bearing and let sit for 12hrs minimum."
Magnet Ring N618274
OEM part for: DeWALT
Part Number: N618274
$4.99
In Stock
Jump To:
Frequently Purchased Together ?
Compatibility
This part will fit the following 16 machines
DeWALT
DW618 Type 1 Fixed Base Router View Diagrams & Manuals
DW618M Type 1 Fixed Base Router View Diagrams & Manuals
DW618D Type 1 D-Handle Router View Diagrams & Manuals
DW618P Type 1 Router View Diagrams & Manuals
DW618B3 Type 1 Three Base Router Kit View Diagrams & Manuals
DW618B3E Type 1 Base Router Kit View Diagrams & Manuals
DW618PKB (Type 1) Combo Kit Router Fxd View Diagrams & Manuals
DW618K (Type 1) 2-1/4hp Router View Diagrams & Manuals
DW618K (Type 2) 2-1/4hp Router View Diagrams & Manuals
DW618PK (Type 1) 2-1/4hp Router View Diagrams & Manuals
DW618PK (Type 2) 2-1/4hp Router View Diagrams & Manuals
DW618 (Type 2) 2-1/4hp Router Power Tool View Diagrams & Manuals
DW618B3 (Type 2) 3 Base Router Kit Power Tool View Diagrams & Manuals
DW618D (Type 2) 2-1/4hp Router Power Tool View Diagrams & Manuals
DW618M (Type 2) 2-1/4hp Router Power Tool View Diagrams & Manuals
DW618PKB (Type 2) Combo Kit Router Fxd Power Tool View Diagrams & Manuals
Show More Compatible Models
This item works with the following types of products:
- Router Parts
This part replaces obsolete part #: 399029-00 (Important! See Repair Note)
Customer Part Reviews ?
Average Rating (out of 5):
Click to filter by ratings:
5 stars
3
4 stars
0
3 stars
0
2 stars
0
1 stars
0
< PREV
- 1
Magnet ring
You had the part I needed and had fast service
Guest -
January 7, 2022
Verified Purchase
Easy repair.
the part arrived and was easy to replace. just removed the plastic cover and pulled the top baring with a battery terminal puller, broke the glue holding the plastic ring on and slowly worked it up with a brass driver till i could use the battery terminal puller on it. slid the new magnet ring on and the bearing after it. runs just as well as it did before.
Guest -
June 17, 2021
Verified Purchase
worked great
worked great fast shipping Thanks
Guest -
December 12, 2020
Verified Purchase
t
t
t -
t days ago
Verified Purchase
eReplacementParts Team
t
Questions & Answers ?
Our customer Service team is at the ready daily to answer your part and product questions.

Ask our Team
We have a dedicated staff with decades of collective experience in helping customers just like you purchase parts to repair their products.
Does this fit my product?Questions & Answers for Magnet Ring
No questions have been asked yet
Customer Repair Instructions ?
All our customer repair instructions are solicited directly from other customers just like you who have purchased and replaced this exact part.
Magnetic ring broken.
Michael - November 1, 2016
👍 7 of 9 people found this instruction helpful
Tool Type
Router
Difficulty
Medium
Time
15-30 minutes
Tools Used
Screwdriver, Socket set, Wrench Set, Nutdriver, Adjustable Wrench, Hammer
Parts Used
Removed the cord.
Removed the top of the router.
Used a bearing puller to remove the bearing.
Cleaned out all of the pieces of the broken magnet. Make sure to get them all.
Place the new magnet ring on the shaft.
Used a socket with the same diameter of the inner race of the bearing, then tapped it in place
Removed the top of the router.
Used a bearing puller to remove the bearing.
Cleaned out all of the pieces of the broken magnet. Make sure to get them all.
Place the new magnet ring on the shaft.
Used a socket with the same diameter of the inner race of the bearing, then tapped it in place
Did you find this story helpful?
Thanks for voting and helping fellow customers!
Magnet ring broke while router was in use. Router lost speed control.
Anthony - September 21, 2017
👍 4 of 4 people found this instruction helpful
Tool Type
Router
Difficulty
Hard
Time
More than 2 hours
Tools Used
Screwdriver, Wrench Set, Adjustable Wrench, Home made tool for bearing removal
Parts Used
To replace magnet ring, the bearing 330003-09 must be removed. To do this I had to completely dismantle the router and make a slotted steel plate to slip behind the bearing while carefully hammering the end of the shaft with a brass drift.
After releasing the springs on the bushes and the earthing wire screw the whole brush ring and field assembly can be pressed out of the case with steady force; then the plastic field case. Now remove the big clamp nut and press the armature assembly out of the larger bearing.
Remove bearing 330003-09 and cut off the plastic remains of the old magnet ring. Glue new magnet ring into position with 2-part epoxy. Re-assemble armature in case and then very carefully tap bearing down to just touch the magnet ring. ( First time I broke the new magnet ring and damaged the bearing getting it off again) Now re-assembled and working fine.
Did you find this story helpful?
Thanks for voting and helping fellow customers!
Magnet ring broke (shattered)
Gregory - August 6, 2016
👍 5 of 6 people found this instruction helpful
Tool Type
Router
Difficulty
Easy
Time
15-30 minutes
Tools Used
, Wheel puller
Parts Used
Used wheel puller to pull the Bearing of to allow access to top shaft under yellow plastic Dewalt housing. once bearing was removed I made sure to remove any errant pieces left behind by the shattered magnet ring of which I discovered a small ring like piece still on the shaft that looked like it belonged there but upon careful inspection and referencing the parts diagram I realized that it was a remnant of the magnet ring alignment ridge made of plastic i discarded that and installed the new piece. reseated the bearing and put together unfortunately the excessive sparking that called attention to the broken ring was still occurring. I disassembled again and noted that there was some green discoloration on the copper commutator contacts of the motor shaft itself. Indicating to me that corrosion was the culprit of the sparking. I tried mitigate the damage with progressive grits of sand paper starting with 800 grit up to 2000 grit but unfortunately I have to order a new motor shaft. Its a sin because even though Ive had the dewalt router for a number of years (kept in its case with the 3 bases) I have about a total use of probably an hour on it ill update after repairing the shaft hopefully dewalt will cover it they seem to be good that way from what i have seen around the internet. details to follow! as far as my purchase I am happy and the part arrived quickly!!!!!
Did you find this story helpful?
Thanks for voting and helping fellow customers!
Factory magnetic ring shattered after years of off and on use.
Ryan - April 22, 2018
👍 1 of 1 people found this instruction helpful
Tool Type
Router
Difficulty
Easy
Time
15-30 minutes
Tools Used
Screwdriver, Bearing puller, sand paper, small scraper
Parts Used
There are some informative videos that walk through the process quite well. Watch them.
Router will still work without the magnetic ring, but at max rpm. Make sure to pull the motor out and remove all magnet shards and debris and put it back together. It's not ideal but it can get a job done while waiting for parts to arrive.
The new magnet fit well and installed easily, remember to epoxy the ring to the shaft and let it cure before use.
I noticed that my soft start isn't quite as soft as it was with the original magnet but that's just an observation, I don't think that it'll be an issue.
Did you find this story helpful?
Thanks for voting and helping fellow customers!
Magnet Ring broke in pieces!!
Hugo - February 16, 2017
👍 1 of 1 people found this instruction helpful
Tool Type
Router
Difficulty
Medium
Time
30-60 minutes
Tools Used
Screwdriver, \\
Parts Used
1. Removed the End Cap.
2. Carefully searched for pieces of the broken Magnet Ring.
3. I used the Gear/Ball Bearing Puller to removed the Ball Bearing (Is supposed that the Puller help to remove the Ball Bearing without damage it, but that wasn't my case, luckily I bought also a replacement of the ball bearing).
4. I found the inner piece/ring of the magnet ring still mounted, so, I used a flat head screw driver to remove it, this helped me to see what is the right side to put in place the new one.
5. To put in place the new ball bearing I have used a hammer and a socket with the same size of the inner race of the bearing.
6. Then placed again the End Cap.
Did you find this story helpful?
Thanks for voting and helping fellow customers!
Arcing on commutator after use at high speed for several hours
bob - May 26, 2016
👍 1 of 1 people found this instruction helpful
Tool Type
Router
Difficulty
Medium
Time
30-60 minutes
Tools Used
Screwdriver, Pliers, Power Drill, bearing puller
Remove plastic housing for electric motor
Remove broken (in pieces) magnetic ring
Inspect commutator
Remove top shaft bearing with bearing/wheel puller
Remove chipped brushes
Sand commutator with silicon carbide sand paper (insert narrow strip of sc sand paper around commutator hold tight against commutator and manually revolve commutator to polish commutator sections)
Replace with new brushes
Replace magnetic ring
Re seat top bearing using drill press as press
Replace plastic housing for motor
Did you find this story helpful?
Thanks for voting and helping fellow customers!
Magnet Ring broke
James - August 16, 2022
Tool Type
Router
Difficulty
Medium
Time
30-60 minutes
Tools Used
Screwdriver, Torx Drive, 3 Jaw Bearing Puller, Magnet Ring/Bearing Press
Parts Used
1. Removed Armature from Housing.
2. Removed Bearing
3. Installed Magnet Ring. Secured Magnet Ring with Loctite 680.
4. Reinstalled Bearing
5, Replaced Armature in Housing
2. Removed Bearing
3. Installed Magnet Ring. Secured Magnet Ring with Loctite 680.
4. Reinstalled Bearing
5, Replaced Armature in Housing
Did you find this story helpful?
Thanks for voting and helping fellow customers!
Magnet Ring broke and variable speed on Router no longer worked
James - February 22, 2021
Tool Type
Router
Difficulty
Medium
Time
30-60 minutes
Tools Used
Screwdriver, Gear puller, hammer
Parts Used
First looked up video on YouTube to learn how to make the repair. eReplacement parts had a great video showing how to take the router apart and replace the part. It was step by step and very easy to follow along.
Did you find this story helpful?
Thanks for voting and helping fellow customers!
the magnet ring on the router motor broke
coleman - September 3, 2020
Tool Type
Router
Difficulty
Medium
Time
Less than 15 minutes
Tools Used
Screwdriver, hammer
Parts Used
1. removed the bearing
2. removed the broken magnet
3. replaced the magnet and bearing
2. removed the broken magnet
3. replaced the magnet and bearing
Did you find this story helpful?
Thanks for voting and helping fellow customers!
Good instructions
Thomas - December 12, 2018
Tool Type
Router
Difficulty
Medium
Time
30-60 minutes
Tools Used
Screwdriver, Pliers, 3” gear puller
Parts Used
Removed case top
Moved speed control aside, disconnecting positive and negative spade connectors.
Removed remaining pieces of magnet, by breaking off with large flat screw driver.
Pulled bearing off with gear puller
Cleaned dust and other residue from top of coils
Installed magnet with thread locker fluid per Dewalt note
Pressed New bearing on with arbor press
Installed case top
Let sit 24 hours to allow thread lock to dry
Did you find this story helpful?
Thanks for voting and helping fellow customers!
Load More Install Stories
OEM stands for Original Equipment Manufacturer and means the part you’re buying is sourced directly from the manufacturer who made your product. At eReplacementParts, we sell only genuine OEM parts, guaranteeing the part you’re purchasing is of better design and of higher quality than aftermarket parts.
Our product descriptions are a combination of data sourced directly from the manufacturers who made your product as well as content researched and curated by our content & customer service teams. This content is edited and reviewed internally before being made public to customers.
Our customer service team are at the ready daily to answer your part and product questions. We have a dedicated staff with decades of collective experience in helping customers just like you purchase parts to repair their products.
All our part reviews are solicited directly from other customers who have purchased this exact part. While we moderate these reviews for profanity, offensive language or personally identifiable information, these reviews are posted exactly as submitted and no alterations are made by our team.
All our customer repair instructions are solicited directly from other customers just like you who have purchased and replaced this exact part. While we moderate these reviews for profanity, offensive language or personally identifiable information, these reviews are posted exactly as submitted and no alterations are made by our team.
Based on data from past customer purchasing behaviors, these parts are most commonly purchased together along with the part you are viewing. These parts may be necessary or helpful to replace to complete your current repair.
All our installation videos are created and produced in collaboration with our in-house repair technician, Mark Sodja, who has helped millions of eReplacementParts customers over the last 13 years repair their products. Mark has years of experience in selling and repairing both commercial and residential products with a specialty in gas-powered equipment.
This data is collected from customers who submitted a repair instruction after replacing this exact part. Customers can rate how easy the repair was to complete and how long it took. We aggregate this data to provide a repair rating that allows customers to quickly determine the difficulty and time needed to perform their own repair.