
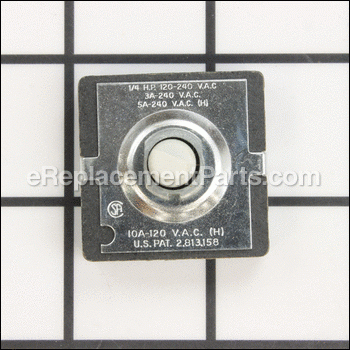

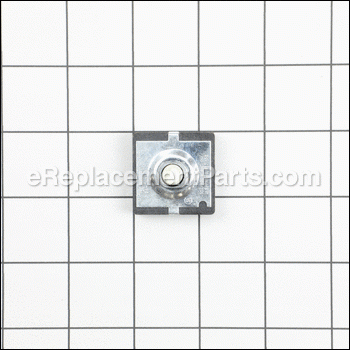
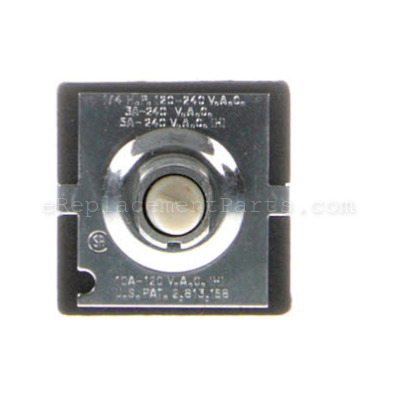


This light switch is a genuine Broan part. This item was designed for use with range hoods and allows the light bulb to turn on and off. It is an identical replacement for a missing or broken light switch that originally came with a new unit. Please make sure to check the appropriate diagram for your model for the correct location and application of this item. This part is sold individually.
Range Hood Light Switch SV08338
OEM part for: Broan
Part Number: SV08338
$87.19
In Stock
Compatibility
This part will fit the following 35 machines
Broan
E60 Range Hood View Diagrams & Manuals
E60E Range Hood View Diagrams & Manuals
E64 Range Hood View Diagrams & Manuals
E64E Range Hood View Diagrams & Manuals
E64000 (30") Elite Series Vent Hood View Diagrams & Manuals
E64000 (36") Elite Series Vent Hood View Diagrams & Manuals
E64000 (42") Elite Series Vent Hood View Diagrams & Manuals
E64000 (48") Elite Series Vent Hood View Diagrams & Manuals
E64000 (32") Elite Series Vent Hood View Diagrams & Manuals
E6430SS E64 Series High Performance Range Hood View Diagrams & Manuals
E64E30SS Range Hood View Diagrams & Manuals
E6436SS Range Hood View Diagrams & Manuals
E64E36SS Range Hood View Diagrams & Manuals
E6442SS Range Hood View Diagrams & Manuals
E64E42SS Range Hood View Diagrams & Manuals
E6448SSE Range Hood View Diagrams & Manuals
E6448TSS Range Hood View Diagrams & Manuals
E64E48SS Range Hood View Diagrams & Manuals
E6030SS Range Hood View Diagrams & Manuals
E60E30SS Range Hood View Diagrams & Manuals
E6042TSS Range Hood View Diagrams & Manuals
E60E42SS Range Hood View Diagrams & Manuals
E6048TSS Range Hood View Diagrams & Manuals
E60E48SS Range Hood View Diagrams & Manuals
E60-A Pro Style Range Hood - 600 Cfm / 13.5 Sones View Diagrams & Manuals
E64E-B Pro Style Under Cabinet Range Hood For Remote Blowers View Diagrams & Manuals
E60-C Pro Style Range Hood - 600 Cfm / 13.5 Sones View Diagrams & Manuals
E64-C Pro Style Under Cabinet Range Hood - 600 Cfm / 13.5 Sones View Diagrams & Manuals
E64-B Pro Style Under Cabinet Range Hood - 600 Cfm / 13.5 Sones View Diagrams & Manuals
E64E-A Pro Style Under Cabinet Range Hood For Remote Blowers View Diagrams & Manuals
E60E-B Pro Style Range Hood For Remote Blowers View Diagrams & Manuals
E60E-A Pro Style Range Hood For Remote Blowers View Diagrams & Manuals
E60-B Pro Style Range Hood - 600 Cfm / 13.5 Sones View Diagrams & Manuals
E64-A Pro Style Under Cabinet Range Hood - 600 Cfm / 13.5 Sones View Diagrams & Manuals
T6048TSSC Range Hood View Diagrams & Manuals
Show More Compatible Models
This item works with the following types of products:
- Range Parts
This part replaces obsolete part #: V08338
Customer Part Reviews ?
Average Rating (out of 5):
Click to filter by ratings:
5 stars
2
4 stars
0
3 stars
0
2 stars
0
1 stars
0
< PREV
- 1
Faster than the nanufacturer
Received a part that was only in stock here, putting a stove hood back in operation about a week earlier than with any other supplier
Stephen -
April 30, 2022
Verified Purchase
exactly what I needed
quick shipping and exactly as described
Guest -
November 12, 2020
Verified Purchase
t
t
t -
t days ago
Verified Purchase
eReplacementParts Team
t
Questions & Answers ?
Our customer Service team is at the ready daily to answer your part and product questions.

Ask our Team
We have a dedicated staff with decades of collective experience in helping customers just like you purchase parts to repair their products.
Does this fit my product?Questions & Answers for Range Hood Light Switch
No questions have been asked yet
Customer Repair Instructions ?
All our customer repair instructions are solicited directly from other customers just like you who have purchased and replaced this exact part.
Range hood light switch shorted out when wire broke off
Stephen - April 30, 2022
Tool Type
Range
Difficulty
Hard
Time
More than 2 hours
Tools Used
Screwdriver, Pliers, Headlamp
Parts Used
Turn off power to range hood at breaker panel. Fan should no longer operate. Remove the two plastic switch knobs by pulling off. These are labeled already.
Remove 3 filter panels by pushing up and out and use a screwdriver or putty knife to compress spring band on bottom end.
Remove the long filter rest from the back.
Remove one screw on right inside and remove horizontal brace (side is looking at it from the front)
Remove the lead to the fan motor (disconnect plug)
Remove 3-4 screws holding the lamp/switch panel
Lift panel up to disengage the slots on lower edge and angle the panel in such a way as to expose the inside. Identify the three wires going to the old switch. Remove the retaining nut from the old switch and retain the nut for reuse. Identify the three wire locations on the old and new switches. Remove wires from the old (pry the old one apart with a screwdriver to remove, or expose about 5/16 of bare wire) and push each wire into corresponding hole in new switch being careful that wire path is maintained so switch can be reinstalled properly.
Reinstall switch with retaining nut and tighten with needle nose pliers. Turn on power to test then turn off again.
Reinstall switch and lamp panel engaging slots at bottom and ensuring all wires are free, with screws. Reinstall R retaining brace with one screw making sure back end is held in retainers. Reattach fan motor plug.
Reinstall bottom filter rail. Compress springs and reinstall filter trays with handles facing you.
Notes: the original switch failed because one of the wires broke off where it was held within the switch by a piece of metal band. I believe this occurred due to movement and traction on the wire because the retaining nut on the switch was loose. 30 seconds to tighten it at any time before it failed probably could have prevented the failure.
Did you find this story helpful?
Thanks for voting and helping fellow customers!
Light switch in Braun Range Hood stopped working
David - January 29, 2021
Tool Type
Range
Difficulty
Easy
Time
15-30 minutes
Tools Used
Screwdriver
Parts Used
1. Turned off circuit breaker
2. Removed all Range Hood Filters
3. Removed cover on underside of range hood by removing 4 screws and straightening out a
small retention tab
4. Removed old switch by removing nut and cutting wires - ensured remaining wires properly
stripped and prepped
5. Inserted wires into new switch. Pushing them in the opening created proper pressure to
keep them in place
6. Put new switch into hole in cover, reattached nut, then re attached range hood cover
Did you find this story helpful?
Thanks for voting and helping fellow customers!
OEM stands for Original Equipment Manufacturer and means the part you’re buying is sourced directly from the manufacturer who made your product. At eReplacementParts, we sell only genuine OEM parts, guaranteeing the part you’re purchasing is of better design and of higher quality than aftermarket parts.
Our product descriptions are a combination of data sourced directly from the manufacturers who made your product as well as content researched and curated by our content & customer service teams. This content is edited and reviewed internally before being made public to customers.
Our customer service team are at the ready daily to answer your part and product questions. We have a dedicated staff with decades of collective experience in helping customers just like you purchase parts to repair their products.
All our part reviews are solicited directly from other customers who have purchased this exact part. While we moderate these reviews for profanity, offensive language or personally identifiable information, these reviews are posted exactly as submitted and no alterations are made by our team.
All our customer repair instructions are solicited directly from other customers just like you who have purchased and replaced this exact part. While we moderate these reviews for profanity, offensive language or personally identifiable information, these reviews are posted exactly as submitted and no alterations are made by our team.
Based on data from past customer purchasing behaviors, these parts are most commonly purchased together along with the part you are viewing. These parts may be necessary or helpful to replace to complete your current repair.
All our installation videos are created and produced in collaboration with our in-house repair technician, Mark Sodja, who has helped millions of eReplacementParts customers over the last 13 years repair their products. Mark has years of experience in selling and repairing both commercial and residential products with a specialty in gas-powered equipment.
This data is collected from customers who submitted a repair instruction after replacing this exact part. Customers can rate how easy the repair was to complete and how long it took. We aggregate this data to provide a repair rating that allows customers to quickly determine the difficulty and time needed to perform their own repair.