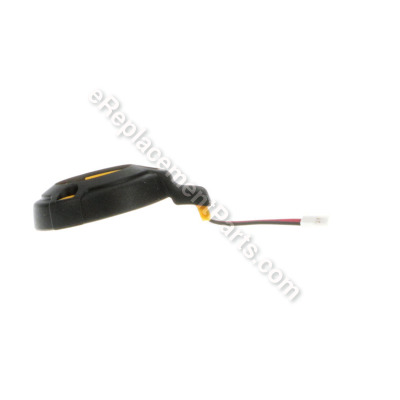
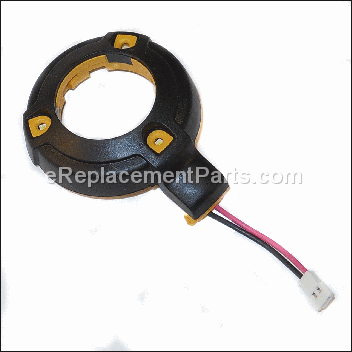
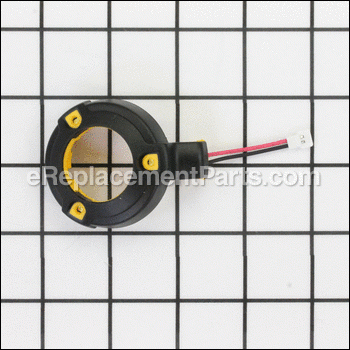
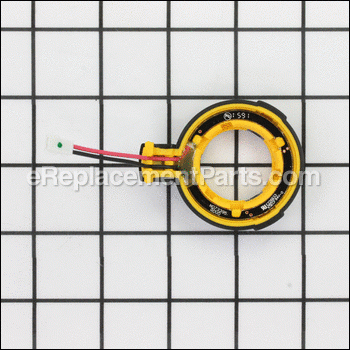


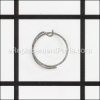
This replacement LED light ring assembly is specially designed for use with Dewalt impact drivers. The worklights are made for lighting the immediate work surface and are not intended to be used as a flashlight. The worklights are activated when the trigger switch is depressed, and will automatically turn off 20 seconds after the trigger switch is released. If the trigger switch remains depressed, the worklights will remain on. Please note this assembly is sold individually.
Light Ring Assembly N073422
OEM part for: DeWALT
Part Number: N073422
$17.38
In Stock
Jump To:
Frequently Purchased Together ?


Compatibility
This part will fit the following 17 machines
DeWALT
DCF885C2 Type 1 20V Impact Driver View Diagrams & Manuals
DCF885L2 Type 1 20V Impact Driver View Diagrams & Manuals
DCF883B Type 1 20V 3/8 Impact Wrench View Diagrams & Manuals
DCF883L2 Type 1 20V 3/8 Impact Wrench View Diagrams & Manuals
DCF885B (Type 1) 20v Impact Driver View Diagrams & Manuals
DCF885B (Type 2) 20v Impact Driver View Diagrams & Manuals
DCF883M2 (Type 2) 20v Max 3/8 Wrench View Diagrams & Manuals
DCF885L1 (Type 5) 20v Comp Imp Driver View Diagrams & Manuals
DCF885M2 (Type 2) 20v Impact Driver View Diagrams & Manuals
DCF885B (Type 4) 20v Impact Driver View Diagrams & Manuals
DCF885B (Type 5) 20v Impact Driver View Diagrams & Manuals
DCF883B (Type 2) 20v Max 3/8 Wrench Power Tool View Diagrams & Manuals
DCF885B-B3 (Type 1) Impact Driver Power Tool View Diagrams & Manuals
DCF885B-B3 (Type 2) Impact Driver Power Tool View Diagrams & Manuals
DCF885C2 (Type 2) Impact Driver Power Tool View Diagrams & Manuals
DCF885C2 (Type 5) Impact Driver Power Tool View Diagrams & Manuals
DCF885M2 (Type 5) Impact Driver Power Tool View Diagrams & Manuals
Show More Compatible Models
This item works with the following types of products:
- Impact Driver Parts
- Impact Wrench Parts
Customer Part Reviews ?
Average Rating (out of 5):
Click to filter by ratings:
5 stars
5
4 stars
0
3 stars
0
2 stars
0
1 stars
0
< PREV
- 1
Light ring
I received just what I ordered and what I am needing
Keith -
May 5, 2022
Verified Purchase
Great part and work good
Thank you it's arrive in time when i needed 👍
Guest -
May 28, 2020
Verified Purchase
Good quality, fit like it should
Great service fast shipping 👍
Guest -
August 26, 2019
Verified Purchase
Great experience
Great to have working lights again on my Dewalt impact driver.
Guest -
August 9, 2019
Verified Purchase
Perfect!!
Just as I needed and worked perfect!!!
Guest -
July 8, 2019
Verified Purchase
t
t
t -
t days ago
Verified Purchase
eReplacementParts Team
t
Questions & Answers ?
Our customer Service team is at the ready daily to answer your part and product questions.

Ask our Team
We have a dedicated staff with decades of collective experience in helping customers just like you purchase parts to repair their products.
Does this fit my product?Questions & Answers for Light Ring Assembly
No questions have been asked yet
Customer Repair Instructions ?
All our customer repair instructions are solicited directly from other customers just like you who have purchased and replaced this exact part.
One of the three lights burned out
Edwin - July 27, 2016
👍 3 of 4 people found this instruction helpful
Tool Type
Impact Driver
Difficulty
Easy
Time
Less than 15 minutes
Tools Used
, Allen wench
Parts Used
Removed screws from the body...opened the shell...only thing I didn't know was the ring turns and clicked in....but a service repair man told me it snaps off with a flathead screwdriver.....he was wrong ....Otherwise everything went smoothly
Did you find this story helpful?
Thanks for voting and helping fellow customers!
The light ring hasn't worked since I bought this tool for $10 USD at a local pawn shop.
DAVID - March 15, 2023
Tool Type
Impact Wrench
Difficulty
Easy
Time
Less than 15 minutes
Tools Used
, Chapman tool driver set
Parts Used
I also ordered a new clamshell kit for the impact driver as well. First, I removed all the screws that hold the clamshell on. They are all accessible from the right side. Next, I lifted the right half of the clamshell off the assembly, leaving all the internals attached to the left side clamshell. Then I removed the light ring assembly by first unhooking the power plug connector then turning the light ring clockwise until it would clear the left side clamshell and finally, slid it off the front of the assembly.
The install went like this, I laid the new left side next to the old on full of internals. I lifted the motor bushing assembly up and out before i lifted the power supply/trigger assembly out and moved the whole mess over to the new clamshell and put it back in the same order that I removed it in.
I slid the light ring assembly back in place, rotated it counterclockwise to seat it, and re connected the power coupling.
Lastly, I put the right-side clamshell in place and replaced all the screws.
Easy-peasy, lemon squeezy!
Did you find this story helpful?
Thanks for voting and helping fellow customers!
No repair instruction
Shannon - October 21, 2021
Tool Type
Impact Driver
Difficulty
Medium
Time
15-30 minutes
Tools Used
Screwdriver
Parts Used
When did the type of screws that I had and just took everything and put it in the new shell and it works great
Did you find this story helpful?
Thanks for voting and helping fellow customers!
LEDs on impact driver not working
Chris - June 6, 2020
Tool Type
Impact Driver
Difficulty
Easy
Time
15-30 minutes
Tools Used
Screwdriver, Torx
Parts Used
I forget if there were 8 or so Philips screws or if they were small Torx screws, but after removing them and cutting a slit in the warning label the unit splits in half (make sure the battery is already out). Unplug the old LED ring and give it a slight twist (clockwise while looking down onit). It pops right off. Reverse for reassembly.
Only takes 15-20 minutes if you're doing it for the first time.
Only takes 15-20 minutes if you're doing it for the first time.
Did you find this story helpful?
Thanks for voting and helping fellow customers!
The three led lights around the chuck went out
Jimmy - February 14, 2019
Tool Type
Impact Driver
Difficulty
Medium
Time
30-60 minutes
Tools Used
Screwdriver, Torx driver
Parts Used
Take all the housing screws out and separate the housing then you have access to the ring with the lights in it, unplug the power wire and remove the ring, replace the new ring and plug up, now put your housing back together, and WAH LAH you have lights again.
THANKS EREPLACEMENTPARTS
DeWalt 20v impact driver
THANKS EREPLACEMENTPARTS
DeWalt 20v impact driver
Did you find this story helpful?
Thanks for voting and helping fellow customers!
Rubber protective grip was falling off of the unit.
Matt - December 29, 2018
Tool Type
Impact Driver
Difficulty
Easy
Time
Less than 15 minutes
Tools Used
, I used a ratcheting screwdriver with a torques bit in it.
Actually sent it to Dewalt to be repaired. The gave me an estimate of $89. I can get a new one for around $110. When I received my Impact Driver back from Dewalt it was in pieces in a bag. I found the clam shell and the LED light ring that go on the front for less that $30 shipped to my house. All I had to do was wipe all the parts down and install them into the new clam shell. Took less than 15 minutes.
Did you find this story helpful?
Thanks for voting and helping fellow customers!
My driver had lost power and was heating up
Dale - December 5, 2018
Tool Type
Impact Driver
Difficulty
Medium
Time
15-30 minutes
Tools Used
Screwdriver, Pliers
1. Remove all screws from the body of the driver
2. Remove one side cover from the driver.
3. Remove motor/ transmission an brush assembly as one unit. Note alignment of electric motor parts.
4. Unplug remove old brush assembly and reinstall new brush assembly.
4a. If ou are replacing the light ring, now is the time to unplug and remove and replace it.
5. Put brush assembly, motor and transmission together and put back into body of driver.
6.Put other side of driver on and reinstall screws.
Put battery in and test the fix.
Did you find this story helpful?
Thanks for voting and helping fellow customers!
OEM stands for Original Equipment Manufacturer and means the part you’re buying is sourced directly from the manufacturer who made your product. At eReplacementParts, we sell only genuine OEM parts, guaranteeing the part you’re purchasing is of better design and of higher quality than aftermarket parts.
Our product descriptions are a combination of data sourced directly from the manufacturers who made your product as well as content researched and curated by our content & customer service teams. This content is edited and reviewed internally before being made public to customers.
Our customer service team are at the ready daily to answer your part and product questions. We have a dedicated staff with decades of collective experience in helping customers just like you purchase parts to repair their products.
All our part reviews are solicited directly from other customers who have purchased this exact part. While we moderate these reviews for profanity, offensive language or personally identifiable information, these reviews are posted exactly as submitted and no alterations are made by our team.
All our customer repair instructions are solicited directly from other customers just like you who have purchased and replaced this exact part. While we moderate these reviews for profanity, offensive language or personally identifiable information, these reviews are posted exactly as submitted and no alterations are made by our team.
Based on data from past customer purchasing behaviors, these parts are most commonly purchased together along with the part you are viewing. These parts may be necessary or helpful to replace to complete your current repair.
All our installation videos are created and produced in collaboration with our in-house repair technician, Mark Sodja, who has helped millions of eReplacementParts customers over the last 13 years repair their products. Mark has years of experience in selling and repairing both commercial and residential products with a specialty in gas-powered equipment.
This data is collected from customers who submitted a repair instruction after replacing this exact part. Customers can rate how easy the repair was to complete and how long it took. We aggregate this data to provide a repair rating that allows customers to quickly determine the difficulty and time needed to perform their own repair.