
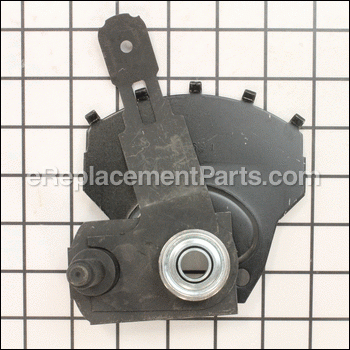

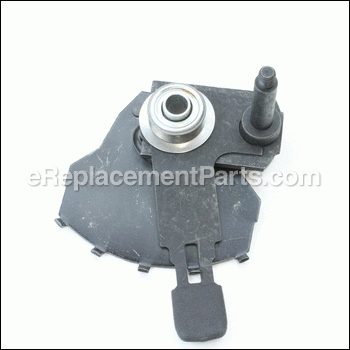
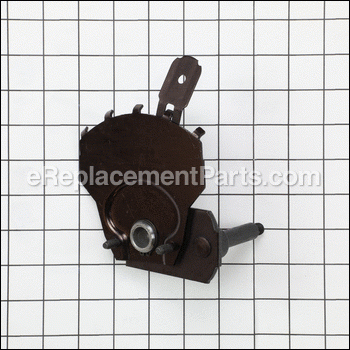
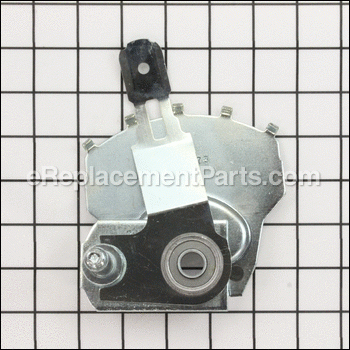
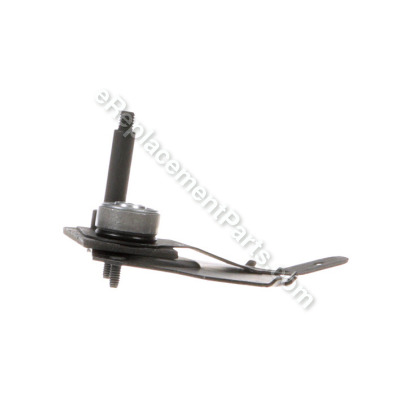

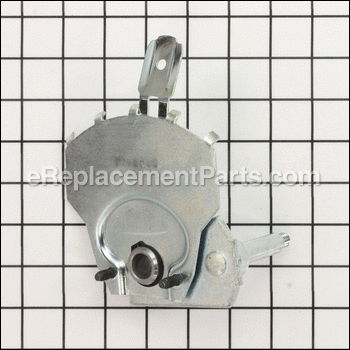
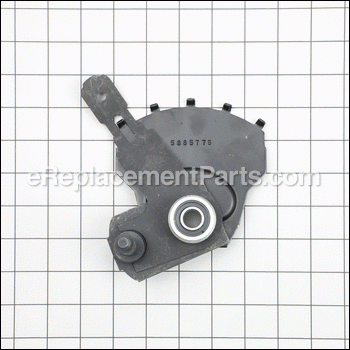

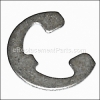
This is a genuine Husqvarna part for use with Husqvarna, Poulan and Jonsered Lawn Mowers. The height adjuster moves the lawn mower wheel up or down to adjust the lawn mower deck to the desired cutting height. The most common reason for replacing the height adjuster plate is if it is damaged. This part is sold individually. Here is a list of tools that are needed to install the left front wheel adjuster are a flat-head screwdriver, 9/16” nut driver, and a 3/8” nut driver.
Adjuster, Asm, 22+fgd, Lf/awd 581497907
OEM part for: Husqvarna, Craftsman, Poulan, Jonsered
Part Number: 581497907
$17.43
In Stock
Jump To:
Frequently Purchased Together ?


Compatibility
This Adjuster, Asm, 22+fgd, Lf/awd will fit the following 269 machines. Confirm this part works with your model, and view the detailed model diagrams and repair help we have to offer.
Husqvarna
Craftsman
Poulan
Jonsered
Show More Compatible ModelsThis item works with the following types of products:
- Lawn Mower Parts
- Lawn Tractor Parts
This part replaces obsolete part #: 581497903, 195110, 431142, 532431144 (Includes Bearing, Key #17), 581497904 (Includes Bearing, Key#17), 581497905 (Lh), 5814979-02, 5324378-73, 5324091-09, 532437874, 532409109, 532409107, 532408018, 581497904, 431144, 408018, 195107, 532431144, 532195107
Customer Part Reviews ?
Average Rating (out of 5):
Click to filter by ratings:
5 stars
9
4 stars
1
3 stars
0
2 stars
0
1 stars
0
< PREV
- 1
What I ordered.
The part shipped when promised and was what I ordered to fix my mower.
Kenneth -
May 20, 2023
Verified Purchase
parts work great
got exactly wht I orerded and it got here qwik.. no complaints, will definetly use replacementparts.com again
Guest -
May 24, 2022
Verified Purchase
Part was as expected and easy fix
I would recommend this company. I will purchase from them.
Guest -
May 9, 2022
Verified Purchase
Easy repair works perfectly
Brand new quick shipping
Guest -
August 3, 2020
Verified Purchase
Simple repair .
The part was perfect fit. Simple and easy repair. Thank you , will definitely use you all again in the future !
Guest -
October 2, 2019
Verified Purchase
DIYers can do this easily!
Part was a perfect match/fit and was a snap to install.
Guest -
September 28, 2019
Verified Purchase
Part works flawlessly
My old self propelled plastics mower wheels were stripped and no longer turning. I removed the axle but unfortunately broke the bolt that held the wheel on. I ordered both wheel adjusters, left and right. My mower is no longer self propelled but the front wheels now rotate and I’m able to continue using it.
Guest -
September 11, 2019
Verified Purchase
Perfect replacement
Works great. Mower is back up and running
Guest -
July 28, 2019
Verified Purchase
Running straight again
front wheel bearings shot, adjusters bent, front mower body housing slightly bent
Remove drive belt cover, front wheels, c-clips, drive shaft pins, adjuster nuts, Drop drive system.
(Removing drive belt cover gives you the room to remove drive system).
After installing new adjusters, there was not enough clearance on drive shaft to re-install the drive shaft pins. Deduced front of mower "out of square" by 1/4".
Pounded straight with hammers, reinstalled in reverse of above.
Works great !
Guest -
July 24, 2019
Verified Purchase
Easy repair
Exact fit took a little while to get here
Robert -
April 15, 2022
Verified Purchase
Questions & Answers ?
Our customer Service team is at the ready daily to answer your part and product questions.

Ask our Team
We have a dedicated staff with decades of collective experience in helping customers just like you purchase parts to repair their products.
Does this fit my product?Questions & Answers for Adjuster, Asm, 22+fgd, Lf/awd
No questions have been asked yet
Customer Repair Instructions ?
All our customer repair instructions are solicited directly from other customers just like you who have purchased and replaced this exact part.
Wheel adjuster bearings had worn away
Tim - December 17, 2017
👍 2 of 2 people found this instruction helpful
Tool Type
Lawn Mower
Difficulty
Easy
Time
15-30 minutes
Tools Used
Screwdriver, Socket set, Wrench Set, Punch, hammer
Parts Used
1. Removed wheel nut using a socket wrench.
2. Removed the wheel, washer and dust cover.
3. Removed E clip from the drive axle using a screw driver
4. Pulled off the drive gear
5. Removed retainer pin in the transmission axle using punch and hammer
6. Removed two nuts that secured the wheel adjuster using a open-face wrench.
7. Removed and replaced the wheel adjuster.
8. Replaced everything in reverse sequence.
Comment: replacing the wheel adjuster nuts was a bit of a challenge because of the tight space and fat fingers.
Did you find this story helpful?
Thanks for voting and helping fellow customers!
Bearing went out and adjuster bent, replacement came as a unit.
Rick - April 21, 2017
👍 3 of 4 people found this instruction helpful
Tool Type
Lawn Mower
Difficulty
Easy
Time
Less than 15 minutes
Tools Used
Screwdriver, Socket set, Wrench Set
Parts Used
Removed wheel and adjuster and replaced with new
Did you find this story helpful?
Thanks for voting and helping fellow customers!
Right wheel wouldn't turn and kept disengaging from adjuster arm
Cora - August 1, 2023
Tool Type
Lawn Mower
Difficulty
Easy
Time
15-30 minutes
Tools Used
Screwdriver, Wrench Set
This is not step by step! I apparently "broke" the lawnmower (as it's usually blamed on me for when the lawnmower doesn't function propertly). The right wheel's adjuster would disengage whenever I turned the corner and would lift up the mower even a tiny bit.
After showing and discussing with my better half, we agreed to order replacement parts for both sides. Was certainly more cost effective than a new mower. The parts came very quickly.
He put them on - not me. He was pleasantly surprised that it was the entire adjuster kit for each side and didn't require a bunch of tinkering. As far as I know (and from the lack of swearing and alcoholic beverages in the garage), it went smooth. The mower was back up and running in no time.
As a matter of fact, the mower hasn't "driven" this easily in years. If you have any troubles with the wheels disengaging from the self-propelled part of the mower - this is the solution!
Did you find this story helpful?
Thanks for voting and helping fellow customers!
rt front drive wheel broke
David - June 15, 2023
Tool Type
Lawn Mower
Difficulty
Medium
Time
1-2 hours
Tools Used
Screwdriver, Pliers, Socket set
1. removed wheels and adjuster arms
2. replaced with new parts
3. rt wheel adjuster arm went on easily
4. left wheel adjuster arm was a bear to get on -the clip would not slip into place we had to leave
it off but it works okay anyway.
2. replaced with new parts
3. rt wheel adjuster arm went on easily
4. left wheel adjuster arm was a bear to get on -the clip would not slip into place we had to leave
it off but it works okay anyway.
Did you find this story helpful?
Thanks for voting and helping fellow customers!
Front left adjuster and self drive teeth on plastic wheels stripped
Rob - April 16, 2023
Tool Type
Lawn Mower
Difficulty
Medium
Time
30-60 minutes
Tools Used
Screwdriver, Pliers, Socket set, Crescent wrenches, Dremel (to grind), retaining clip plier
1. Removed both front wheels.
2. Removed self drive gears.
3. Removed old front adjusters (decided to do both)
4. Installed new height adjusters.
5. Installed new self drive gears (bought new ones as the old ones would not seat over the resized new bearing sleeves that were part of the front adjusters. New ones were the same size as the old ones so was forced to grind the opening larger to accommodate the bearing sleeve - new gears were a wasted purchase as I could’ve just ground the old ones)
6. Installed new wheels (purchased separately)
Did you find this story helpful?
Thanks for voting and helping fellow customers!
Left-front adjuster/bearing-assembly needed replacing. Bearings were falling out causing wobbly wheel.
GARY - December 27, 2022
Tool Type
Lawn Mower
Difficulty
Medium
Time
15-30 minutes
Tools Used
Screwdriver, Pliers, Socket set, Wrench Set
Parts Used
1) Raise front of lawn mower for access to underside of adjuster assembly.
2) Remove wheel lug nut, wheel, then c-clip and pin securing drive gear, then drive gear.
3) Remove 2 small nuts that are securing the back of the adjuster assembly to the
underside of lawn mower.
4) Remove rubber dustcover and old adjuster assembly from lawn mower.
5) Clean all parts that you will be reusing for installation of new replacement part.
6) Install new replacement part and all cleaned parts in reverse order of removal.
7) Lower lawn mower and test operation of front wheel drive system. You may have to
replace the wheel if the wheel's inner plastic gear surface had been "chewed" up by the
loose, wobbly operation.
8) Now, go enjoy mowing your lawn!
Did you find this story helpful?
Thanks for voting and helping fellow customers!
worn out front bearings
Andrew - April 1, 2022
Tool Type
Lawn Mower
Difficulty
Easy
Time
30-60 minutes
Tools Used
Screwdriver, Pliers, Socket set, Wrench Set
I ordered the front wheel height adjuster assemblies for my mower and was sent two left sides. The bags were correctly labeled right and left but there was a left side in the right bag. The only difference between them is the adjuster handle. So I used the handle off of my old one and finished the assembly of the mower.
Did you find this story helpful?
Thanks for voting and helping fellow customers!
Front wheel was not rotating and the level was loose
Madeleine - February 7, 2020
Tool Type
Lawn Mower
Difficulty
Easy
Time
15-30 minutes
Tools Used
Screwdriver, Pliers, Socket set
Parts Used
Remove the broken part and substituted it with the replacement. Once you remove the old part it was a simple installation with little effort.
Did you find this story helpful?
Thanks for voting and helping fellow customers!
front wheel bearings shot, adjusters bent, front mower body housing slightly bent
william - July 24, 2019
Tool Type
Lawn Mower
Difficulty
Easy
Time
15-30 minutes
Tools Used
Socket set, Wrench Set, Nutdriver, rubber mallet, non mar hammer, 3# hammer
Remove drive belt cover, front wheels, c-clips, drive shaft pins, adjuster nuts, Drop drive system.
(Removing drive belt cover gives you the room to remove drive system).
After installing new adjusters, there was not enough clearance on drive shaft to re-install the drive shaft pins. Deduced front of mower "out of square" by 1/4".
Pounded straight with hammers, reinstalled in reverse of above.
Works great !
Did you find this story helpful?
Thanks for voting and helping fellow customers!
Front axle adjuster was broke
JOHN - January 18, 2019
Tool Type
Lawn Mower
Difficulty
Easy
Time
30-60 minutes
Tools Used
Socket set, Wrench Set
Removed and replaced broken parts.
Did you find this story helpful?
Thanks for voting and helping fellow customers!
Load More Install Stories
OEM stands for Original Equipment Manufacturer and means the part you’re buying is sourced directly from the manufacturer who made your product. At eReplacementParts, we sell only genuine OEM parts, guaranteeing the part you’re purchasing is of better design and of higher quality than aftermarket parts.
Our product descriptions are a combination of data sourced directly from the manufacturers who made your product as well as content researched and curated by our content & customer service teams. This content is edited and reviewed internally before being made public to customers.
Our customer service team are at the ready daily to answer your part and product questions. We have a dedicated staff with decades of collective experience in helping customers just like you purchase parts to repair their products.
All our part reviews are solicited directly from other customers who have purchased this exact part. While we moderate these reviews for profanity, offensive language or personally identifiable information, these reviews are posted exactly as submitted and no alterations are made by our team.
All our customer repair instructions are solicited directly from other customers just like you who have purchased and replaced this exact part. While we moderate these reviews for profanity, offensive language or personally identifiable information, these reviews are posted exactly as submitted and no alterations are made by our team.
Based on data from past customer purchasing behaviors, these parts are most commonly purchased together along with the part you are viewing. These parts may be necessary or helpful to replace to complete your current repair.
All our installation videos are created and produced in collaboration with our in-house repair technician, Mark Sodja, who has helped millions of eReplacementParts customers over the last 13 years repair their products. Mark has years of experience in selling and repairing both commercial and residential products with a specialty in gas-powered equipment.
This data is collected from customers who submitted a repair instruction after replacing this exact part. Customers can rate how easy the repair was to complete and how long it took. We aggregate this data to provide a repair rating that allows customers to quickly determine the difficulty and time needed to perform their own repair.