


This is an OEM replacement part sourced directly from the manufacturer. Sold individually.
This part is compatible with the lawn tractors listed below.
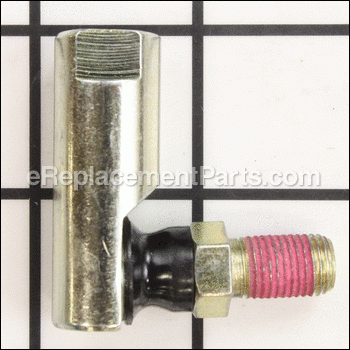
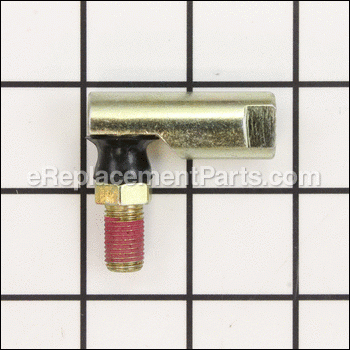
It is helpful to count the number of threads exposed so when you reinstall it\'ll be back in the same position.
A wrench set is needed for repair.
Joint Assy-lock Ba 923-0448A
OEM part for: MTD, Ryobi, Yard Machines, Bolens, Yard Man, Craftsman, Troy-Bilt, Cub Cadet, Husky, Murray
Part Number: 923-0448A
$25.97
In Stock
Jump To:
Product Description ?
- Classification: Part
- Weight: 0.12 lbs.
- Shipping: Ships Worldwide
Frequently Purchased Together ?


Compatibility
This Joint Assy-lock Ba will fit the following 3903 machines. Confirm this part works with your model, and view the detailed model diagrams and repair help we have to offer.
Ryobi
Yard Machines
MTD
Bolens
Yard Man
Craftsman
Troy-Bilt
Cub Cadet
Husky
Murray
Show More Compatible ModelsThis item works with the following types of products:
- Lawn Tractor Parts
- Lawn Mower Parts
This part replaces obsolete part #: 923-0448AB, 923-0048A, 7230448A, 7230448, 723-0448, 723-0448AP, 723-0448A
Customer Part Reviews ?
Average Rating (out of 5):
Click to filter by ratings:
5 stars
39
4 stars
0
3 stars
0
2 stars
1
1 stars
0
< PREV
- 1
- 2
- 3
Easy and quick repair
The part that was ordered came in very quick. Was able to replace the part on my mower within 3 days of the original part breaking. Quick service parts working great
Guest -
23 days ago
Verified Purchase
Super easy repair!!!
Received in 5 days, and installed in 10 minutes. Working better than the original. I ordered two for the eventual wearing out of the other side!!!
Glenn -
July 15, 2023
Verified Purchase
great repair parts everting worked. well
Everything arrived. On time. and was the correct parts.
MICHAEL -
June 12, 2023
Verified Purchase
Steering made better
This part was exactly what I needed. The time spent repairing was vary little. Thank you for your help and sending the part as ask.
Dennis -
May 24, 2023
Verified Purchase
Correct part, perfect match, now works like new
Arrived quick!
Guest -
April 19, 2022
Verified Purchase
Easy fix
Part was identical to original and easily installed
Guest -
November 13, 2021
Verified Purchase
Repair was simple
Correct part, arrived in timely manner, great all around.
Guest -
September 8, 2020
Verified Purchase
Great service! The part was exactly right! 15 minutes and he was mowing.
Perfect!
Guest -
July 9, 2020
Verified Purchase
stearing repair
I received the part in 3 days. very easy repair, and more importantly it was the correct part. Without a doubt I will order parts again as needed
Guest -
June 30, 2020
Verified Purchase
Repeat cx
This is maybe the 4th or 5th time I have ordered and each time I have received the correct parts and in a timely manner
Guest -
June 22, 2020
Verified Purchase
Questions & Answers ?
Our customer Service team is at the ready daily to answer your part and product questions.

Ask our Team
We have a dedicated staff with decades of collective experience in helping customers just like you purchase parts to repair their products.
Does this fit my product?Questions & Answers for Joint Assy-lock Ba
No questions have been asked yet
Customer Repair Instructions ?
All our customer repair instructions are solicited directly from other customers just like you who have purchased and replaced this exact part.
Steering linkage separated
Alfred - August 28, 2016
👍 24 of 26 people found this instruction helpful
Tool Type
Lawn Tractor
Difficulty
Easy
Time
Less than 15 minutes
Tools Used
Socket set, Adjustable Wrench
Parts Used
Remove the broken socket from linkage and wheel knuckle. Install the joint on the linkage and then attach it to the wheel
Did you find this story helpful?
Thanks for voting and helping fellow customers!
Lock Ball Joint fell apart and couldn't steer front wheel at all.
Judith - July 1, 2016
👍 12 of 12 people found this instruction helpful
Tool Type
Lawn Tractor
Difficulty
Easy
Time
15-30 minutes
Tools Used
, Vise Grips, Socket Wrench
Parts Used
Removed old piece and replaced with new piece on inside of front right wheel, and extension piece from above on the other end. Easy to replace...
Did you find this story helpful?
Thanks for voting and helping fellow customers!
Ball joint wore and broke lawn mower would not steer
Avery - October 25, 2016
👍 8 of 8 people found this instruction helpful
Tool Type
Lawn Mower
Difficulty
Easy
Time
Less than 15 minutes
Tools Used
Pliers, Wrench Set
Parts Used
1. Unscrewed broke ball joint from tie rod and unbolted ball socket from tire hub.
2. Screwed new ball joint on to tie rod, making sure that new ball joint at same depth as original.
3. Attached other end of ball joint to tire hub and tightened nut.
2. Screwed new ball joint on to tie rod, making sure that new ball joint at same depth as original.
3. Attached other end of ball joint to tire hub and tightened nut.
Did you find this story helpful?
Thanks for voting and helping fellow customers!
Ball joint was worn out
Tim - May 6, 2017
👍 5 of 5 people found this instruction helpful
Tool Type
Lawn Mower
Difficulty
Easy
Time
15-30 minutes
Tools Used
Wrench Set
Parts Used
Loosen the nut next to the ball joint on the drag link, remove the nut from the bottom of the ball joint and remove. Install the new on in reverse order
Did you find this story helpful?
Thanks for voting and helping fellow customers!
Steering bushing siezed due to lack of grease.
steven - September 6, 2017
👍 2 of 2 people found this instruction helpful
Tool Type
Lawn Tractor
Difficulty
Easy
Time
Less than 15 minutes
Tools Used
Socket set, Wrench Set
Removed broken steering arm, and ball joint. Knocked seized kingpin out of axle bushing. Polished with crocus cloth, reassembled with new steer arm and ball joint. Greased machine. Instructed owner to grease monthly.
Did you find this story helpful?
Thanks for voting and helping fellow customers!
Ball joint on the right wheel broke.
Helen - June 30, 2017
👍 2 of 2 people found this instruction helpful
Tool Type
Lawn Mower
Difficulty
Easy
Time
15-30 minutes
Tools Used
Pliers, Wrench Set
Parts Used
1. Unscrewed existing nut on old joint.
2. Removed broken joint. (Needed a bit of WD-40 to help unscrew the weather/worn joint.)
3. Screwed on new joint.
4. Refastened nut.
2. Removed broken joint. (Needed a bit of WD-40 to help unscrew the weather/worn joint.)
3. Screwed on new joint.
4. Refastened nut.
Did you find this story helpful?
Thanks for voting and helping fellow customers!
Gear on steer shaft stripped out
mark - June 26, 2017
👍 1 of 1 people found this instruction helpful
Tool Type
Lawn Tractor
Difficulty
Easy
Time
15-30 minutes
Tools Used
Screwdriver, Socket set, Wrench Set, Small hammer
Removed steer wheel.
Removed cover just under steering wheel.
Set front of mower up on stand to ease access to phillips headed screw at bottom of shaft. Removed it.
Watch for washers and bushing on end of shaft.
Slide old shaft out top slide new one in, making sure bushing is in fitted slot then washer and screw, housing under steer wheel then steer wheel bolted back on.
Did you find this story helpful?
Thanks for voting and helping fellow customers!
Ball joint had worked loose from steering arm.
TERRY - June 5, 2017
👍 1 of 1 people found this instruction helpful
Tool Type
Lawn Tractor
Difficulty
Easy
Time
Less than 15 minutes
Tools Used
Wrench Set
Parts Used
Remove the nut from the steering arm
Thread the ball joint from the drag link
Reassemble in reverse
Thread the ball joint from the drag link
Reassemble in reverse
Did you find this story helpful?
Thanks for voting and helping fellow customers!
Steering rod ball joint broke
TOM - June 29, 2016
👍 1 of 1 people found this instruction helpful
Tool Type
Lawn Tractor
Difficulty
Easy
Time
30-60 minutes
Tools Used
Pliers, Wrench Set
Parts Used
I loosened the nut on the steering drag link. Then removed the nut from the steering arm. I remove the old ball joint. Then threaded the ball joint on the drag link to the approximate same place as the old one, then I put the other end of the ball joint through the steering arm and tightened the nut. Then tightened the nut on the drag link.
Did you find this story helpful?
Thanks for voting and helping fellow customers!
Replaced Ball Joint
Donna - June 3, 2016
👍 1 of 1 people found this instruction helpful
Tool Type
Lawn Tractor
Difficulty
Easy
Time
15-30 minutes
Tools Used
Socket set, Wrench Set
Remove the the ball joint by removing the nut on the short of the ball joint and pulling it out of the steering block. Then thread the long end of the ball joint from the drag link. Thread the new ball joint on the drag link until it lines up with the hole on the steering block, then tighten the nut on the drag link, and press the short end thru the block and tighten the nut.
Did you find this story helpful?
Thanks for voting and helping fellow customers!
Load More Install Stories
OEM stands for Original Equipment Manufacturer and means the part you’re buying is sourced directly from the manufacturer who made your product. At eReplacementParts, we sell only genuine OEM parts, guaranteeing the part you’re purchasing is of better design and of higher quality than aftermarket parts.
Our product descriptions are a combination of data sourced directly from the manufacturers who made your product as well as content researched and curated by our content & customer service teams. This content is edited and reviewed internally before being made public to customers.
Our customer service team are at the ready daily to answer your part and product questions. We have a dedicated staff with decades of collective experience in helping customers just like you purchase parts to repair their products.
All our part reviews are solicited directly from other customers who have purchased this exact part. While we moderate these reviews for profanity, offensive language or personally identifiable information, these reviews are posted exactly as submitted and no alterations are made by our team.
All our customer repair instructions are solicited directly from other customers just like you who have purchased and replaced this exact part. While we moderate these reviews for profanity, offensive language or personally identifiable information, these reviews are posted exactly as submitted and no alterations are made by our team.
Based on data from past customer purchasing behaviors, these parts are most commonly purchased together along with the part you are viewing. These parts may be necessary or helpful to replace to complete your current repair.
All our installation videos are created and produced in collaboration with our in-house repair technician, Mark Sodja, who has helped millions of eReplacementParts customers over the last 13 years repair their products. Mark has years of experience in selling and repairing both commercial and residential products with a specialty in gas-powered equipment.
This data is collected from customers who submitted a repair instruction after replacing this exact part. Customers can rate how easy the repair was to complete and how long it took. We aggregate this data to provide a repair rating that allows customers to quickly determine the difficulty and time needed to perform their own repair.