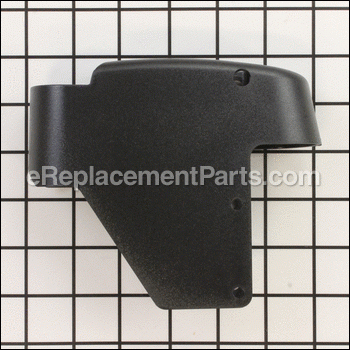

This is an authentic OEM part for use in saws made by DeWALT and Delta. The housing attaches to the control knob and the switch. During the installation process, an allen wrench might be needed to replace this part. It will need to be replaced if it becomes broken. This is made of plastic and is sold individually.
Housing 286313-00
OEM part for: DeWALT, Delta
Part Number: 286313-00
$12.89
In Stock
Jump To:
Frequently Purchased Together ?

Compatibility
This part will fit the following 5 machines
DeWALT
DW788 Type 1 Scroll Saw View Diagrams & Manuals
DW788L Type 1 Scroll Saw View Diagrams & Manuals
DW788 Type 2 Scroll Saw View Diagrams & Manuals
DW788LS (Type 1) Scroll Saw Package View Diagrams & Manuals
Delta
40-690 (Type 1) 20" VS Scroll Saw View Diagrams & Manuals
This item works with the following types of products:
- Saw Parts
- Scroll Saw Parts
Customer Part Reviews ?
Average Rating (out of 5):
Click to filter by ratings:
5 stars
3
4 stars
0
3 stars
0
2 stars
0
1 stars
0
< PREV
- 1
Satisfied
Price was reasonable and received it promptly
Philip -
December 7, 2021
Verified Purchase
Ship fast with reasonable price
I recently bought a used Dewalt 788 scroll saw and the housing was cracked and need to replace. I searched online and found ereplacementparts.com offering replacement part. It was fast and reasonable price tag. And I installed my part and get my hands on my new toy in no time!!
Guest -
October 4, 2019
Verified Purchase
Part as described. Fit perfectly. Fairly priced.
Part as described. Fit perfectly. Cheap. What else could you ask for?
Guest -
September 19, 2019
Verified Purchase
t
t
t -
t days ago
Verified Purchase
eReplacementParts Team
t
Questions & Answers ?
Our customer Service team is at the ready daily to answer your part and product questions.

Ask our Team
We have a dedicated staff with decades of collective experience in helping customers just like you purchase parts to repair their products.
Does this fit my product?Questions & Answers for Housing
No questions have been asked yet
Customer Repair Instructions ?
All our customer repair instructions are solicited directly from other customers just like you who have purchased and replaced this exact part.
Variable speed switch quit working
JEFF - May 5, 2022
Tool Type
Scroll Saw
Difficulty
Medium
Time
30-60 minutes
Tools Used
Screwdriver, Socket set, Nutdriver, Adjustable Wrench
Parts Used
I took the saw apart and installed the new circuit board and variable switch in the DW788 saw. What really stinks about this repair is Dewalt makes you change out an expensive circuit board, that there is nothing wrong, with just so you can install the new variable speed switch. The new switch should just plug into the wire that comes from the circuit board but no, Dewalt changes the connector on the new switch purposefully so that the new switch won't fit with the old board. A $100+ dollar one hour needless repair for a $10 switch that should be able to be changed out in 5 minutes. .
Did you find this story helpful?
Thanks for voting and helping fellow customers!
Saw would not run, Control housing was cracked
Christopher - April 16, 2022
Tool Type
Scroll Saw
Difficulty
Easy
Time
Less than 15 minutes
Tools Used
Screwdriver, Pliers, t-25 torx driver
Parts Used
I have 5 of these saws at student workstations in a school shop. This Type 1 saw apparently manufactured in the 1990's would not run when I received it as a donation. After a complete overhaul, this one will rotate in while I overhaul the rest. These saws work well out of the box, but benefit greatly from a bit of fettling and regular maintenance. I performed the repair below as a student demonstration. Therefore these instructions are excessively detailed.
1) Verify that the circuit, power cord, fuse, and motor brushes are in proper condition before attempting more invasive repairs. Verify that the saw is unplugged before continuing.
2) Remove switch/speed control housing by removing 4 T-25 Torx screws.
3) Disconnect the switch leads. Grasp the connector with pliers and gently pull. Pull the connectors, not the wires.
4) It's a good idea to verify that the problem is with the switch and not deeper in the electronics. With the saw unplugged, use a short piece of #12 copper wire (fits the terminals nicely, use what you have instead) to jump the switch. Plug in the saw to verify that the problem is the switch and not deeper in the electronics. Unplug the saw and remove the jumper before continuing.
5) (optional) The housing on our saw was cracked so I elected to replace it as well. This required removal of the speed control dial and potentiometer from the old housing. The speed dial simply pulls off the shaft of the potentiometer. The pot is secured with a large nut and thin washer. Remove the nut with a pair of sharp-nosed pliers. As you remove the pot, note the small metal tab that orients the pot in the housing. Install the pot in the new housing, install the washer and tighen the nut, replace the speed dial.
6) Look at the new switch to identify the spring tabs that secure it to the housing. Note the orientation of the old switch before you remove it. Depress the tabs on the old switch using the flat of a screwdriver. Push the switch out of the housing. Then push the new switch in until it snaps in. Make sure you put the new switch in the same orientation as the old one or it won't work properly.
7) Reconnect the leads. You needn't worry about polarity.
8) Reinstall the housing and gently tighten the 4 T-25 torx screws. Don't over tighten or you will crack the housing.
9) Happy Scroll Sawing!
Did you find this story helpful?
Thanks for voting and helping fellow customers!
Broken housing
Philip - December 8, 2021
Tool Type
Scroll Saw
Difficulty
Easy
Time
15-30 minutes
Tools Used
Screwdriver, Socket set, Only a 7/16\\
Parts Used
Removed 4 screws then the switch
Did you find this story helpful?
Thanks for voting and helping fellow customers!
OEM stands for Original Equipment Manufacturer and means the part you’re buying is sourced directly from the manufacturer who made your product. At eReplacementParts, we sell only genuine OEM parts, guaranteeing the part you’re purchasing is of better design and of higher quality than aftermarket parts.
Our product descriptions are a combination of data sourced directly from the manufacturers who made your product as well as content researched and curated by our content & customer service teams. This content is edited and reviewed internally before being made public to customers.
Our customer service team are at the ready daily to answer your part and product questions. We have a dedicated staff with decades of collective experience in helping customers just like you purchase parts to repair their products.
All our part reviews are solicited directly from other customers who have purchased this exact part. While we moderate these reviews for profanity, offensive language or personally identifiable information, these reviews are posted exactly as submitted and no alterations are made by our team.
All our customer repair instructions are solicited directly from other customers just like you who have purchased and replaced this exact part. While we moderate these reviews for profanity, offensive language or personally identifiable information, these reviews are posted exactly as submitted and no alterations are made by our team.
Based on data from past customer purchasing behaviors, these parts are most commonly purchased together along with the part you are viewing. These parts may be necessary or helpful to replace to complete your current repair.
All our installation videos are created and produced in collaboration with our in-house repair technician, Mark Sodja, who has helped millions of eReplacementParts customers over the last 13 years repair their products. Mark has years of experience in selling and repairing both commercial and residential products with a specialty in gas-powered equipment.
This data is collected from customers who submitted a repair instruction after replacing this exact part. Customers can rate how easy the repair was to complete and how long it took. We aggregate this data to provide a repair rating that allows customers to quickly determine the difficulty and time needed to perform their own repair.