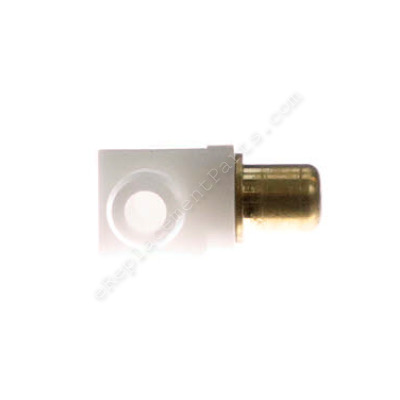
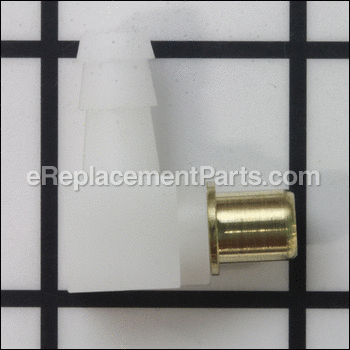
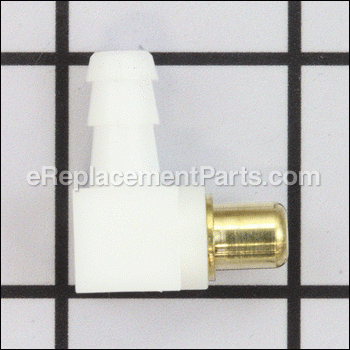


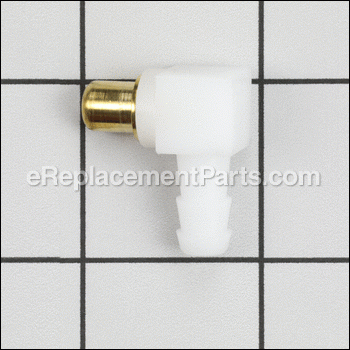

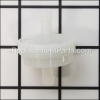
This is a Genuine Manufacturer Sourced replacement part used on a a variety of Engines. This is a Fuel Line Connector connects the fuel line to the carburetor. This part is made out of Plastic and Metal, it is Sold Individually.
Connector-hose 692317
OEM part for: Briggs and Stratton, Toro, Lawn Boy, Craftsman, Murray
Part Number: 692317
$7.06
In Stock
Jump To:
Frequently Purchased Together ?


Compatibility
This Connector-hose will fit the following 6149 machines. Confirm this part works with your model, and view the detailed model diagrams and repair help we have to offer.
Briggs and Stratton
Toro
Lawn Boy
Craftsman
Murray
Show More Compatible ModelsThis item works with the following types of products:
- Engine Parts
- Generator Parts
- Snowblower Parts
- Blower Parts
- Vacuum Parts
- Lawn Tractor Parts
- Lawn Mower Parts
This part replaces obsolete part #: 494451, 493496
Customer Part Reviews ?
Average Rating (out of 5):
Click to filter by ratings:
5 stars
14
4 stars
3
3 stars
1
2 stars
0
1 stars
0
< PREV
- 1
- 2
Great help from the rep!
Good service, excellent help finding the right part. Quick arrival time. I was able to get the job done. Thanks
Guest -
September 27, 2023
Verified Purchase
Easy process, excellent outcome.
I ordered a variety of parts for a 20 year old Briggs and Stratton intek engine. Parts were really easy to find, ordering was a snap and delivery was fast. My machine is back up working as new again. As such my experience was outstanding. Thank you.
Guest -
May 27, 2023
Verified Purchase
Great experience
Fast delivery, correct part that fit perfectly. Web site easy to use.
Guest -
July 5, 2022
Verified Purchase
PART FIT LIKE I HOPED GENARATER IS BACK RUNNING
PART ARRIVED QUICKLY AND WAS WHAT I NEEDED TO GET MY GENERATOR RUNNING AGAIN
Rodger -
February 4, 2022
Verified Purchase
Literally a 5 minute repair. Thank you.
Brand new. Perfect fit. Thank you
AUBREY -
September 1, 2020
Verified Purchase
Worked as expected
Part fit perfectly. Just like original.
Guest -
August 21, 2020
Verified Purchase
This was a very easy repair .
Received my part in reasonable amount of time ,made repair and went to work ,thanks
Guest -
May 13, 2020
Verified Purchase
Perfect Fit
I bought a knockoff part from another site and its brass fitting diameter was 0.02 too small. So it was worthlessly loose. Picked up the real Briggs & Straton from eReplacementParts, perfect fit. Got my shredder running in minutes. Thanks ERP!
Guest -
March 25, 2020
Verified Purchase
when needing parts i can count on ereplacementpart
Just what i needed. thank you
John -
September 12, 2019
Verified Purchase
Great service, parts were correct and delivered on time
Great service, parts were correct and delivered on time
Guest -
September 3, 2019
Verified Purchase
Questions & Answers ?
Our customer Service team is at the ready daily to answer your part and product questions.

Ask our Team
We have a dedicated staff with decades of collective experience in helping customers just like you purchase parts to repair their products.
Does this fit my product?Questions & Answers for Connector-hose
The plastic piece that the fuel hose slides on has come off the metal piece it was connected to. Consequently, the metal piece is still in the side of the carborator. How do I get the metal piece out of the side of the carborator? Does it just pull out, twist out? I don't know.
Curtis
asked on 2023-03-07
Hello Curtis, thank you for your question. We have an installation story from one of our previous customers that should be of some help. " I tried to remove with vise grips and it broke off so I inserted a square E-Z out and finally extruded the brass insert. Taped in the new piece with Loctite on it . Good as new!" We hope this helps.
eReplacementParts Team March 07, 2023
Customer Repair Instructions ?
All our customer repair instructions are solicited directly from other customers just like you who have purchased and replaced this exact part.
fuel inlet broke off
Bruce - May 3, 2017
👍 9 of 10 people found this instruction helpful
Tool Type
Lawn Mower
Difficulty
Medium
Time
15-30 minutes
Tools Used
, Vise grips and sq. E-Z out
Parts Used
tried to remove with vise grips and it broke off so I inserted a square E-Z out and finally ext rated the brass insert. Taped in the new piece. with loctite on it , good as new.
Did you find this story helpful?
Thanks for voting and helping fellow customers!
Connection from gas line to carburetor
Bud - May 31, 2018
👍 5 of 5 people found this instruction helpful
Tool Type
Lawn Tractor
Difficulty
Medium
Time
Less than 15 minutes
Tools Used
Pliers, A screw and small hammer
Parts Used
Instructions that came with part was complicated. Found a you tube video that was so simple, took only a few minutes.
Removed old metal part by tapping a screw into part and pulling straight out. New part went right in.
Removed old metal part by tapping a screw into part and pulling straight out. New part went right in.
Did you find this story helpful?
Thanks for voting and helping fellow customers!
Leaking fuel
Danny - May 18, 2017
👍 4 of 4 people found this instruction helpful
Tool Type
Lawn Tractor
Difficulty
Easy
Time
15-30 minutes
Tools Used
Pliers, Socket set, Vise
Parts Used
Took parts off to expose the carburetor,
Then with a pair of lock jaw pliers I removed the old hose connector.
After that I removed the carburetor,
placed sealer on the new connector and pressed it in with a vise. Reassembled the mower and problem solved
Then with a pair of lock jaw pliers I removed the old hose connector.
After that I removed the carburetor,
placed sealer on the new connector and pressed it in with a vise. Reassembled the mower and problem solved
Did you find this story helpful?
Thanks for voting and helping fellow customers!
Old connector was leaking fuel.
Jim - October 7, 2017
👍 3 of 3 people found this instruction helpful
Tool Type
Generator
Difficulty
Medium
Time
1-2 hours
Tools Used
Screwdriver, Pliers, Socket set, Nutdriver, Adjustable Wrench
Parts Used
Drained all fuel, disassembled the air filter, the shroud and the muffler for easier access. Inserted the easy out in the brass connector. Heated the portion of the carburetor around the brass insert. Gripped the brass with vice grips and gently rocked the part loose. Replaced the brass connector using some red sealer and gently secured the fitting into place. Reassembled all other parts. Tested and all worked well.
Did you find this story helpful?
Thanks for voting and helping fellow customers!
Fuel leak at the carburator.
Robert - August 8, 2018
👍 1 of 1 people found this instruction helpful
Tool Type
Lawn Tractor
Difficulty
Medium
Time
15-30 minutes
Tools Used
Wrench Set, Homemade puller to extract the old broken connector.
Parts Used
1. Pried off the plastic part of the connector.
2. Tapped the center hole a few threads.
3. Found an old bushing that was large enough to clear the fitting flange.
4. Put a nut on a 10-32 screw, long enough to reach through the bushing and a washer.
5. Tightened the screw into the thread I made.
6. Held screw head and tightened the nut, towards the bushing.
7. Thus Jacking the remainder of the fitting out of it's press fit hole.
8. Inserted the new hose fitting and tightened it in with a small clamp.
9. Reinstalled the fuel line and ready to go!
Did you find this story helpful?
Thanks for voting and helping fellow customers!
Float bowl solenoid was leaking. This was not apparent at first.
David - July 27, 2017
👍 1 of 1 people found this instruction helpful
Tool Type
Engine
Difficulty
Medium
Time
1-2 hours
Tools Used
Screwdriver, Pliers, Socket set, Nutdriver, Bench vise
First I had to remove the air cleaner. Then I had to remove the carb and manifold assembly. After that I had to remove the manifolds. When it was just the carburetor I had to put it in the vise to remove and replace the fuel inlet fitting , as it is a pressed fitting. Caution should taken not to over press it. Then I put the new bowl and gasket to the carburetor. The solenoid is what holds the bowl in place of a bolt. After reassembly and testing I discovered it was still leaking. Apparently as it turned out it was the internal seal on the solenoid . i ordered a new one and installed it and no further leaks were found.
Did you find this story helpful?
Thanks for voting and helping fellow customers!
fuel inlet to carburetor split and leaking
Mark - December 11, 2023
Tool Type
Engine
Difficulty
Easy
Time
15-30 minutes
Tools Used
Pliers, vise grips c clamp
Parts Used
Remove air cleaner for better access drain remaining gas from fuel tank and disconnected fuel line from carburetor. with plyers pulled the plastic elbow from brass bushing and then with vise grips slightly tighten on brass bushing and pull bushing from carburetor. I applied a small amount of RTV to the new part and using a small c clamp i carefully pressed the new elbow into the carburetor reconnected the fuel line and clamp. Replace air cleaner.
Did you find this story helpful?
Thanks for voting and helping fellow customers!
OLD BLOKE
Andy - November 10, 2022
Tool Type
Engine
Difficulty
Easy
Time
Less than 15 minutes
Tools Used
Screwdriver, Pliers
AIR FILTER WAS EASY
unhook fuel line from carb use vise grips and 2 screwdrivers pry it out put some great stuff on let it set for 90 min ready to go
unhook fuel line from carb use vise grips and 2 screwdrivers pry it out put some great stuff on let it set for 90 min ready to go
Did you find this story helpful?
Thanks for voting and helping fellow customers!
Hose connector to carb was leaking fuel
Lawrence - January 23, 2022
Tool Type
Snowblower
Difficulty
Easy
Time
15-30 minutes
Tools Used
Screwdriver, Nipping pliers, T20 torx, 10 mm socket
Parts Used
Drained fuel from tank & carb bowl.
Cut a new fuel line & installed while it was exposed
Pulled out hose connector from carb by prying with nippers.
Put in new connector with plastic set.
Attached fuel line & new hose clamps
Put in gas to leak test. All was good.
Finished & filled.
Next day was 18” of snow to remove.
Snow blower was back in service.
Did you find this story helpful?
Thanks for voting and helping fellow customers!
Leaking connection
Sharon - October 7, 2020
Tool Type
Blower
Difficulty
Medium
Time
15-30 minutes
Tools Used
Screwdriver, Pliers
Parts Used
Installed new connector.
Used carburetor cleaner
Job completed
Used carburetor cleaner
Job completed
Did you find this story helpful?
Thanks for voting and helping fellow customers!
Load More Install Stories
OEM stands for Original Equipment Manufacturer and means the part you’re buying is sourced directly from the manufacturer who made your product. At eReplacementParts, we sell only genuine OEM parts, guaranteeing the part you’re purchasing is of better design and of higher quality than aftermarket parts.
Our product descriptions are a combination of data sourced directly from the manufacturers who made your product as well as content researched and curated by our content & customer service teams. This content is edited and reviewed internally before being made public to customers.
Our customer service team are at the ready daily to answer your part and product questions. We have a dedicated staff with decades of collective experience in helping customers just like you purchase parts to repair their products.
All our part reviews are solicited directly from other customers who have purchased this exact part. While we moderate these reviews for profanity, offensive language or personally identifiable information, these reviews are posted exactly as submitted and no alterations are made by our team.
All our customer repair instructions are solicited directly from other customers just like you who have purchased and replaced this exact part. While we moderate these reviews for profanity, offensive language or personally identifiable information, these reviews are posted exactly as submitted and no alterations are made by our team.
Based on data from past customer purchasing behaviors, these parts are most commonly purchased together along with the part you are viewing. These parts may be necessary or helpful to replace to complete your current repair.
All our installation videos are created and produced in collaboration with our in-house repair technician, Mark Sodja, who has helped millions of eReplacementParts customers over the last 13 years repair their products. Mark has years of experience in selling and repairing both commercial and residential products with a specialty in gas-powered equipment.
This data is collected from customers who submitted a repair instruction after replacing this exact part. Customers can rate how easy the repair was to complete and how long it took. We aggregate this data to provide a repair rating that allows customers to quickly determine the difficulty and time needed to perform their own repair.