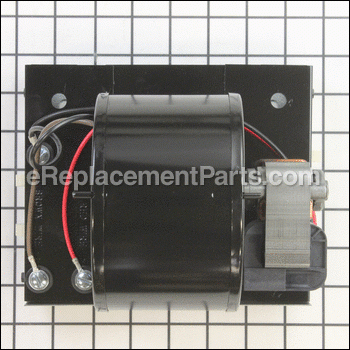

Srv Heater Assy Complete C-can S97017063
OEM part for: Broan
Part Number: S97017063
$226.68
In Stock
Compatibility
This Srv Heater Assy Complete C-can will fit the following 20 machines. Confirm this part works with your model, and view the detailed model diagrams and repair help we have to offer.
Broan
Show More Compatible ModelsThis item works with the following types of products:
- Ventilation Parts
This part replaces obsolete part #: 97017063
Customer Part Reviews ?
Average Rating (out of 5):
Click to filter by ratings:
5 stars
3
4 stars
0
3 stars
0
2 stars
0
1 stars
0
< PREV
- 1
new heater
it is like a new fan, more quite and works well. thanks
Guest -
October 20, 2021
Verified Purchase
The part worked great
The repairman said the part was in perfect condition and it is working just great in the heater. The experience with your company was amazing!!
Guest -
November 21, 2020
Verified Purchase
The part was an exact replacement for what i had.
After they were able to identify the model of hood I had, they were able to help identify the part I needed. The part arrived within a couple of days, was the exact replacement and was mounted almost immediately. Coouldn't ask for better service.
Guest -
November 6, 2019
Verified Purchase
Questions & Answers ?
Our customer Service team is at the ready daily to answer your part and product questions.

Ask our Team
We have a dedicated staff with decades of collective experience in helping customers just like you purchase parts to repair their products.
Does this fit my product?Questions & Answers for Srv Heater Assy Complete C-can
does S37017063 include the heat element and cage?
Marsha
for model number Broan 655C
asked on 2023-10-25
Hello Marsha, Thank you for your inquiry. We show that this part includes Heater Motor, Blower Wheel, Element, & Thermal Cutoff. We hope this helps.
eReplacementParts Team October 25, 2023
Customer Repair Instructions ?
All our customer repair instructions are solicited directly from other customers just like you who have purchased and replaced this exact part.
Electric motor and heat unit failed.
James - January 12, 2017
👍 3 of 3 people found this instruction helpful
Tool Type
Ventilation
Difficulty
Easy
Time
15-30 minutes
Tools Used
Screwdriver, Pliers, none
Parts Used
1. Turned power off
2. Removed out side, lens and lite bulb.
3. Unplugged heater motor.
4. Unscrewed 2 screws holding motor in place.
5. Removed heater motor.
6. Installed new heater motor reverse order.
2. Removed out side, lens and lite bulb.
3. Unplugged heater motor.
4. Unscrewed 2 screws holding motor in place.
5. Removed heater motor.
6. Installed new heater motor reverse order.
Did you find this story helpful?
Thanks for voting and helping fellow customers!
Blower fan quit
Ernest - January 28, 2017
👍 1 of 1 people found this instruction helpful
Tool Type
Ventilation
Difficulty
Easy
Time
Less than 15 minutes
Tools Used
Screwdriver
Parts Used
Took old part out 2 screws out and unplug , new part plug in tighten 2 screws . Very helpful people on the phone . THANKS
Did you find this story helpful?
Thanks for voting and helping fellow customers!
Bathroom vent heater motor failed
Matt - January 17, 2017
👍 1 of 1 people found this instruction helpful
Tool Type
Ventilation
Difficulty
Easy
Time
Less than 15 minutes
Tools Used
Screwdriver, Nutdriver
Remove plastic light cover by gently pulling to one side and down. Remove light bulb. Remove acorn nut inside light fixture and lower grill and light fixture backing plate. Unplug light fixture. Loosen (do not remove) 2 Phillips screws from heater blower unit. Unplug blower. Lift and pivot out. On the new unit I used 2 small pieces of shrink wrap on the pivot arms to try to make the unit quieter (it helped). Installation is the reverse procedure. I replaced grill at the same time since mine had yellowed in 9 years. Since the heater blower unit costs the same as a whole new unit, I'd recommend buying a whole new unit and taking the parts off that you need. The main body is a pain to remove from the attic but all the components are replaceable from inside the house.
Did you find this story helpful?
Thanks for voting and helping fellow customers!
Fan motor and fuse went bad
Shane - November 29, 2020
Tool Type
Heater
Difficulty
Easy
Time
Less than 15 minutes
Tools Used
Screwdriver
Parts Used
Unpluged old heater . Then l Losing The 2 screws that hold it in place. Remove the old heater Install the new heater Then tied up the 2 screws then plugged it back in
Did you find this story helpful?
Thanks for voting and helping fellow customers!
Needed a spare. You really sell good stuff.
Leroy - May 27, 2020
Tool Type
Heater
Difficulty
Easy
Time
Less than 15 minutes
Tools Used
Screwdriver
Parts Used
First - turn off electricity at the Electrical Panel.
Took off the vent covering with my hands, unscrew the bulb, unscrew the long screw that holds up the covering and the covering just fell gently in my hands, unplug the electrical plug and the Heater is fully exposed. All that was done with my hands ( no tool ).
Loosened the two screws that held the Heater in the housing with a Screw Driver and angled the motor out of its housing. Unplug the Heater.
Installing the new Heater and everything else, is exactly the reverse. Now, turn on Electricity.
Did you find this story helpful?
Thanks for voting and helping fellow customers!
Bathroom ceiling heater/ventilation fan. Heater portion significant vibration and noise.
D. - February 26, 2017
Tool Type
Ventilation
Difficulty
Easy
Time
Less than 15 minutes
Tools Used
Screwdriver, Pliers
Parts Used
1. Turn off all power to unit at wall switch
2. Removed light bulb lens, light bulb and outer grill.
3. Loosened two screws holding heater assembly.
4. Lower assembly slightly and position key-hole so heater assembly can be removed from screws.
5. While lowering assembly with one hand, reach up into housing with other hand and unplug power cord.
6. Install new unit in reverse order.
Did you find this story helpful?
Thanks for voting and helping fellow customers!
Ether the heating element was bad or the thermal coupler. It was not heating. Also the female plug in was brittle and broken.
Earl - December 7, 2015
👍 3 of 6 people found this instruction helpful
Tool Type
Ventilation
Difficulty
Easy
Time
15-30 minutes
Tools Used
Screwdriver
Parts Used
Remove the Broan cover plug, using a straight screwdriver remove the cover (defuser). Install new heating unit exactly how the old one was removed only in reverse.
Works great.
Works great.
Did you find this story helpful?
Thanks for voting and helping fellow customers!
OEM stands for Original Equipment Manufacturer and means the part you’re buying is sourced directly from the manufacturer who made your product. At eReplacementParts, we sell only genuine OEM parts, guaranteeing the part you’re purchasing is of better design and of higher quality than aftermarket parts.
Our product descriptions are a combination of data sourced directly from the manufacturers who made your product as well as content researched and curated by our content & customer service teams. This content is edited and reviewed internally before being made public to customers.
Our customer service team are at the ready daily to answer your part and product questions. We have a dedicated staff with decades of collective experience in helping customers just like you purchase parts to repair their products.
All our part reviews are solicited directly from other customers who have purchased this exact part. While we moderate these reviews for profanity, offensive language or personally identifiable information, these reviews are posted exactly as submitted and no alterations are made by our team.
All our customer repair instructions are solicited directly from other customers just like you who have purchased and replaced this exact part. While we moderate these reviews for profanity, offensive language or personally identifiable information, these reviews are posted exactly as submitted and no alterations are made by our team.
Based on data from past customer purchasing behaviors, these parts are most commonly purchased together along with the part you are viewing. These parts may be necessary or helpful to replace to complete your current repair.
All our installation videos are created and produced in collaboration with our in-house repair technician, Mark Sodja, who has helped millions of eReplacementParts customers over the last 13 years repair their products. Mark has years of experience in selling and repairing both commercial and residential products with a specialty in gas-powered equipment.
This data is collected from customers who submitted a repair instruction after replacing this exact part. Customers can rate how easy the repair was to complete and how long it took. We aggregate this data to provide a repair rating that allows customers to quickly determine the difficulty and time needed to perform their own repair.