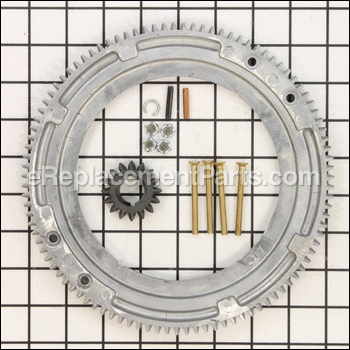

Gear-ring 696537
OEM part for: Briggs and Stratton, Toro
Part Number: 696537
$54.92
In Stock
Jump To:
Frequently Purchased Together ?
Compatibility
This Gear-ring will fit the following 10104 machines. Confirm this part works with your model, and view the detailed model diagrams and repair help we have to offer.
This item works with the following types of products:
- Engine Parts
- Generator Parts
- Snowblower Parts
This part replaces obsolete part #: 399676, 392134
Customer Part Reviews ?
Average Rating (out of 5):
Click to filter by ratings:
5 stars
4
4 stars
0
3 stars
0
2 stars
0
1 stars
0
< PREV
- 1
Part worked perfectly. Shipping was fast, everything arrived as listed an no issues. Great service.
Part worked perfectly. Shipping was fast, everything arrived as listed an no issues. Great service.
Kent -
June 1, 2022
Verified Purchase
easy repair
Every part fit exactly and delivery was quick.
Guest -
November 25, 2020
Verified Purchase
Part was as it was described
The part looks as described.
Terry -
January 19, 2020
Verified Purchase
Gear ring
The gear ring & o ring were exactly as described & fit perfectly! The instruction sheet made it easy to install. The delivery was in a reasonable time frame & came packaged so no broken pieces. I'd ask a question prior to ordering as to whether this part would fit my tractor. I was given an answer the next day & as I was told,it fit & works great.
Guest -
October 3, 2019
Verified Purchase
Questions & Answers ?
Our customer Service team is at the ready daily to answer your part and product questions.

Ask our Team
We have a dedicated staff with decades of collective experience in helping customers just like you purchase parts to repair their products.
Does this fit my product?Questions & Answers for Gear-ring
No questions have been asked yet
Customer Repair Instructions ?
All our customer repair instructions are solicited directly from other customers just like you who have purchased and replaced this exact part.
Damaged teeth on plastic ring gear
Steve - May 28, 2017
👍 4 of 4 people found this instruction helpful
Tool Type
Lawn Tractor
Difficulty
Medium
Time
30-60 minutes
Tools Used
Screwdriver, Power Drill, Socket set, Bolt type puller
Parts Used
1. Removed engine shroud, shroud screen, hold down bolts .
2. Removed flywheel .
3. Drilled out rivet ends on ring gear. removed old ring gear.
4. Installed new ring gear with supplied bolts.
5. Re-installed flywheel, hold down bolts, screen, engine shroud.
2. Removed flywheel .
3. Drilled out rivet ends on ring gear. removed old ring gear.
4. Installed new ring gear with supplied bolts.
5. Re-installed flywheel, hold down bolts, screen, engine shroud.
Did you find this story helpful?
Thanks for voting and helping fellow customers!
Ring gear was badly worn
Ronald - October 23, 2016
👍 4 of 5 people found this instruction helpful
Tool Type
Lawn Tractor
Difficulty
Medium
Time
30-60 minutes
Tools Used
Power Drill, Socket set, Nutdriver
Parts Used
I removed the recoil starter assembly and then the ring gear assembly. I drilled out the rivets that held the worn ring gear and installed the new ring gear with the machine screws and nuts provided with the new ring gear. I then reinstalled the ring gear mounting assembly and the recoil starter assembly. Immediately after installation, I tapped the starter key and the engine started. I put away my tools, jumped on the seat and proceeded to mow the lawn. Thanks to the timely arrival of the ring gear assembly, I rode on the seat instead of walking behind the hand mower.
Did you find this story helpful?
Thanks for voting and helping fellow customers!
Teeth were all but gone
Bruce - May 11, 2017
👍 2 of 2 people found this instruction helpful
Tool Type
Lawn Tractor
Difficulty
Medium
Time
30-60 minutes
Tools Used
Power Drill, Socket set, Wrench Set, Nutdriver, puller
Parts Used
Remove blower housing and attached items.
Pull flywheel
Remove rivets holding ring gear--either drill or grind the heads off and punch out.
Remove all filings collected by magnets
Bolt on new gear with the screws provided.
Install flywheel back on engine and reinstall all covers.
Pull flywheel
Remove rivets holding ring gear--either drill or grind the heads off and punch out.
Remove all filings collected by magnets
Bolt on new gear with the screws provided.
Install flywheel back on engine and reinstall all covers.
Did you find this story helpful?
Thanks for voting and helping fellow customers!
starter ring gear was broken on 40 year oldlawn tractor
Arthur - August 14, 2021
Tool Type
Lawn Tractor
Difficulty
Hard
Time
More than 2 hours
Tools Used
Screwdriver, Pliers, Socket set, Wrench Set, Adjustable Wrench, balancer puller
Parts Used
I keep an old MTD lawn tractor at our camping place so I don't need to take mower when we go camping. The wheel ring was originally plasctic and was broken. The old briggs engine was still good, I never dreamed I would be able to get the part I needed, let alone, one made better than the original one. It took me most of the day but the 40 year old MTD is back to working. Thanks
Did you find this story helpful?
Thanks for voting and helping fellow customers!
my generator ahs a Briggs & Stratton 10 HP engine with a pull starter so I changed it over to a 12 volt electric start
Harold - December 20, 2020
Tool Type
Generator
Difficulty
Easy
Time
1-2 hours
Tools Used
Screwdriver, Socket set, Wrench Set, Nutdriver, tin snips
Parts Used
I left the rope starter in tact and installed an aluminum ring gear to the flywheel, cut a 2 inch section out of the flywheel cover and installed a 12 volt starter, I also added a pushbutton switch with a 4 guage lead to the starter and a lead to use a jumper box for power.
Did you find this story helpful?
Thanks for voting and helping fellow customers!
electric start gear
howard - September 30, 2019
Tool Type
Generator
Difficulty
Easy
Time
30-60 minutes
Tools Used
Screwdriver, Socket set, Wrench Set
Parts Used
put gear in for starter
Did you find this story helpful?
Thanks for voting and helping fellow customers!
the plastic ring gear was shot (no teeth) and the pinion gear teeth were rounded off.
Thomas - June 28, 2018
Tool Type
Lawn Tractor
Difficulty
Medium
Time
1-2 hours
Tools Used
Screwdriver, Socket set, Wrench Set, high speed hand held dremal.
Parts Used
1. I removed the flywheel using the puller
2. I used a hand held high speed grinder to cut off the braided end of the pins holding the ring gear. Then I used a 3/16 inch punch to drive the pins out to remove the ring gear.
4. I then inserted the bolts with the new ring gear in place as directed and tightened to specs.
5. I then replaced the flywheel and tightened to specks.
6. I then removed the starter and replaced the pinion gear as per instructions.
7. I then reinstalled the blower housing and drained the gas tank finding water in the gas, I mopped out the tank with paper towel.
8. I removed the carburetor and cleaned it, reinstalling it with a gas filter. It runs like a champ.
Did you find this story helpful?
Thanks for voting and helping fellow customers!
OEM stands for Original Equipment Manufacturer and means the part you’re buying is sourced directly from the manufacturer who made your product. At eReplacementParts, we sell only genuine OEM parts, guaranteeing the part you’re purchasing is of better design and of higher quality than aftermarket parts.
Our product descriptions are a combination of data sourced directly from the manufacturers who made your product as well as content researched and curated by our content & customer service teams. This content is edited and reviewed internally before being made public to customers.
Our customer service team are at the ready daily to answer your part and product questions. We have a dedicated staff with decades of collective experience in helping customers just like you purchase parts to repair their products.
All our part reviews are solicited directly from other customers who have purchased this exact part. While we moderate these reviews for profanity, offensive language or personally identifiable information, these reviews are posted exactly as submitted and no alterations are made by our team.
All our customer repair instructions are solicited directly from other customers just like you who have purchased and replaced this exact part. While we moderate these reviews for profanity, offensive language or personally identifiable information, these reviews are posted exactly as submitted and no alterations are made by our team.
Based on data from past customer purchasing behaviors, these parts are most commonly purchased together along with the part you are viewing. These parts may be necessary or helpful to replace to complete your current repair.
All our installation videos are created and produced in collaboration with our in-house repair technician, Mark Sodja, who has helped millions of eReplacementParts customers over the last 13 years repair their products. Mark has years of experience in selling and repairing both commercial and residential products with a specialty in gas-powered equipment.
This data is collected from customers who submitted a repair instruction after replacing this exact part. Customers can rate how easy the repair was to complete and how long it took. We aggregate this data to provide a repair rating that allows customers to quickly determine the difficulty and time needed to perform their own repair.