
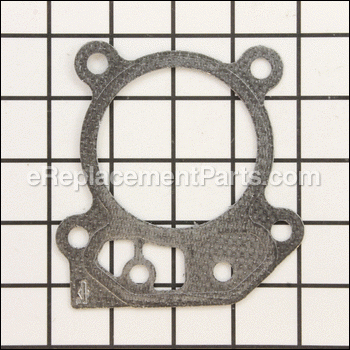


This is an authentic replacement part manufactured for use with Briggs & Stratton small engines. The cylinder head gasket is used to seal the connection between the cylinder the head cover. This gasket is available as an individual replacement part, please see model diagram for associative parts.
Gasket-cylinder Head 799586
OEM part for: Briggs and Stratton
Part Number: 799586
$13.97
In Stock
Jump To:
Frequently Purchased Together ?

Compatibility
This Gasket-cylinder Head will fit the following 476 machines. Confirm this part works with your model, and view the detailed model diagrams and repair help we have to offer.
Briggs and Stratton
Show More Compatible ModelsThis item works with the following types of products:
- Engine Parts
Customer Part Reviews ?
Average Rating (out of 5):
Click to filter by ratings:
5 stars
2
4 stars
1
3 stars
0
2 stars
0
1 stars
0
< PREV
- 1
Ereplacementparts A-OK
Exactly the part I needed. No hassles. Arrived promptly. 🤙🏼
Guest -
August 6, 2019
Verified Purchase
Perfect replacement.
I'll be back for more.
Guest -
June 17, 2019
Verified Purchase
Correct parts
One of the head bolts was missing or was never installed. Had mower about a year and slowly became hard to start . Received a new head bolt and gasket and installed the bolt first. Mower started on first attempt!
Guest -
October 30, 2019
Verified Purchase
Questions & Answers ?
Our customer Service team is at the ready daily to answer your part and product questions.

Ask our Team
We have a dedicated staff with decades of collective experience in helping customers just like you purchase parts to repair their products.
Does this fit my product?Questions & Answers for Gasket-cylinder Head
Verifying the gasket cylinder is compatible with this engine model.
Chris
for model number 09P702-0144-F1
asked on 2022-06-16
Hello Chris, thank you for your question. Yes, the Gasket 799586you had chosen is compatible with your model. If you need help placing an order, customer service is open 7 days a week. Please feel free to give us a call. We look forward to hearing from you.
eReplacementParts Team June 16, 2022
Customer Repair Instructions ?
All our customer repair instructions are solicited directly from other customers just like you who have purchased and replaced this exact part.
Leaking oil from gaskets.
Joseph - August 21, 2017
👍 3 of 4 people found this instruction helpful
Tool Type
Lawn Mower
Difficulty
Easy
Time
15-30 minutes
Tools Used
Socket set, Nutdriver
Had to replace the gaskets and replaced the spark plug as well. Everything I ordered fit perfectly and the shipping was quick. Thank you.
Did you find this story helpful?
Thanks for voting and helping fellow customers!
Briggs 550 EX exhaust valve guide moved
Andrew - July 26, 2023
Tool Type
Engine
Difficulty
Medium
Time
More than 2 hours
Tools Used
Screwdriver, Pliers, Socket set, Wrench Set, Nutdriver, Razor blade and Brakleen
Parts Used
1. Engine lacked compression.
2. Removed spark plug wire and engine cover.
3. Removed air cleaner.
4. Removed carburetor and fuel tank as well as carburetor bracket.
5. Removed muffler.
6. Removed the spark plug and pulled the head.
7. Discovered exhaust valve guide that was press fit had moved about an inch in the
direction of the combustion chamber preventing exhaust valve from closing.
8. Found a used replacement head on the Internet.
9. Lapped the valves/valve seats on the replacement head and cleaned everything
thoroughly to ensure all lapping compound was removed.
10. Reinstalled replacement head with new head gasket after carefully cleaning and
scraping mating surfaces.
11. Torqued head bolts in a cross—cross pattern to 160 inch/pounds.
12. Set valve rocker lash to .005” for both exhaust and intake valves about 1/4” beyond top
dead center of compression stroke. Then, reinstalled the spark plug.
13. Reinstalled rocker cover with new gasket.
14. Torqued to 20 inch pounds. Then, to 40 inch pounds.
15. Reinstalled muffler.
16. Reinstalled carburetor bracket and carburetor with fuel tank.
17. Reinstalled air cleaner.
18. Reinstalled engine cover.
19. Replaced spark plug wire.
20. Pulled cord and shouted, “It’s alive!”
Did you find this story helpful?
Thanks for voting and helping fellow customers!
Lawn mower would not start
Mark - May 25, 2020
Tool Type
Engine
Difficulty
Medium
Time
1-2 hours
Tools Used
Screwdriver, Pliers, Socket set, Wrench Set
Parts Used
The starter rope pulled rather easily, the plug was slightly damp with gas, and cranking the motor with the plug removed yet connected and grounded showed it had spark. I thus suspected a compression problem. I thought it may be a burnt valve or failed head gasket so I removed the head. All appeared fine but I damaged the head gasket in removal. Fortunately ereplacementparts.com quickly shipped a new gasket which fit perfectly. In the end I only needed to adjust the valves. I had no specific directions for this but rather gathered information from multiple places and managed to be successful. With the OverHead Valves behind an accessible cover it really isn't a bad job.
Did you find this story helpful?
Thanks for voting and helping fellow customers!
Crank shaft bent.
Allen - June 23, 2017
👍 0 of 2 people found this instruction helpful
Tool Type
Engine
Difficulty
Easy
Time
30-60 minutes
Tools Used
Socket set, Wrench Set, Nutdriver
1. Removed the engine from the lawn mower.
2. Split the case.
3. Removed the crank shaft.
4. Straightened the crank shaft.
5. Put the engine back together.
6. Installed the engine on the lawn mower.
7. Started on the first pull.
8. Runs like new.
2. Split the case.
3. Removed the crank shaft.
4. Straightened the crank shaft.
5. Put the engine back together.
6. Installed the engine on the lawn mower.
7. Started on the first pull.
8. Runs like new.
Did you find this story helpful?
Thanks for voting and helping fellow customers!
Lawn mower Briggs 6,25hp blowing smoke more after warm
Brian - October 19, 2016
👍 0 of 2 people found this instruction helpful
Tool Type
Engine
Difficulty
Medium
Time
30-60 minutes
Tools Used
Socket set, Torque Wrench
Parts Used
1 Remove top cover
2 Remove carburetor
3 Remove muffler
4 Remove head
5 Clean head gasket surface and jug surface
6 Install new head gasket, head and torque bolts
7 Reinstall muffler and carb, then starter rope cover
8 Like new mower. Thanks ereplacementparts
2 Remove carburetor
3 Remove muffler
4 Remove head
5 Clean head gasket surface and jug surface
6 Install new head gasket, head and torque bolts
7 Reinstall muffler and carb, then starter rope cover
8 Like new mower. Thanks ereplacementparts
Did you find this story helpful?
Thanks for voting and helping fellow customers!
OEM stands for Original Equipment Manufacturer and means the part you’re buying is sourced directly from the manufacturer who made your product. At eReplacementParts, we sell only genuine OEM parts, guaranteeing the part you’re purchasing is of better design and of higher quality than aftermarket parts.
Our product descriptions are a combination of data sourced directly from the manufacturers who made your product as well as content researched and curated by our content & customer service teams. This content is edited and reviewed internally before being made public to customers.
Our customer service team are at the ready daily to answer your part and product questions. We have a dedicated staff with decades of collective experience in helping customers just like you purchase parts to repair their products.
All our part reviews are solicited directly from other customers who have purchased this exact part. While we moderate these reviews for profanity, offensive language or personally identifiable information, these reviews are posted exactly as submitted and no alterations are made by our team.
All our customer repair instructions are solicited directly from other customers just like you who have purchased and replaced this exact part. While we moderate these reviews for profanity, offensive language or personally identifiable information, these reviews are posted exactly as submitted and no alterations are made by our team.
Based on data from past customer purchasing behaviors, these parts are most commonly purchased together along with the part you are viewing. These parts may be necessary or helpful to replace to complete your current repair.
All our installation videos are created and produced in collaboration with our in-house repair technician, Mark Sodja, who has helped millions of eReplacementParts customers over the last 13 years repair their products. Mark has years of experience in selling and repairing both commercial and residential products with a specialty in gas-powered equipment.
This data is collected from customers who submitted a repair instruction after replacing this exact part. Customers can rate how easy the repair was to complete and how long it took. We aggregate this data to provide a repair rating that allows customers to quickly determine the difficulty and time needed to perform their own repair.