
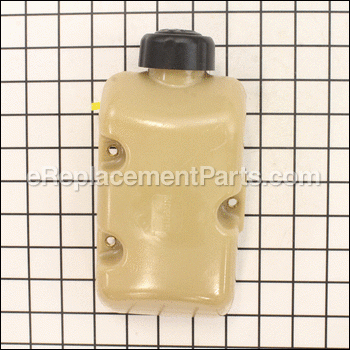


This authentic manufacturer sourced replacement fuel tank assembly is utilized on Toro handheld gas powered equipment. It is the container that holds fuel that is needed for the engine to run. It is made of durable plastic and it includes the fuel tank, fuel lines, cap and the in-tank fuel filter. Please note the hardware used to secure this tank is sold separately.
Fuel Tank Assembly W/fuel Line 308675054
OEM part for: Toro
Part Number: 308675054
$41.00
In Stock
Jump To:
Frequently Purchased Together ?

Compatibility
This part will fit the following 10 machines
Toro
51974 18in Straight Shaft Gas Trimmer View Diagrams & Manuals
51944 (2011) 25Cc Power Head View Diagrams & Manuals
51944 (2010) 25Cc Power Head View Diagrams & Manuals
51955 17in Curved-Shaft Gas Trimmer View Diagrams & Manuals
51977 (313000001-313999999) 18in Straight-Shaft Gas Trimmer View Diagrams & Manuals
51948 (314000001-314999999) 25cc Power Head, 2014 View Diagrams & Manuals
51958 (314000001-314999999) 17in Curved-shaft Gas Trimmer, 2014 View Diagrams & Manuals
51978 (317000001-999999999) 18in Straight-shaft Gas Trimmer View Diagrams & Manuals
51978 (314000001-314999999) 18in Straight-shaft Gas Trimmer, 2014 View Diagrams & Manuals
51978 (316000001-316999999)(2016) 51978, 18in Straight-Shaft Gas Trimmer, 2016 (Sn 316000001-316999999) View Diagrams & Manuals
Show More Compatible Models
This item works with the following types of products:
- Trimmer Parts
This part replaces obsolete part #: 310833001
Customer Part Reviews ?
Average Rating (out of 5):
Click to filter by ratings:
5 stars
8
4 stars
0
3 stars
0
2 stars
0
1 stars
0
< PREV
- 1
Worked as expected
Correct part, fit well and fast service. Jacks small engine sent me a part for a chainsaw that was wrong part and would not make it good. Thank you e-replacement parts for a good experience
Guest -
August 18, 2023
Verified Purchase
Great service.
Correct part. Very short turnaround.
Guest -
August 4, 2021
Verified Purchase
Easy Replacement of failed part.
works good.
Guest -
September 26, 2020
Verified Purchase
Awesome
Perfect
Guest -
May 6, 2020
Verified Purchase
Perfect fit replacement
The new replacement tank arrived as promised and fit perfectly. In fact, it is an improved part as they eliminated the rubber grommet that had gone bad on my original tank. Unbelievably easy process from ordering to installation at a legitimate cost.
Stephen P -
October 14, 2019
Verified Purchase
easy repair
very quick delivery. thank you
Guest -
September 24, 2019
Verified Purchase
Exactly what I needed.
Arrived promptly and was an exact match.
Buck -
August 19, 2019
Verified Purchase
Exactly what I needed
When having the issue with the trimmer, I just thought I would have to get a new one instead of being able to get the part for the old one. The part was exactly what was needed to give the trimmer a new life again.
Guest -
July 29, 2019
Verified Purchase
t
t
t -
t days ago
Verified Purchase
eReplacementParts Team
t
Questions & Answers ?
Our customer Service team is at the ready daily to answer your part and product questions.

Ask our Team
We have a dedicated staff with decades of collective experience in helping customers just like you purchase parts to repair their products.
Does this fit my product?Questions & Answers for Fuel Tank Assembly W/fuel Line
No questions have been asked yet
Customer Repair Instructions ?
All our customer repair instructions are solicited directly from other customers just like you who have purchased and replaced this exact part.
Trimmer head plastic wore away and gasket around fuel lines into tank dry rotted
Matt - May 22, 2017
👍 8 of 9 people found this instruction helpful
Tool Type
Trimmer
Difficulty
Easy
Time
Less than 15 minutes
Tools Used
Screwdriver, Socket set
Removed nut holding on trimmer head and placed new one on, remember left hand thread. Removed screws to gas tank and disconnected 2 fuel lines by pulling off gently and pushing new ones on.
Did you find this story helpful?
Thanks for voting and helping fellow customers!
Fuel tank leaked
JAMES - February 3, 2019
👍 2 of 2 people found this instruction helpful
Tool Type
Trimmer
Difficulty
Easy
Time
15-30 minutes
Tools Used
Power Drill, Nutdriver
Parts Used
1. Removed the 3 screws holding the fuel tank. Used an impact driver and socket for speed, but a handheld nut driver or socket wrench would have been sufficient.
2. Removed the carburetor cover for access to fuel line connections.
3. Attached the new fuel tank with original screws.
4. Reattached the two new fuel lines that came with the new tank.
5. Replaced carburetor cover and thumbscrew.
6. Filled tank with fuel--checked for leaks.
7. Started engine--Good to go.
Simple. Even a caveman could do it. :-)
Did you find this story helpful?
Thanks for voting and helping fellow customers!
Tank was leaking
George - October 18, 2017
👍 1 of 1 people found this instruction helpful
Tool Type
Trimmer
Difficulty
Medium
Time
30-60 minutes
Tools Used
Screwdriver, Pliers, Needle-nose pliers
Parts Used
1. Remove three screws
2. Pull off to fuel lines
3. Install the two new fuel lines. This is a little tricky and can be a little difficult, it takes a little time.
4. Reinstall the three screws
2. Pull off to fuel lines
3. Install the two new fuel lines. This is a little tricky and can be a little difficult, it takes a little time.
4. Reinstall the three screws
Did you find this story helpful?
Thanks for voting and helping fellow customers!
Gas lines leak
Humberto - June 25, 2017
👍 2 of 3 people found this instruction helpful
Tool Type
Trimmer
Difficulty
Easy
Time
Less than 15 minutes
Tools Used
Screwdriver, Pliers
Parts Used
Remove the screws holding the old tank, remove the fuel lines. Install the new fuel tank and connect the fuel lines.
Did you find this story helpful?
Thanks for voting and helping fellow customers!
Hole in gas tank
Susan - June 21, 2023
Tool Type
Trimmer
Difficulty
Easy
Time
Less than 15 minutes
Tools Used
Screwdriver
Parts Used
Easily unscrewed old tank and installed new one.Filled with gas and it started right up.
Did you find this story helpful?
Thanks for voting and helping fellow customers!
The fuel line was leaking
Richard - July 5, 2021
Tool Type
Trimmer
Difficulty
Easy
Time
Less than 15 minutes
Tools Used
Screwdriver, No other tools required.
Parts Used
Removed the fuel tank assembly and replaced it with the new one.
Reattached the prime bulb line and the carburetor line. Easy.
Reattached the prime bulb line and the carburetor line. Easy.
Did you find this story helpful?
Thanks for voting and helping fellow customers!
Fuel tank leak
Shawn - May 15, 2020
Tool Type
Trimmer
Difficulty
Easy
Time
Less than 15 minutes
Tools Used
, Torn wrench
Parts Used
Unscrew old tank. Disconnected fuel lines. Installed and reconnected new fuel lines
Did you find this story helpful?
Thanks for voting and helping fellow customers!
Leaking gas from grommet on top of tank.
Rodney - May 4, 2020
Tool Type
Trimmer
Difficulty
Easy
Time
30-60 minutes
Tools Used
Screwdriver, Pliers
Parts Used
1. Drained fuel.
2. Removed three screw holding tank to trimmer.
3. Disassembled fuel lines.
4. Attached new tank fuel lines.
5. Reattached tank to trimmer by inserting the three screws.
2. Removed three screw holding tank to trimmer.
3. Disassembled fuel lines.
4. Attached new tank fuel lines.
5. Reattached tank to trimmer by inserting the three screws.
Did you find this story helpful?
Thanks for voting and helping fellow customers!
needs fuel tank w/fuel lines
Rosalind - June 4, 2019
Tool Type
Trimmer
Difficulty
Easy
Time
Less than 15 minutes
Tools Used
Screwdriver
Parts Used
removed old fuel tank replaced with replacement
Did you find this story helpful?
Thanks for voting and helping fellow customers!
Original fuel tank leaked at fuel line grommet. New tank has no grommet
Samuel - April 25, 2018
👍 1 of 2 people found this instruction helpful
Tool Type
Trimmer
Difficulty
Easy
Time
Less than 15 minutes
Tools Used
Screwdriver
Parts Used
Disconnected fuel lines (2)
Removed 3 screws and removed fuel tank
Installed new tank with 3 screws
Reconnected fuel lines.
Removed 3 screws and removed fuel tank
Installed new tank with 3 screws
Reconnected fuel lines.
Did you find this story helpful?
Thanks for voting and helping fellow customers!
Load More Install Stories
OEM stands for Original Equipment Manufacturer and means the part you’re buying is sourced directly from the manufacturer who made your product. At eReplacementParts, we sell only genuine OEM parts, guaranteeing the part you’re purchasing is of better design and of higher quality than aftermarket parts.
Our product descriptions are a combination of data sourced directly from the manufacturers who made your product as well as content researched and curated by our content & customer service teams. This content is edited and reviewed internally before being made public to customers.
Our customer service team are at the ready daily to answer your part and product questions. We have a dedicated staff with decades of collective experience in helping customers just like you purchase parts to repair their products.
All our part reviews are solicited directly from other customers who have purchased this exact part. While we moderate these reviews for profanity, offensive language or personally identifiable information, these reviews are posted exactly as submitted and no alterations are made by our team.
All our customer repair instructions are solicited directly from other customers just like you who have purchased and replaced this exact part. While we moderate these reviews for profanity, offensive language or personally identifiable information, these reviews are posted exactly as submitted and no alterations are made by our team.
Based on data from past customer purchasing behaviors, these parts are most commonly purchased together along with the part you are viewing. These parts may be necessary or helpful to replace to complete your current repair.
All our installation videos are created and produced in collaboration with our in-house repair technician, Mark Sodja, who has helped millions of eReplacementParts customers over the last 13 years repair their products. Mark has years of experience in selling and repairing both commercial and residential products with a specialty in gas-powered equipment.
This data is collected from customers who submitted a repair instruction after replacing this exact part. Customers can rate how easy the repair was to complete and how long it took. We aggregate this data to provide a repair rating that allows customers to quickly determine the difficulty and time needed to perform their own repair.