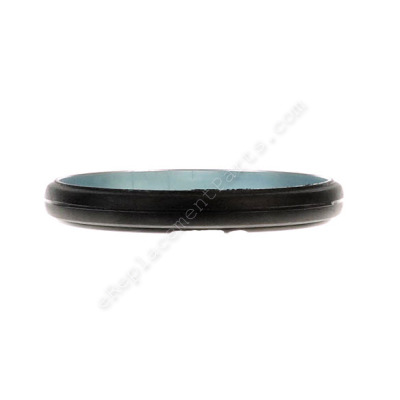
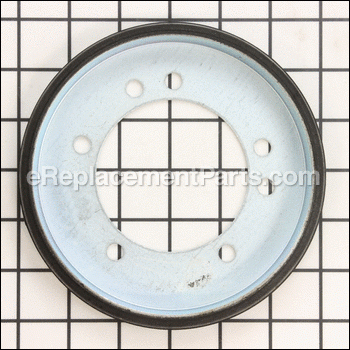


Genuine Manufacturer Sourced replacement part designed for use with a variety of Ariens Snowblowers. This Friction Ring is an important part of a Clutch Assembly which helps to drive your unit. This item is made out of Metal with a Rubber Outer Ring and it is Sold Individually.
Disc- Friction 09475300
OEM part for: Ariens
Part Number: 09475300
$37.30
In Stock
Jump To:
Frequently Purchased Together ?


Compatibility
This Disc- Friction will fit the following 923 machines. Confirm this part works with your model, and view the detailed model diagrams and repair help we have to offer.
Ariens
Show More Compatible ModelsThis item works with the following types of products:
- Snowblower Parts
- Blower Parts
- Lawn Tractor Parts
This part replaces obsolete part #: 04743700, 00170800, 00300300
Customer Part Reviews ?
Average Rating (out of 5):
Click to filter by ratings:
5 stars
13
4 stars
1
3 stars
0
2 stars
0
1 stars
1
< PREV
- 1
- 2
It was a first time easy repair
Part fit perfectly
Guest -
December 1, 2023
Verified Purchase
just what I needed for an old Ariens Emperor riding mower (1975 )
Parts are getting scarce for this great machine. This is just about the only thing that has worn out on it and I bought 2 so I'll have them in the future. This mower should still be here when I'm long gone now! yea e replacement parts
Guest -
June 17, 2023
Verified Purchase
Ariens friction wheel repair
Easy to find the part on the website. Exact fit part for a mechanically knowledgeable person. E-replacement has yet to let me down, no matter what I’m repairing. Thanks.
Guest -
February 15, 2022
Verified Purchase
Quick delivery, reasonable price. Snow blower is back up and running great.
Quick delivery, reasonable price. Snow blower is back up and running great. Would definitely use them again. Yhanks
Guest -
January 18, 2022
Verified Purchase
Friction Wheel for my Riding Lawn Mower
Very pleased with the Friction Wheel replacement part.
Guest -
October 4, 2021
Verified Purchase
Was exactly the part I was after
Recieved part a day before expected, exact part needed , packaging was above expected . Over-all great job. Pleased with service, we will do business again ! Thank you.
Guest -
June 1, 2021
Verified Purchase
Excellent place to find the exact parts you need. Love it!!
This friction wheel repaired the snowblower to top working order.
Guest -
March 1, 2021
Verified Purchase
Excellent Ariens part
Friction wheel arrived early and was an Ariens part.
Easy to install following Ariens manual and a few utube videos.
Guest -
January 7, 2021
Verified Purchase
Easy to replace
Part was just as expected.
Guest -
May 21, 2020
Verified Purchase
About 1/2 hr. Repair and working good.
I like that the part comes from Ariens factory. The next day we had a another snow storm work like it was new.
Jack -
January 29, 2020
Verified Purchase
Questions & Answers ?
Our customer Service team is at the ready daily to answer your part and product questions.

Ask our Team
We have a dedicated staff with decades of collective experience in helping customers just like you purchase parts to repair their products.
Does this fit my product?Questions & Answers for Disc- Friction
What is the part number for oil fill tube for ariens pro 28,420 cc,with briggs engine?
Larry
for model number 926038
asked on 2023-03-28
Hello lary, Thank you for contacting us. In order for us to locate the correct parts and repair information, we actually need the model number and type code of the Briggs and Stratton engine, as the engine parts are listed separately under the engine's model number. Once you have located the model number and type code/spec number, please feel free to resubmit the question and we will be happy to help you. We are looking forward to hearing from you.
eReplacementParts Team March 28, 2023
Will this friction wheel 09475300 work and fit on ariens mod. 926038?
Larry
for model number 926038
asked on 2023-03-28
Hello Larry, Thank you for your inquiry. We have researched the model number you have provided and confirm that this part will fit your model. Good luck with your repair.
eReplacementParts Team March 28, 2023
Customer Repair Instructions ?
All our customer repair instructions are solicited directly from other customers just like you who have purchased and replaced this exact part.
Replacing Friction Wheel on 24 year old Ariens ST 1032
Randy - January 30, 2016
👍 38 of 41 people found this instruction helpful
Tool Type
Snowblower
Difficulty
Easy
Time
30-60 minutes
Tools Used
Socket set, Wrench Set
Parts Used
1. Tip blower forward .
2. Remove 4 bolts from bottom inspection plate, and remove.
3. Remove 5 bolts from Friction Wheel - Hold shaft with end wrench or adjustable wrench to keep it from turning.
4. Slip friction wheel out - Move shift lever to allow room to remove friction wheel. Take note as to which direction the cupped side of the wheel faces.
5. Attach new friction wheel- put in all bolts hand tight prior to tightening with wrench so as not to warp the wheel. Make certain there is no grease or gunk on the friction wheel or aluminum friction plate. I used carburetor cleaner to clean both. Friction plate should be perfectly smooth and without grooves worn into it.
6. Replace inspection plate.
7. Adjust shift linkage per owner's manual as old wheel was likely worn.
Did you find this story helpful?
Thanks for voting and helping fellow customers!
Friction wheel bad spot made drive jump & bang
Dennis - February 6, 2016
👍 18 of 18 people found this instruction helpful
Tool Type
Snowblower
Difficulty
Medium
Time
15-30 minutes
Tools Used
Pliers, Socket set, Wrench Set, None
Parts Used
First tilt snow blower up that the bottom is facing out. Remove the wheels & remove cover. Next take a picture if you can of the inside so can see how it is put together. Next take a look at the friction wheel to see if that is the problem the cover on the wheel is a hard rubber cover look to see if all or part of it is missing. If wheel is no good you must remove the shaft first. There are two clips on the shaft remove them first so you can slide it off next on the left side of blower remove the shaft holder then on the right side. Now look at the tooth gear on the right start to remove shaft by pulling it out on the left there is a small gear on the shaft on the right that will slide off be careful not to loose it take it off put in your parts tray. Now slide shaft out hold on to the friction wheel there are two big washers remember where they go slide off the friction wheel from the holder. Next you will have to remove the bearing from the old wheel three bolts hold it on. If you have a new wheel or need to order it get from (ereplacement parts). If you have wheel or when you get it in just do the reverse on the install use a little grease on gears & wd40 the shaft bearings ends. Not a hard job & take you time total job time should be no more then 30 min. The part is $26.00. You save time & lot of labor money by doing it yourself. Thanks
Did you find this story helpful?
Thanks for voting and helping fellow customers!
Friction wheel was missing 3 inches of rubber.
Thomas - July 17, 2016
👍 10 of 10 people found this instruction helpful
Tool Type
Snowblower
Difficulty
Medium
Time
30-60 minutes
Tools Used
Pliers, Socket set
Parts Used
1. Tipped snowblower onto the it's mouth.
2. Removed wheels from axle.
3. Removed plate that covers the transmission assembly.
4. Removed axle bearings from axle.
5. Slid axle shaft left to remove small gear then slid it to the right after removing the limit pin.
6. Pulled friction disk assembly from the bracket and slid assembly off the shaft.
7. Removed worn disk from the assembly using a torques bit (#40) and replaced with new disk.
8. Reassembled in reverse order.
9. Applied low temp grease on moving parts and axle.
Did you find this story helpful?
Thanks for voting and helping fellow customers!
Friction wheel needed replacement
AL - July 5, 2017
👍 5 of 5 people found this instruction helpful
Tool Type
Lawn Tractor
Difficulty
Medium
Time
1-2 hours
Tools Used
Socket set, Wrench Set
Parts Used
1. Raised the mower to a height that made the part accessible
2 Ratchet with a 1/2 socket, removed six bolts
3 Used screw driver to break loose from attachment.
4 Replaced new part with the six bolts
2 Ratchet with a 1/2 socket, removed six bolts
3 Used screw driver to break loose from attachment.
4 Replaced new part with the six bolts
Did you find this story helpful?
Thanks for voting and helping fellow customers!
Snowblower drive was not engaging
jonathan - January 4, 2017
👍 4 of 5 people found this instruction helpful
Tool Type
Snowblower
Difficulty
Medium
Time
1-2 hours
Tools Used
Screwdriver, Socket set
Parts Used
Removed the old and replaced with the new friction wheel.
Did you find this story helpful?
Thanks for voting and helping fellow customers!
Thumping sound and wheel drive slipping.
James - February 28, 2016
👍 2 of 2 people found this instruction helpful
Tool Type
Snowblower
Difficulty
Easy
Time
30-60 minutes
Tools Used
Screwdriver, Pliers, Socket set, Cheap siphon to drain the gas tank.
Parts Used
Step by step instructions were clearly listed in the Aries owners manual. I also downloaded the parts manual to better identify the parts specified in the instructions. Job couldn't have been easier. Getting the wheel back in was a bit tricky, due to having to keep the upper and lower washers from falling out while inserting the assembly into the speed selector arm. I moved it all the way to the left and inserted the friction disc carrier with the bottom angled a bit to go in first, so that the washer wouldn't fall off.
Did you find this story helpful?
Thanks for voting and helping fellow customers!
Wheels did not engage.
Michael - November 25, 2017
👍 1 of 1 people found this instruction helpful
Tool Type
Snowblower
Difficulty
Medium
Time
30-60 minutes
Tools Used
Screwdriver, Power Drill, Socket set, Wrench Set
Parts Used
Looked at this snowblower repair on youtube. I then followed procedure as described in you tube video.
Did you find this story helpful?
Thanks for voting and helping fellow customers!
bad friction wheel
Myron - September 7, 2023
Tool Type
Snowblower
Difficulty
Medium
Time
1-2 hours
Tools Used
Pliers, Socket set, Wrench Set
removed bad friction wheel replaced with new
Did you find this story helpful?
Thanks for voting and helping fellow customers!
Friction drive wheel
JOSEPH - February 19, 2022
Tool Type
Snowblower
Difficulty
Easy
Time
30-60 minutes
Tools Used
Pliers, Socket set
Parts Used
Drained gasoline out of tank
Tipped blower onto auger end.
Removed both wheels
Removed cap screws from cover plate exposing drive
Removed keepers on wheel shift, one bearing, pulled shaft out, sprocket is on splines and needed to catch it as shaft is pulled.
Friction wheel is hung between two yokes, turn sideways and remove.
Remove 3 screws from wheels(torex) reverse bolting replacement wheel.
Clean and light grease all sliding parts, be careful not to over grease as it will throw it on the frictional drives.
Reassemble drive wheel into yokes,
Check movement with lever that connects to hand lever which should have been disconnected. Forgot to mention that earlier.
Bolt cover plate back in place, clean and lub. Shafts so wheels side on easy. Note under wheels there is a splined shaft bushing that has a keyway to turn wheels be careful to clean and reinstall the key, may need to be replaced if rusted.
Install both wheels.
Return blower to normal to running position, refuel.
Wait about 15 minutes before running to let engine oil return to normal sump,longer if very cold.
Blower should be ready to run.
Did you find this story helpful?
Thanks for voting and helping fellow customers!
friction wheel was worn out and one shear bolt needed to be replace.
Ronald - February 18, 2022
Tool Type
Snowblower
Difficulty
Easy
Time
Less than 15 minutes
Tools Used
Socket set, Adjustable Wrench
remove broken bolt. Also replaced the friction wheel.
Did you find this story helpful?
Thanks for voting and helping fellow customers!
Load More Install Stories
OEM stands for Original Equipment Manufacturer and means the part you’re buying is sourced directly from the manufacturer who made your product. At eReplacementParts, we sell only genuine OEM parts, guaranteeing the part you’re purchasing is of better design and of higher quality than aftermarket parts.
Our product descriptions are a combination of data sourced directly from the manufacturers who made your product as well as content researched and curated by our content & customer service teams. This content is edited and reviewed internally before being made public to customers.
Our customer service team are at the ready daily to answer your part and product questions. We have a dedicated staff with decades of collective experience in helping customers just like you purchase parts to repair their products.
All our part reviews are solicited directly from other customers who have purchased this exact part. While we moderate these reviews for profanity, offensive language or personally identifiable information, these reviews are posted exactly as submitted and no alterations are made by our team.
All our customer repair instructions are solicited directly from other customers just like you who have purchased and replaced this exact part. While we moderate these reviews for profanity, offensive language or personally identifiable information, these reviews are posted exactly as submitted and no alterations are made by our team.
Based on data from past customer purchasing behaviors, these parts are most commonly purchased together along with the part you are viewing. These parts may be necessary or helpful to replace to complete your current repair.
All our installation videos are created and produced in collaboration with our in-house repair technician, Mark Sodja, who has helped millions of eReplacementParts customers over the last 13 years repair their products. Mark has years of experience in selling and repairing both commercial and residential products with a specialty in gas-powered equipment.
This data is collected from customers who submitted a repair instruction after replacing this exact part. Customers can rate how easy the repair was to complete and how long it took. We aggregate this data to provide a repair rating that allows customers to quickly determine the difficulty and time needed to perform their own repair.