
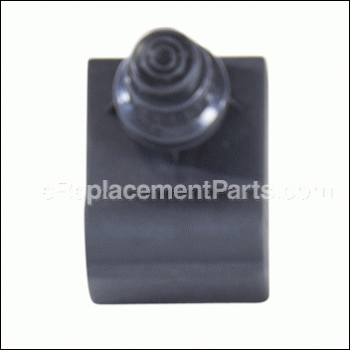
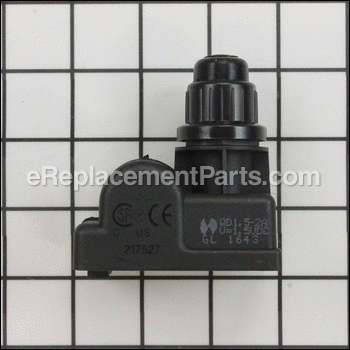
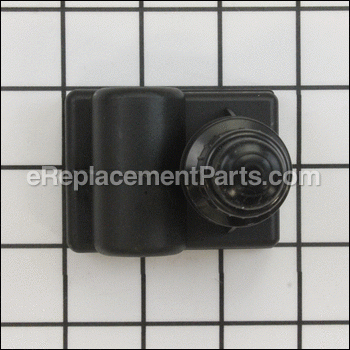
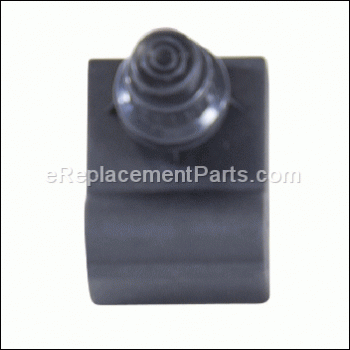
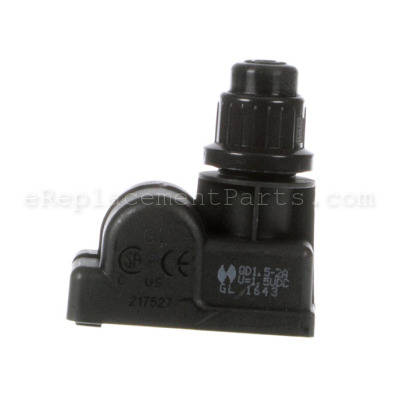


Electronic Ignition Module G409-0021-W1
OEM part for: Char-Broil
Part Number: G409-0021-W1
$13.69
Usually ships in 7 - 12 business days
7 - 12 business days
Jump To:
Frequently Purchased Together ?


Compatibility
This part will fit the following 38 machines
Char-Broil
463460710 Designer Series 4-Burner with Side Burner View Diagrams & Manuals
463420511 4-Burner Grill With Outdoor Stovetop View Diagrams & Manuals
463210311 4-Burner Gas Grill With Side Burner View Diagrams & Manuals
463320110 Three-Burner Gas Grill with Side Burner View Diagrams & Manuals
463320109 Three Burner Gas Grill with Side Burner View Diagrams & Manuals
463470109 Three Burner Grill with Side Burner View Diagrams & Manuals
464220110 4 Burner Gas Grill with Side Burner View Diagrams & Manuals
464321407 Grill View Diagrams & Manuals
464321607 Grill View Diagrams & Manuals
466420909 Gas Grill View Diagrams & Manuals
463210310 Four-Burner Gas Grill with Side Burner View Diagrams & Manuals
463436214 Classic 4-Burner Gas Grill View Diagrams & Manuals
463334614 Classic 3-Burner Gas Grill with Sideburner View Diagrams & Manuals
463461614 N480 4-Burner Gas Grill with Lidded Sideburner View Diagrams & Manuals
463441311 LP Gas Outdoor BBQ Grill with Side Burner View Diagrams & Manuals
463370519 GAS2COAL 3-Burner Hybrid Grill View Diagrams & Manuals
463278418 GAS2COAL 4-Burner Hybrid Grill View Diagrams & Manuals
463420510 Four-Burner Gas Grill With Outdoor Stovetop View Diagrams & Manuals
463436213 Bbq Grill View Diagrams & Manuals
463436215 4 Burner Grill With Side Burner View Diagrams & Manuals
463436413 Classic Grill View Diagrams & Manuals
463439915 Traditional 4 Burner Gas Grill View Diagrams & Manuals
463441312 Classic Grill View Diagrams & Manuals
463460712 Classic Grill View Diagrams & Manuals
463461613 Classic Grill View Diagrams & Manuals
466320509 Three Burner Gas Grill View Diagrams & Manuals
466334613 Classic Grill View Diagrams & Manuals
466370516 Gas 2 Coal Grill View Diagrams & Manuals
466420511 Gas Grill View Diagrams & Manuals
466420513 Classic Grill View Diagrams & Manuals
466420910 Four-Burner Grill With Flush Lidded Sideburner View Diagrams & Manuals
466420911 Gas Grill View Diagrams & Manuals
466436213 Classic Grill View Diagrams & Manuals
466460713 Classic Grill View Diagrams & Manuals
466471109 Four Burner Gas Grill View Diagrams & Manuals
466471110 Four-Burner Gas Grill View Diagrams & Manuals
466471111 Classic Grill View Diagrams & Manuals
466471112 Classic Grill View Diagrams & Manuals
Show More Compatible Models
This item works with the following types of products:
- Outdoor Grill Parts
This part replaces obsolete part #: 80009062, 263602100281, 80000030
Repair Videos ?

Articles:
|
Having trouble getting your grill to light up? A common cause of this issue is a defective ignition switch. We'll sho...
November 08, 2012
|

Customer Part Reviews ?
Average Rating (out of 5):
Click to filter by ratings:
5 stars
1
4 stars
1
3 stars
0
2 stars
0
1 stars
0
< PREV
- 1
Great part works well
This new electronic igniter was easy to install and worked well.
Guest -
August 7, 2019
Verified Purchase
Prefect fit
Easy to order and the part fit perfectly. Would have given 5 stars out but there were issues with USPS. They zero idea of what's going on. I would suggest the company switch carrier.
Guest -
August 15, 2019
Verified Purchase
t
t
t -
t days ago
Verified Purchase
eReplacementParts Team
t
Questions & Answers ?
Our customer Service team is at the ready daily to answer your part and product questions.

Ask our Team
We have a dedicated staff with decades of collective experience in helping customers just like you purchase parts to repair their products.
Does this fit my product?Questions & Answers for Electronic Ignition Module
No questions have been asked yet
Customer Repair Instructions ?
All our customer repair instructions are solicited directly from other customers just like you who have purchased and replaced this exact part.
Original module had become wet & corroded in the battery area.
Kenneth - May 16, 2018
👍 4 of 6 people found this instruction helpful
Tool Type
Outdoor Grill
Difficulty
Easy
Time
Less than 15 minutes
Tools Used
Pliers
Parts Used
1. Removed button cap & module holding nut.
2. Removed module & heat shield.
3. Discounted the two wires from rear of non functioning module.
4. Connected the two wires to the new module.
5. Placed new module & heat shield into the grill.
6. Secured module & heat shield with retaining nut.
7. Installed new battery & ignition button/cap.
2. Removed module & heat shield.
3. Discounted the two wires from rear of non functioning module.
4. Connected the two wires to the new module.
5. Placed new module & heat shield into the grill.
6. Secured module & heat shield with retaining nut.
7. Installed new battery & ignition button/cap.
Did you find this story helpful?
Thanks for voting and helping fellow customers!
Electronic starter was only working periodically
David - March 1, 2018
👍 1 of 1 people found this instruction helpful
Tool Type
Outdoor Grill
Difficulty
Medium
Time
15-30 minutes
Tools Used
Screwdriver, Wrench Set, Soapy solution spray bottle.
Parts Used
1) Made sure the gas was off prior to start of work.
2) Removed the gas supply manifold which required removal of 6 each bracket screws and the coupling nut from the supply line.
3) This allowed access to remove the electronic ignition from behind the burner control console.
4) Removed the plastic nut securing the electronic ignition to the control console, unplugged the two wires and pushed it through to the back side.
5) Installed new electronic ignition into place, plugged in the two wires and secured with the plastic nut.
6) Reattached the gas supply line to the manifold and secured the manifold back into place with the three brackets reusing the 6 screws. Verify proper alignment of manifold holes to burner valves prior to tightening or you will not get gas to the burners and could have a leak.
7) Turned gas on and verified with soap solution that there were no leaks.
Did you find this story helpful?
Thanks for voting and helping fellow customers!
My grill is 10 years old. The grease tray rusted out and the electronic ignition module failed.
Marian - June 17, 2021
Tool Type
Outdoor Grill
Difficulty
Easy
Time
Less than 15 minutes
Tools Used
Adjustable Wrench
Parts came quickly and very easy to install. The grease tray just slid into place. The electronic ignition very easy after reading the instructions.
My Father bought this grill for me. Since he is now gone it feels good to continue to enjoy the grill. Thank you
My Father bought this grill for me. Since he is now gone it feels good to continue to enjoy the grill. Thank you
Did you find this story helpful?
Thanks for voting and helping fellow customers!
Ignighter didn’t work, drip pan rusted.
Charles - September 17, 2020
Tool Type
Outdoor Grill
Difficulty
Easy
Time
15-30 minutes
Tools Used
, My own hands
Removed the broken and rusted parts and replaced new parts by hand. No tools were necessary.
Did you find this story helpful?
Thanks for voting and helping fellow customers!
Ignition model stopped producing spark.
John - May 3, 2018
Tool Type
Outdoor Grill
Difficulty
Easy
Time
Less than 15 minutes
Tools Used
Parts Used
1. Unscrewed the plunger off the front.
2. Unplugged the connectors in the back.
3. Removed old module from the back.
4. Installation is reverse of removal.
2. Unplugged the connectors in the back.
3. Removed old module from the back.
4. Installation is reverse of removal.
Did you find this story helpful?
Thanks for voting and helping fellow customers!
Rusted carry over tubes. Bad ignition module.
Nathan - October 17, 2017
Tool Type
Outdoor Grill
Difficulty
Easy
Time
30-60 minutes
Tools Used
Power Drill
Steps to replace burners and carry-over tubes:
1) Take off grill grates
2) Remove cotter pins from burners
3) Pull burners and carry-over tubes out
4) Insert new burners
5) Insert new carry-over tubes
6) Insert new cotter pins
Ignition module required removing the gas pipe under the burner adjustment knobs with phillips screw gun...
1) Take off grill grates
2) Remove cotter pins from burners
3) Pull burners and carry-over tubes out
4) Insert new burners
5) Insert new carry-over tubes
6) Insert new cotter pins
Ignition module required removing the gas pipe under the burner adjustment knobs with phillips screw gun...
Did you find this story helpful?
Thanks for voting and helping fellow customers!
Ignition module failed
Walter - June 22, 2020
👍 0 of 1 people found this instruction helpful
Tool Type
Outdoor Grill
Difficulty
Medium
Time
30-60 minutes
Tools Used
Screwdriver, Socket set, None
Parts Used
1. Removed the steel cooking grates
2. Unscrew the igniter knob
3. Remove the Gas2Coal panel
4. Unscrew the washer from the igniter
5. Push the igniter from its holder
6. Disconnect the 2 wires
7. Remove the old igniter
8. Attach the new igniter
9. Reverse the steps
2. Unscrew the igniter knob
3. Remove the Gas2Coal panel
4. Unscrew the washer from the igniter
5. Push the igniter from its holder
6. Disconnect the 2 wires
7. Remove the old igniter
8. Attach the new igniter
9. Reverse the steps
Did you find this story helpful?
Thanks for voting and helping fellow customers!
OEM stands for Original Equipment Manufacturer and means the part you’re buying is sourced directly from the manufacturer who made your product. At eReplacementParts, we sell only genuine OEM parts, guaranteeing the part you’re purchasing is of better design and of higher quality than aftermarket parts.
Our product descriptions are a combination of data sourced directly from the manufacturers who made your product as well as content researched and curated by our content & customer service teams. This content is edited and reviewed internally before being made public to customers.
Our customer service team are at the ready daily to answer your part and product questions. We have a dedicated staff with decades of collective experience in helping customers just like you purchase parts to repair their products.
All our part reviews are solicited directly from other customers who have purchased this exact part. While we moderate these reviews for profanity, offensive language or personally identifiable information, these reviews are posted exactly as submitted and no alterations are made by our team.
All our customer repair instructions are solicited directly from other customers just like you who have purchased and replaced this exact part. While we moderate these reviews for profanity, offensive language or personally identifiable information, these reviews are posted exactly as submitted and no alterations are made by our team.
Based on data from past customer purchasing behaviors, these parts are most commonly purchased together along with the part you are viewing. These parts may be necessary or helpful to replace to complete your current repair.
All our installation videos are created and produced in collaboration with our in-house repair technician, Mark Sodja, who has helped millions of eReplacementParts customers over the last 13 years repair their products. Mark has years of experience in selling and repairing both commercial and residential products with a specialty in gas-powered equipment.
This data is collected from customers who submitted a repair instruction after replacing this exact part. Customers can rate how easy the repair was to complete and how long it took. We aggregate this data to provide a repair rating that allows customers to quickly determine the difficulty and time needed to perform their own repair.