
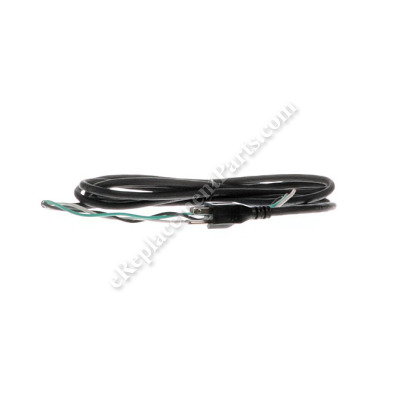


This power cord is a genuine Milwaukee replacement part. It is used on a variety of their power tools. This cord plugs into a regular outlet delivering the power to the unit. If the cord is bent or damaged otherwise it is important to replace it immediately. Please note that the cord protector/sleeve is sold separately.
Replacing power cord is a simple job that should only require a screwdriver.
• Remove the housing
• Disconnect the old cord wires
• Pull out the cord through the sleeve
• Remove old cord and secure new one in place
• Reassemble test the tool
Cord 18-3 10 In. 22-64-1832
OEM part for: Milwaukee
Part Number: 22-64-1832
$19.62
In Stock
Jump To:
Product Description ?
- Classification: Part
- Weight: 0.65 lbs.
- Shipping: Ships Worldwide
Frequently Purchased Together ?

Compatibility
This part will fit the following 112 machines
Milwaukee
6783-1 (SER 471-51500) Electric Drill View Diagrams & Manuals
6783-1 (SER 471-70000) Electric Drill View Diagrams & Manuals
6783-1 (SER 471A) Electric Drill View Diagrams & Manuals
4980 (SER 41367-F) Grinder View Diagrams & Manuals
4980 (SER 41675-G) Grinder View Diagrams & Manuals
4991 (SER W10-86) Grinder View Diagrams & Manuals
4995 (SER W10-86) Grinder View Diagrams & Manuals
5051 (SER W10-86) Grinder View Diagrams & Manuals
5091 (SER W10-86) Grinder View Diagrams & Manuals
6798-1 (SER 450-224000) Screwdriver View Diagrams & Manuals
6783-1 (SER 471-54000) Screwdriver View Diagrams & Manuals
6750-1 (SER 464-142000) Drywall Screwdriver View Diagrams & Manuals
0102-1 (SER 428-189500) Electric Drill / Driver View Diagrams & Manuals
0102-1 (SER 428-214001) Electric Drill / Driver View Diagrams & Manuals
0102-1 (SER 428-249500) Electric Drill / Driver View Diagrams & Manuals
0102-1 (SER 428A-249500) Electric Drill / Driver View Diagrams & Manuals
0102-1 (SER 428B) Electric Drill / Driver View Diagrams & Manuals
0102-1 (SER 428C) Electric Drill / Driver View Diagrams & Manuals
0102-1 (SER 428D) Electric Drill / Driver View Diagrams & Manuals
0141-1 (SER 708-1001) Electric Drill / Driver View Diagrams & Manuals
0141-1 (SER 708-5701) Electric Drill / Driver View Diagrams & Manuals
0141-1 (SER 708A-15500) Electric Drill / Driver View Diagrams & Manuals
0141-1 (SER 708-15500) Electric Drill / Driver View Diagrams & Manuals
0141-1 (SER 708B) Electric Drill / Driver View Diagrams & Manuals
0141-1 (SER 708C) Electric Drill / Driver View Diagrams & Manuals
0141-1 (SER 708D) Electric Drill / Driver View Diagrams & Manuals
4900 (SER 40769-K) Grinder View Diagrams & Manuals
4900 (SER 41671-L) Grinder View Diagrams & Manuals
4920 (SER 41673-V) Grinder View Diagrams & Manuals
4931 (SER W10-86) Grinder View Diagrams & Manuals
4935 (SER W10-86) Grinder View Diagrams & Manuals
0222-1 (SER 430-1151500) Electric Drill / Driver View Diagrams & Manuals
0222-1 (SER 430A-1151500) Electric Drill / Driver View Diagrams & Manuals
0222-1 (SER 430-864000) Electric Drill / Driver View Diagrams & Manuals
0222-1 (SER 430-967501) Electric Drill / Driver View Diagrams & Manuals
0227-1 (SER 831A) Electric Drill / Driver View Diagrams & Manuals
0227-1 (SER 831B) Electric Drill / Driver View Diagrams & Manuals
0227-1 (SER 831C) Electric Drill / Driver View Diagrams & Manuals
0227-1 (SER 831D) Electric Drill / Driver View Diagrams & Manuals
0228-1 (SER 689-1001) Electric Drill / Driver View Diagrams & Manuals
0228-1 (SER 689-189001) Electric Drill / Driver View Diagrams & Manuals
0228-1 (SER 689-457000) Electric Drill / Driver View Diagrams & Manuals
0228-1 (SER 689A-457000) Electric Drill / Driver View Diagrams & Manuals
0228-1 (SER 689-90000) Electric Drill / Driver View Diagrams & Manuals
0228-1 (SER 689A) Electric Drill / Driver View Diagrams & Manuals
0228-1 (SER 689B) Electric Drill / Driver View Diagrams & Manuals
0228-1 (SER 689C) Electric Drill / Driver View Diagrams & Manuals
0228-1 (SER 689D) Electric Drill / Driver View Diagrams & Manuals
0230-1 (SER 732-1001) Electric Drill / Driver View Diagrams & Manuals
0230-1 (SER 732-29500) Electric Drill / Driver View Diagrams & Manuals
0230-1 (SER 732A) Electric Drill / Driver View Diagrams & Manuals
0230-1 (SER 732B) Electric Drill / Driver View Diagrams & Manuals
0230-1 (SER 732C) Electric Drill / Driver View Diagrams & Manuals
0230-1 (SER 732D) Electric Drill / Driver View Diagrams & Manuals
0230-1 (SER 732-8501) Electric Drill / Driver View Diagrams & Manuals
0232-1 (SER 832A) Electric Drill / Driver View Diagrams & Manuals
0232-1 (SER 832B) Electric Drill / Driver View Diagrams & Manuals
6000 (SER 285-4288) Sander View Diagrams & Manuals
6004 (SER 600-1001) Sander View Diagrams & Manuals
6005 (SER 544-1001) Sander View Diagrams & Manuals
6006 (SER 601-1001) Sander View Diagrams & Manuals
6012 (SER 661-1001) Sander View Diagrams & Manuals
5392-1 (SER 665-1001) Hammer Drill View Diagrams & Manuals
5392-1 (SER 665-140001) Hammer Drill View Diagrams & Manuals
5392-1 (SER 665-370500) Hammer Drill View Diagrams & Manuals
5392-1 (SER 665-56500) Hammer Drill View Diagrams & Manuals
5392-1 (SER 665-91000) Hammer Drill View Diagrams & Manuals
5392-1 (SER 665B) Hammer Drill View Diagrams & Manuals
5392-1 (SER 665C) Hammer Drill View Diagrams & Manuals
5392-1 (SER 665D) Hammer Drill View Diagrams & Manuals
0237-1 (SER 867A) Electric Drill / Driver View Diagrams & Manuals
0237-1 (SER 867B) Electric Drill / Driver View Diagrams & Manuals
0238-1 (SER 723-1001) Electric Drill / Driver View Diagrams & Manuals
0238-1 (SER 723-15001) Electric Drill / Driver View Diagrams & Manuals
0238-1 (SER 723-48500) Electric Drill / Driver View Diagrams & Manuals
0238-1 (SER 723A) Electric Drill / Driver View Diagrams & Manuals
0239-1 (SER 756-1001) Electric Drill / Driver View Diagrams & Manuals
0239-1 (SER 756-18000) Electric Drill / Driver View Diagrams & Manuals
0239-1 (SER 756-4701) Electric Drill / Driver View Diagrams & Manuals
0239-1 (SER 756-9001) Electric Drill / Driver View Diagrams & Manuals
0239-1 (SER 756A) Electric Drill / Driver View Diagrams & Manuals
0566-1 (SER 496-61651) Drain Cleaner View Diagrams & Manuals
6252 (SER 553-1001) Jig Saw View Diagrams & Manuals
6282 (SER 554-1001) Jig Saw View Diagrams & Manuals
0566-1 (SER 496-50000) Drain Cleaner View Diagrams & Manuals
6747-1 (SER 453-157000) Drywall Screwdriver View Diagrams & Manuals
6851 (SER 758-1001) Power Unit View Diagrams & Manuals
6543-1 (SER 469-41000) Screwdriver View Diagrams & Manuals
6800 (SER 220-1001) Shear View Diagrams & Manuals
0566-1 (SER 496-41000) Drain Cleaner View Diagrams & Manuals
0566-1 (SER 496-41500) Drain Cleaner View Diagrams & Manuals
0566-1 (SER 496-101500) Drain Cleaner View Diagrams & Manuals
0566-1 (SER 496B) Drain Cleaner View Diagrams & Manuals
0566-1 (SER 496C) Drain Cleaner View Diagrams & Manuals
4920 (SER 40000-U) 1/3 H.P. Bench Grinder View Diagrams & Manuals
0566-69 (SER 977A) Drain Cleaner View Diagrams & Manuals
6798-1 (SER 450-182000) Positive Clutch Rev Screw Driver View Diagrams & Manuals
6798-1 (SER 450-187100) Positive Clutch Rev Screw Driver View Diagrams & Manuals
6798-1 (SER 450B) Positive Clutch Rev Screw Driver View Diagrams & Manuals
6543-1 (SER 469-47000) 1000 R.P.M. Rev. Screwdriver View Diagrams & Manuals
6543-1 (SER 469A) 1000 R.P.M. Rev. Screwdriver View Diagrams & Manuals
6583-1 (SER 470-46500) Adjustable Torque Screwdriver View Diagrams & Manuals
6583-1 (SER 470-49000) Adjustable Torque Screwdriver View Diagrams & Manuals
6583-1 (SER 470A) Adjustable Torque Screwdriver View Diagrams & Manuals
6747-1 (SER 453-105000) 2500 RPM Rev. Drywall Screwdriver View Diagrams & Manuals
6747-1 (SER 453-111000) 2500 RPM Rev. Drywall Screwdriver View Diagrams & Manuals
6747-1 (SER 453B) 2500 RPM Rev. Drywall Screwdriver View Diagrams & Manuals
6750-1 (SER 464-110000) Drywall Screwdriver View Diagrams & Manuals
6750-1 (SER 464-240000) Drywall Screwdriver View Diagrams & Manuals
6750-1 (SER 464A) Drywall Screwdriver View Diagrams & Manuals
6583-1 (SER 470-70000) Adjustable Torque Screwdriver View Diagrams & Manuals
6850 (SER 550-47000) 18 Gauge Swivel Head Shear View Diagrams & Manuals
Show More Compatible Models
This item works with the following types of products:
- Drill Parts
- Electric Drill Parts
- Grinder Parts
- Screwdriver Parts
- Sander Parts
- Hammer Drill Parts
- Drain Cleaner Parts
- Jig saw Parts
- Saw Parts
- Shear Parts
- Bench Grinder Parts
This part replaces obsolete part #: 22-64-0245, 22-64-0225, 22-64-1831, 22-64-1120
Customer Part Reviews ?
Average Rating (out of 5):
Click to filter by ratings:
5 stars
4
4 stars
0
3 stars
0
2 stars
0
1 stars
0
< PREV
- 1
Quick and easy fix!
My Milwaukee Drill is back to safe and working order.
Guest -
July 24, 2022
Verified Purchase
Perfect replacement cord for my 30 year old Milwaukee Drill
Was exactly what I needed to fix my Milwaukee Drill. Easy to install and the price was fair.
Guest -
February 4, 2020
Verified Purchase
Right part, right fit, delivered on time
Needed power cord for Milwaukee Hammer Drill, found it on eReplacementParts. This 10 foot, 18/3 power cord was just right. Arrived on the date expected, a reasonable price. It's installed and the $160 hammer drill is back on the job site, OSHA compliant, working as expected and all for about 10% the cost of a new drill (not including expedited shipping and my 30 minutes to install). Good stuff. Purchased from eReplacementParts before, will order from here again.
Guest -
October 24, 2019
Verified Purchase
High quality part.
Not all replacement power cords are equal. The cords I ordered were high quality and made it easier for me to install.
Guest -
August 15, 2019
Verified Purchase
t
t
t -
t days ago
Verified Purchase
eReplacementParts Team
t
Questions & Answers ?
Our customer Service team is at the ready daily to answer your part and product questions.

Ask our Team
We have a dedicated staff with decades of collective experience in helping customers just like you purchase parts to repair their products.
Does this fit my product?Questions & Answers for Cord 18-3 10 In.
No questions have been asked yet
Customer Repair Instructions ?
All our customer repair instructions are solicited directly from other customers just like you who have purchased and replaced this exact part.
The terminal block for the wires is integral to the switch. the wires are held into the switch by spring pressure
Chris - April 8, 2016
👍 4 of 4 people found this instruction helpful
Tool Type
Electric Drill
Difficulty
Expert
Time
1-2 hours
Tools Used
Screwdriver, Pliers, Soldering iron
Given the cost of new drills from Milwaukee and others I would suggest the average homeowner simply buy a new drill. in my case the Milwaukee tool in question is not made anymore. It has very high torque with low speed which is ideal for the kind of hobby work that I do. In order to facilitate replacing the power cord you must remove the switch assembly and take the terminal block apart. while easily done you must be careful. Once the old cord is removed then you must cut the 3 leads to the proper length, use the old cord as a pattern. Strip the leads then solder them to make them a solid wire. once that's done simply push the now "solid" wire into the spring pressure contact points taking care for polarity. Test the switch then re-assemble the handle...you're done
Did you find this story helpful?
Thanks for voting and helping fellow customers!
Electric cord damaged
j - December 18, 2016
👍 2 of 2 people found this instruction helpful
Tool Type
Electric Drill
Difficulty
Easy
Time
15-30 minutes
Tools Used
Screwdriver, Side cutters
Parts Used
Remove one handle half
Make a wiring diagram
Remove the cord wires
Remove the old cord relief
Cut the cord wires to the correct length, then strip the ends of them
Install the cord relief on the new cord
Wire the cord in
Install the handle half making sure no wires are getting pinched
Make a wiring diagram
Remove the cord wires
Remove the old cord relief
Cut the cord wires to the correct length, then strip the ends of them
Install the cord relief on the new cord
Wire the cord in
Install the handle half making sure no wires are getting pinched
Did you find this story helpful?
Thanks for voting and helping fellow customers!
The power cords on both my Makita saw & Milwaukee Drill cracked & dry rotted!
Stephen - August 5, 2018
👍 1 of 1 people found this instruction helpful
Tool Type
Circular Saw
Difficulty
Medium
Time
15-30 minutes
Tools Used
Screwdriver, Pliers, Wire strippers & crimpers
1) Makita Skill saw, removed the 4 screws in the handle by the trigger & pried open.
2) Removed the 2 wires from the switch .
3) Cut the new cord wires to length, stripped the ends & installed into the switch.
4) Made sure the cord guard was interested the proper location then reinstalled the cover with the 4 screws.
1) Milwaukee Drill 1/2 inch, removed the handle screws 4 & pried open the handle.
2) Removed the screws holding the wires to the switch & ground.
3) Cut the new wires to length stripped the ends of each wire & installed & crimped a new round wire end & reinstalled to the ground and switch.
4) Reinstalled the handle cover with cord guard in the correct location.
Did you find this story helpful?
Thanks for voting and helping fellow customers!
Milwaukee orbital sander cord cover was totally disintegrating.
Jerry - January 30, 2016
👍 1 of 1 people found this instruction helpful
Tool Type
Sander
Difficulty
Easy
Time
15-30 minutes
Tools Used
Screwdriver, soldering iron and crimpers
Removed 5 screws from top of sander. Removed 3 screws from existing cord and removed old cord. Tinned the wires with solder and added connectors. reinstalled new cord with 3 screws. Aligned new cord and reinforcement put cover on and reinstalled with 5 screws.
Don't know why I didn't do this along time ago, but thanks to you guys getting and replacing the cord was a peace of cake.
Don't know why I didn't do this along time ago, but thanks to you guys getting and replacing the cord was a peace of cake.
Did you find this story helpful?
Thanks for voting and helping fellow customers!
Power cord had cracked outside insulation
Thomas - October 25, 2021
Tool Type
Hammer Drill
Difficulty
Medium
Time
15-30 minutes
Tools Used
Power Drill
Parts Used
1. Removed cover over the trigger assembly.
2. Removed the black and white wires from the trigger switch.
3. Trimmed the wires to the proper length.
4. Treaded the wires through the protective sleeve.
5. Tinned the bare wire ends to stiffen them.
6. Replaced the black and white wires into the switch and the ground wire to the ground block.
7. Routed the wires back to their original positions.
8. Re-installed the cover.
9. Tested for proper operation.
Did you find this story helpful?
Thanks for voting and helping fellow customers!
power cord was fraying
Rocio - September 30, 2019
Tool Type
Electric Drill
Difficulty
Easy
Time
15-30 minutes
Tools Used
Screwdriver, soldering iron
Parts Used
1. removed electric drill cover
2. took photos to remember how things were
3. ordered new cord and made sure I understood which color cables went where
4. removed black cable shield and unhooked three cables, noticing colors and which went where
5. cut the new cables to match the lenght of the old cables and exposed the wires
6. twisted each cable's wires
7. soldered wires to become one solid wire in each of the three cables
8. inserted the cord shield and connected the new wires in their corresponding places
9. made sure everything was cleanly tucked in, all wires and cord shield
10. replaced the cover and screwed it back in place
Did you find this story helpful?
Thanks for voting and helping fellow customers!
OEM stands for Original Equipment Manufacturer and means the part you’re buying is sourced directly from the manufacturer who made your product. At eReplacementParts, we sell only genuine OEM parts, guaranteeing the part you’re purchasing is of better design and of higher quality than aftermarket parts.
Our product descriptions are a combination of data sourced directly from the manufacturers who made your product as well as content researched and curated by our content & customer service teams. This content is edited and reviewed internally before being made public to customers.
Our customer service team are at the ready daily to answer your part and product questions. We have a dedicated staff with decades of collective experience in helping customers just like you purchase parts to repair their products.
All our part reviews are solicited directly from other customers who have purchased this exact part. While we moderate these reviews for profanity, offensive language or personally identifiable information, these reviews are posted exactly as submitted and no alterations are made by our team.
All our customer repair instructions are solicited directly from other customers just like you who have purchased and replaced this exact part. While we moderate these reviews for profanity, offensive language or personally identifiable information, these reviews are posted exactly as submitted and no alterations are made by our team.
Based on data from past customer purchasing behaviors, these parts are most commonly purchased together along with the part you are viewing. These parts may be necessary or helpful to replace to complete your current repair.
All our installation videos are created and produced in collaboration with our in-house repair technician, Mark Sodja, who has helped millions of eReplacementParts customers over the last 13 years repair their products. Mark has years of experience in selling and repairing both commercial and residential products with a specialty in gas-powered equipment.
This data is collected from customers who submitted a repair instruction after replacing this exact part. Customers can rate how easy the repair was to complete and how long it took. We aggregate this data to provide a repair rating that allows customers to quickly determine the difficulty and time needed to perform their own repair.