
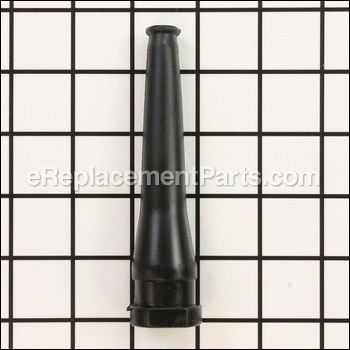
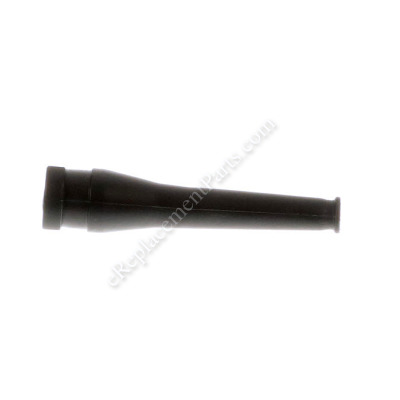


This is a Genuine OEM Bosch replacement Protector Grommet which is used on a variety of Power Tools. This part is made out of Rubber and is Sold Individually. It is important to have a cord protector on your tool to improve friction, seal cable and protect it from a potential damage.
Cord Protector 3600703011
OEM part for: Bosch
Part Number: 3600703011
$4.99
In Stock
Jump To:
Product Description ?
- Ø7,9-Ø12x120 MM
- Classification: Part
- Weight: 0.05 lbs.
- Shipping: Ships Worldwide
Frequently Purchased Together ?


Compatibility
This Cord Protector will fit the following 575 machines. Confirm this part works with your model, and view the detailed model diagrams and repair help we have to offer.
Bosch
Show More Compatible ModelsThis item works with the following types of products:
- Chop Saw Parts
- Saw Parts
- Polisher Parts
- Rotary Hammer Parts
- Drill Parts
- Hammer Drill Parts
- Demolition Hammer Parts
- Grinder Parts
- Shear Parts
- Impact Wrench Parts
- Electric Drill Parts
This part replaces obsolete part #: 1600703010
Customer Part Reviews ?
Average Rating (out of 5):
Click to filter by ratings:
5 stars
1
4 stars
0
3 stars
0
2 stars
0
1 stars
0
< PREV
- 1
Easy Repair, worked great!
I put a new, longer power cord on my jackhammer, and this cord protector worked great to relieve the strain at the handle.
Scott -
February 28, 2023
Verified Purchase
Questions & Answers ?
Our customer Service team is at the ready daily to answer your part and product questions.

Ask our Team
We have a dedicated staff with decades of collective experience in helping customers just like you purchase parts to repair their products.
Does this fit my product?Questions & Answers for Cord Protector
No questions have been asked yet
Customer Repair Instructions ?
All our customer repair instructions are solicited directly from other customers just like you who have purchased and replaced this exact part.
Cord protector failed due to age
Bill - October 5, 2022
Tool Type
Grinder
Difficulty
Easy
Time
15-30 minutes
Tools Used
Screwdriver, Torx-bit driver
Parts Used
1. Separated case halves.
2. Removed strain relief for power cord.
3. Disconnected power wires from switch.
4. Slid old cord protector off, installed new cord protector.
5. Connected power wires to switch.
6. Installed strain relief.
7. Attached case halves together.
8. Tool tested ok.
2. Removed strain relief for power cord.
3. Disconnected power wires from switch.
4. Slid old cord protector off, installed new cord protector.
5. Connected power wires to switch.
6. Installed strain relief.
7. Attached case halves together.
8. Tool tested ok.
Did you find this story helpful?
Thanks for voting and helping fellow customers!
Oil leaking.
Augie - November 28, 2017
Tool Type
Demolition Hammer
Difficulty
Easy
Time
30-60 minutes
Tools Used
Screwdriver, Pliers, Allen wrenches
Removed the lower section of the tool. Replaced O-rings, seal, cord and cord protector. I used the exploded view of my tool on your website, which proved to be super helpful.
Did you find this story helpful?
Thanks for voting and helping fellow customers!
Power cord was old and had insulation cracking.
Daniel - August 14, 2017
Tool Type
Grinder
Difficulty
Easy
Time
15-30 minutes
Tools Used
Screwdriver
1.Removed handle from grinder
2.Removed screws to separate the two halves of the handle
3.Removed cord retaining clamp and loosened electrical connections to remove old cord
4.Made electrical connections with new cord and secured with retaining clamp
5.Make sure the switch was properly in place and wire with cord protector
6.Secured the two halves of the handle with screws
7.Reattached handle to grinder body
Did you find this story helpful?
Thanks for voting and helping fellow customers!
Power cord was damaged.
Taylor - August 2, 2017
Tool Type
Demolition Hammer
Difficulty
Easy
Time
Less than 15 minutes
Tools Used
Screwdriver
1. Remove ON/Off switch with flat head screwdriver.
2. Remove the six screws holding the handle assembly to the main body.
3. Remove old power cord, keeping in mind its orientation and where the wires connected.
4. Install new cord protector and connect wire ends into their correct locations.
5. Reattach handle assembly with the six screws.
6. Place On/Off switch half-way in its location and snap the other end in.
7. Verify that the machine functions properly.
Did you find this story helpful?
Thanks for voting and helping fellow customers!
OEM stands for Original Equipment Manufacturer and means the part you’re buying is sourced directly from the manufacturer who made your product. At eReplacementParts, we sell only genuine OEM parts, guaranteeing the part you’re purchasing is of better design and of higher quality than aftermarket parts.
Our product descriptions are a combination of data sourced directly from the manufacturers who made your product as well as content researched and curated by our content & customer service teams. This content is edited and reviewed internally before being made public to customers.
Our customer service team are at the ready daily to answer your part and product questions. We have a dedicated staff with decades of collective experience in helping customers just like you purchase parts to repair their products.
All our part reviews are solicited directly from other customers who have purchased this exact part. While we moderate these reviews for profanity, offensive language or personally identifiable information, these reviews are posted exactly as submitted and no alterations are made by our team.
All our customer repair instructions are solicited directly from other customers just like you who have purchased and replaced this exact part. While we moderate these reviews for profanity, offensive language or personally identifiable information, these reviews are posted exactly as submitted and no alterations are made by our team.
Based on data from past customer purchasing behaviors, these parts are most commonly purchased together along with the part you are viewing. These parts may be necessary or helpful to replace to complete your current repair.
All our installation videos are created and produced in collaboration with our in-house repair technician, Mark Sodja, who has helped millions of eReplacementParts customers over the last 13 years repair their products. Mark has years of experience in selling and repairing both commercial and residential products with a specialty in gas-powered equipment.
This data is collected from customers who submitted a repair instruction after replacing this exact part. Customers can rate how easy the repair was to complete and how long it took. We aggregate this data to provide a repair rating that allows customers to quickly determine the difficulty and time needed to perform their own repair.