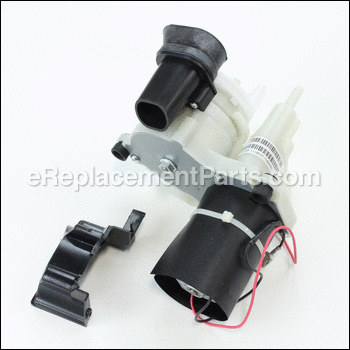
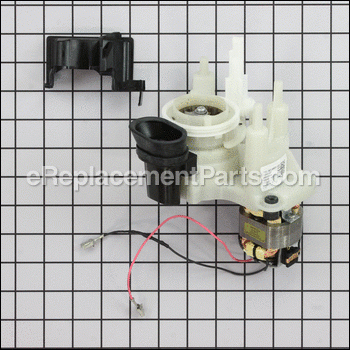
This is an authentic DeLonghi replacement part manufactured for use with espresso and coffee makers. The grinder is a complete replacement part that is used to grind the coffee into grounds. This grinder assembly is available as an individual replacement part, please see model diagram for associative parts.
Complete Grinder 7313216831
OEM part for: DeLonghi
Part Number: 7313216831
Jump To:
Frequently Purchased Together ?
Compatibility
This part will fit the following 33 machines
DeLonghi
This item works with the following types of products:
- Coffee Maker Parts
This part replaces obsolete part #: 7332206700, 7332190400
Customer Part Reviews ?
- 1
Questions & Answers ?
Our customer Service team is at the ready daily to answer your part and product questions.

Ask our Team
We have a dedicated staff with decades of collective experience in helping customers just like you purchase parts to repair their products.
Does this fit my product?Questions & Answers for Complete Grinder
Customer Repair Instructions ?
All our customer repair instructions are solicited directly from other customers just like you who have purchased and replaced this exact part.
Grinder was not grinding enough beans for the coffee ESAM3500N Delonghi Unit
Tool Type
Coffee Maker
Difficulty
Medium
Time
30-60 minutes
Tools Used
Screwdriver
Parts Used
The hardest part is first figuring out how to remove all the casing after undoing all the visible screws. You don't want to break the plastic but you need to be firm - note the sides tend to come off easier when slid towards the back since that is how they hook in. After removing the sides and back there a few screws that hold the top down so that also needs removing along with the front panel. The latter needs to be also unplugged from the circuit board for complete removal. All you need is a screwdriver and all the screws are the same size. Finally the black chute where the beans are normally held needs to be removed by the visible screws on top. You also need to use a thin blade screwdriver to lever up the smooth black cap that is in the middle of the grinder bean adjustment knob to get at the screw that holds this knob in place. This is just a cap that is pushed in to hide the screw. At this point you should now have access to the grinder unit that just can be lifted out after unhooking the 2 wires that are connected it to the circuit board. Unhook the wires at the circuit board. Installation is the reverse of the above.
Grinder belt was damaged so it would not grind beans. belt not available to order so i had to order complete grinder
Tool Type
Coffee Maker
Difficulty
Easy
Time
15-30 minutes
Tools Used
Screwdriver, Pliers
Parts Used
Grinder Not Working (Grinder bearing came unseated we think, caused it to jam)
Tool Type
Coffee Maker
Difficulty
Medium
Time
30-60 minutes
Tools Used
Screwdriver, Pliers, Needle-Nose Pliers
Parts Used
Before starting... Your phones camera is your friend! Always take pictures of your disassembly process at every step possible to remember where things go, or the type of screws that go in the different locations. You can never have too many pictures. You will thank yourself later when you're reassembling the machine. This is especially true when you remove wires from the circuit board.
I cant explain exactly how to do the disassembly... We basically just started removing screws in the order we thought we needed to in order to remove the components in order to access the inner parts of the machine. First was removing the sides, top, and back. Then remove the top front panel (buttons and screen). To remove top front panel, you will need to remove screws, AND disconnect a wire ribbon from the circuit board (GENTLY) and wind it through channels in the side of the machine. The front door panel does not need to be removed for this repair.
The grinder assembly removal requires.
To remove the grinder unit, find all the screws holding it and and remove them. You will also need to remove 2 wires from the circuit board that are connected with sleeve push connector clips. You will have to cut 2 tie wraps when doing this. The grinder assembly has a red wire and a black wire.
Diagnosis:
A) We determined that this was the problem bc when we turned on the machine, everything worked except for the coffee bean grinding cycle. Do this test before disassembly... if everything turns on and works, but the only thing that doesn't work is that is does not grind the beans when its time, then it might be the grinder assembly.
B) After disassembling the coffee maker and looking at the grinder assembly (and all other parts of coffeemaker), it looked like a couple bearings in the grinding motor became unseated and had jammed the grinder assembly.
C) We also did a visual inspection of all electronics and circuit boards for visible sign of burned out areas (Often, if there is a problem on a circuit board, you can see a black spot that indicates something shorted out or burned out). We did not see any issues with any electronics.
After searching for replacement parts, we noticed that we could purchase the whole grinder assembly, instead of trying to repair or replace the individual parts (bearings, race, motor, etc). We determined that this was the best option because we would be replacing all of the parts that may have also been damaged when the bearings came unseated.
Repair (UNPLUG BEFORE BEGINNING):
1) Disassemble coffeemaker enough to remove grinding unit
2) Replace with new Grinder Unit
3) Reassemble Coffeemaker and test
Good Luck!
OEM stands for Original Equipment Manufacturer and means the part you’re buying is sourced directly from the manufacturer who made your product. At eReplacementParts, we sell only genuine OEM parts, guaranteeing the part you’re purchasing is of better design and of higher quality than aftermarket parts.
Our product descriptions are a combination of data sourced directly from the manufacturers who made your product as well as content researched and curated by our content & customer service teams. This content is edited and reviewed internally before being made public to customers.
Our customer service team are at the ready daily to answer your part and product questions. We have a dedicated staff with decades of collective experience in helping customers just like you purchase parts to repair their products.
All our part reviews are solicited directly from other customers who have purchased this exact part. While we moderate these reviews for profanity, offensive language or personally identifiable information, these reviews are posted exactly as submitted and no alterations are made by our team.
All our customer repair instructions are solicited directly from other customers just like you who have purchased and replaced this exact part. While we moderate these reviews for profanity, offensive language or personally identifiable information, these reviews are posted exactly as submitted and no alterations are made by our team.
Based on data from past customer purchasing behaviors, these parts are most commonly purchased together along with the part you are viewing. These parts may be necessary or helpful to replace to complete your current repair.
All our installation videos are created and produced in collaboration with our in-house repair technician, Mark Sodja, who has helped millions of eReplacementParts customers over the last 13 years repair their products. Mark has years of experience in selling and repairing both commercial and residential products with a specialty in gas-powered equipment.
This data is collected from customers who submitted a repair instruction after replacing this exact part. Customers can rate how easy the repair was to complete and how long it took. We aggregate this data to provide a repair rating that allows customers to quickly determine the difficulty and time needed to perform their own repair.


