
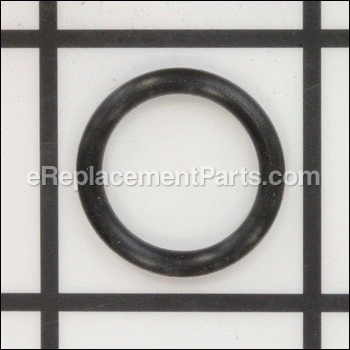

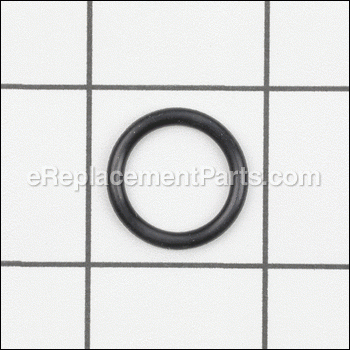

This is a genuine replacement part from original manufacturer. It is compatible with Ryobi, MTD, Troy-Bilt, Yard Man, and Bolens machines. It\\\'s used with a variety of power tools including trimmers, tillers, and blowers. O-rings create a seal between solid parts, retaining pressure. Because many machines use more than one type of O-ring, use care to ensure that the right one is being used in the right spot. This ring is sold individually.
Carburetor O-ring 791-181751
OEM part for: Ryobi, MTD, Troy-Bilt, Yard Man, Bolens, Craftsman, Cub Cadet, Yard Machines
Part Number: 791-181751
$4.52
Usually ships in 7 - 12 business days
7 - 12 business days
Jump To:
Frequently Purchased Together ?


Compatibility
This Carburetor O-ring will fit the following 436 machines. Confirm this part works with your model, and view the detailed model diagrams and repair help we have to offer.
Ryobi
MTD
Troy-Bilt
Yard Man
Bolens
Craftsman
Cub Cadet
Yard Machines
Show More Compatible ModelsThis item works with the following types of products:
- Trimmer Parts
- Cultivator Parts
- Blower Parts
- Edger Parts
Repair Videos ?
Watch the Repair Video for
Carburetor O-ring

Customer Part Reviews ?
Average Rating (out of 5):
Click to filter by ratings:
5 stars
3
4 stars
2
3 stars
0
2 stars
0
1 stars
0
< PREV
- 1
perect fit
now it runs like new
craig -
July 19, 2021
Verified Purchase
great part ,work perfect
shipping was fast and part work perfectly will buy again
Guest -
January 12, 2021
Verified Purchase
Parts
Excellent fit
Refujio -
July 8, 2019
Verified Purchase
worked good
direct replacement
Guest -
May 31, 2020
Verified Purchase
good
good
Guest -
September 4, 2019
Verified Purchase
Questions & Answers ?
Our customer Service team is at the ready daily to answer your part and product questions.

Ask our Team
We have a dedicated staff with decades of collective experience in helping customers just like you purchase parts to repair their products.
Does this fit my product?Questions & Answers for Carburetor O-ring
No questions have been asked yet
Customer Repair Instructions ?
All our customer repair instructions are solicited directly from other customers just like you who have purchased and replaced this exact part.
Would not reach max rpm and difficult to start
Malcolm - August 17, 2016
👍 2 of 3 people found this instruction helpful
Tool Type
Blower
Difficulty
Medium
Time
30-60 minutes
Tools Used
Screwdriver
1. Removed the original carburetor, gasket and o-ring
2. Detached the control cable leading to the carburetor.
3. Installed the new gasket, installed the new o-ring on the carburetor.
4. Installed the carburetor using the original screws and attached the control cable.
5. Bumped the bulb 10 times with the choke on nd pulled the starter cord.
6. The motor fired up on the first crank and was running on choke.
7. I took it off of choke and it ran fine, installed the air filter and cover and began blowing off my patio. NO ISSUES , THANKS
Did you find this story helpful?
Thanks for voting and helping fellow customers!
carburetor
Marty - July 15, 2021
Tool Type
Trimmer
Difficulty
Easy
Time
30-60 minutes
Tools Used
Screwdriver
remove old one .....replace with new one ... very straight forward.........
Did you find this story helpful?
Thanks for voting and helping fellow customers!
gas leak
Richard - August 8, 2020
Tool Type
Trimmer
Difficulty
Medium
Time
30-60 minutes
Tools Used
Screwdriver
replace all fule parts
Did you find this story helpful?
Thanks for voting and helping fellow customers!
The carburetor was over 10 years old and wouldn't prime gas anymore.
Charlee - June 3, 2016
👍 1 of 2 people found this instruction helpful
Tool Type
Trimmer
Difficulty
Easy
Time
15-30 minutes
Tools Used
Screwdriver, Pliers
Remove the air cleaner cover and filter. Remove the fuel lines and throttle from the carburetor. Remove the screws that connect the air filter base and carburetor to the cylinder.
Remove the old o-ring, carburetor and gasket. Install the new gasket, carburetor, o-ring and the air filter base and tighten the screws. Install the throttle and fuels lines. Install the filter and the air cleaner cover.
Remove the old o-ring, carburetor and gasket. Install the new gasket, carburetor, o-ring and the air filter base and tighten the screws. Install the throttle and fuels lines. Install the filter and the air cleaner cover.
Did you find this story helpful?
Thanks for voting and helping fellow customers!
Carburetor was leaking gas
Rich - July 13, 2017
👍 0 of 1 people found this instruction helpful
Tool Type
Trimmer
Difficulty
Easy
Time
15-30 minutes
Tools Used
Screwdriver
Took off the old carburetor, replaced all gaskets and carburetor. Runs good now and doesn't leak,
Did you find this story helpful?
Thanks for voting and helping fellow customers!
Leaf blower wouldn't idle correct
Jonathan - April 14, 2017
👍 0 of 1 people found this instruction helpful
Tool Type
Blower
Difficulty
Easy
Time
30-60 minutes
Tools Used
Screwdriver, Pliers, Socket set
1st Removed the screw's from the plastic cover housing.
2nd I took the air filter housing off and the two screws out of the carburetor.
3rd I removed the gasket and the o-ring from the carburetor. Then took the clip off the holder for the throttle cable.
Last, I put everything back in reverse with the new parts and gasket and o-ring.
Afterwards I replaced the spark plug.
Did you find this story helpful?
Thanks for voting and helping fellow customers!
Would run for short time and then die.
Dale - September 5, 2016
👍 0 of 1 people found this instruction helpful
Tool Type
Trimmer
Difficulty
Easy
Time
30-60 minutes
Tools Used
Screwdriver
Replaced the carburetor, fuel tank, and air filter assembly.
Did you find this story helpful?
Thanks for voting and helping fellow customers!
Would not idle or increase in RPMs
Richard - May 20, 2016
👍 0 of 1 people found this instruction helpful
Tool Type
Trimmer
Difficulty
Easy
Time
Less than 15 minutes
Tools Used
Screwdriver, Pliers
The repair was easy due to the parts matched exactly
Removed air cleaner
Removed screws that held the Carbuerator on
Removed fuel lines
Removed throttle cable assembly
Removed old gasket/ heat barrier
Replaced all parts cut fuel line used the supplied connectors
Put the trimmer back together
Primed the carb and it started within 3 pulls runs just like new
Did you find this story helpful?
Thanks for voting and helping fellow customers!
OEM stands for Original Equipment Manufacturer and means the part you’re buying is sourced directly from the manufacturer who made your product. At eReplacementParts, we sell only genuine OEM parts, guaranteeing the part you’re purchasing is of better design and of higher quality than aftermarket parts.
Our product descriptions are a combination of data sourced directly from the manufacturers who made your product as well as content researched and curated by our content & customer service teams. This content is edited and reviewed internally before being made public to customers.
Our customer service team are at the ready daily to answer your part and product questions. We have a dedicated staff with decades of collective experience in helping customers just like you purchase parts to repair their products.
All our part reviews are solicited directly from other customers who have purchased this exact part. While we moderate these reviews for profanity, offensive language or personally identifiable information, these reviews are posted exactly as submitted and no alterations are made by our team.
All our customer repair instructions are solicited directly from other customers just like you who have purchased and replaced this exact part. While we moderate these reviews for profanity, offensive language or personally identifiable information, these reviews are posted exactly as submitted and no alterations are made by our team.
Based on data from past customer purchasing behaviors, these parts are most commonly purchased together along with the part you are viewing. These parts may be necessary or helpful to replace to complete your current repair.
All our installation videos are created and produced in collaboration with our in-house repair technician, Mark Sodja, who has helped millions of eReplacementParts customers over the last 13 years repair their products. Mark has years of experience in selling and repairing both commercial and residential products with a specialty in gas-powered equipment.
This data is collected from customers who submitted a repair instruction after replacing this exact part. Customers can rate how easy the repair was to complete and how long it took. We aggregate this data to provide a repair rating that allows customers to quickly determine the difficulty and time needed to perform their own repair.