eReplacementParts.com
877-346-4814
Bosch Parts
Repair Parts Home  Power Tool Parts  Bosch Parts  2610997207 Carbon Brush Set

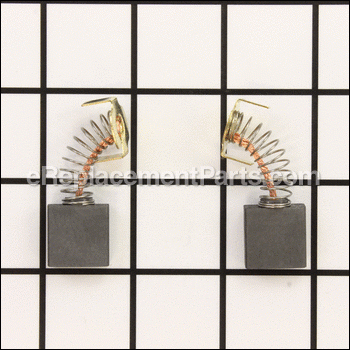
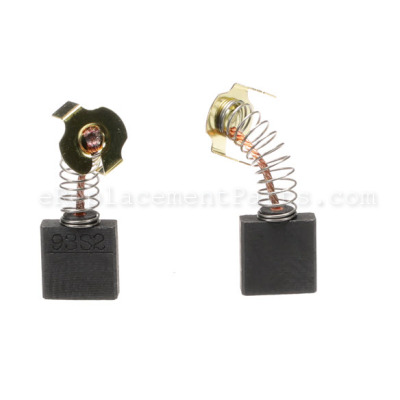
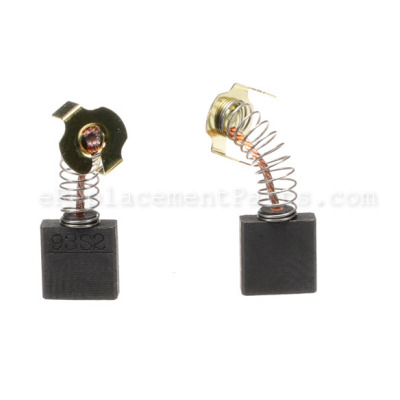
Carbon Brush Set 2610997207

OEM part for: Bosch

Part Number: 2610997207


Install
Videos!
Carbon Brush Set - 2610997207:Bosch 360 View
Carbon Brush Set - 2610997207:BoschCarbon Brush Set - 2610997207:BoschCarbon Brush Set - 2610997207:Bosch 360 View
Usually ships in 7 - 12 business days
Leaves our warehouse within
7 - 12 business days
Easy 30-60 minutes (26 rated repairs)?
OEM: Original Equipment Manufacturer ?
Bosch
Does this d-block d-md-none fit my product?

Product Description ?

Genuine Bosch replacement part
Set of 2 Carbon Brushes with wire lead and brush spring attached.

• Worn brushes are often the cause of a poorly running motor
• Replacing brushes can fix an intermittent motor
• New brushes can restore a motor’s electric braking


Carbon motor brushes are one of the most commonly replaced power tool components.  Because carbon brushes are wear items, meaning that through friction and use they will gradually wear away, they will eventually require replacement.  Worn brushes are common causes of intermittent motor function, reduced electric braking, and reduced motor power.  A worn out brush will often be worn down near the wire lead and may be cracked, pitted, or burned.  When replacing carbon brushes, be sure to also inspect your armature for burns, cracks, or other damage which indicates a larger motor problem.

  • Classification: Part
  • Weight: 0.02 lbs.
  • Also Known As: Motor Brush Set
  • Shipping: Ships Worldwide

Frequently Purchased Together ?

Compatibility

This part will fit the following 32 machines

Bosch

4000 (0601476139) Table Saw View Diagrams & Manuals
4412 (0601665039) 12" Miter Saw View Diagrams & Manuals
3915 (0601475039) 10 Inch Slide Miter Saw View Diagrams & Manuals
B3915 (0601475035) 10" Slide Miter Saw View Diagrams & Manuals
4212L () 12" Dual-Bevel Upfront Control & Laser Tracking Compound Miter Saw View Diagrams & Manuals
5412L (0601665239) 12" Laser Tracking Dual-Bevel Slide Miter Saw View Diagrams & Manuals
4410L 10" Upfront Control & Laser Tracking Dual-Bevel Slide Miter Saw View Diagrams & Manuals
4212 (060166F035) Miter Saw View Diagrams & Manuals
4410 (060166E139) Miter Saw View Diagrams & Manuals
4212L (060166F239) Miter Saw View Diagrams & Manuals
4100 (0601B13010) Table Saw View Diagrams & Manuals
4100DG-09 (0601B13010) 10" Worksite Table Saw View Diagrams & Manuals
4100DG-09 (3601L13010) 10" Worksite Table Saw View Diagrams & Manuals
4100-09 (0601B13010) 10" Worksite Table Saw View Diagrams & Manuals
4100-09 (3601L13010) 10" Worksite Table Saw View Diagrams & Manuals
4405 (0601475061) 10" Single-Bevel Slide Miter Saw View Diagrams & Manuals
5412 (0601665239) 12 in. Dual-Bevel Slide Miter Saw View Diagrams & Manuals
5412 (06016651A9) 12 in. Dual-Bevel Slide Miter Saw View Diagrams & Manuals
5312 12" Dual-Bevel Slide Miter Saw View Diagrams & Manuals
4310 10" Dual-Bevel Slide Miter Saw View Diagrams & Manuals
GTS1031 (3601M30510) Table Saw View Diagrams & Manuals
GTS1041A (3601M13510) Table Saw View Diagrams & Manuals
GCM 10 SD (0601B22541) Slide Mitre Saw View Diagrams & Manuals
4000 (0601476260) Saw Table View Diagrams & Manuals
4100 (3601L13010) Table Saw View Diagrams & Manuals
4100 (3601L13011) Table Saw View Diagrams & Manuals
4100 (3601L13012) Table Saw View Diagrams & Manuals
4412 (0601665139) Table Saw View Diagrams & Manuals
4212 (060166F222) Miter Saw View Diagrams & Manuals
4410 (060166E222) Miter Saw View Diagrams & Manuals
GCM12SD (0601B23541) Slide Mitre Saw View Diagrams & Manuals
4410L (060166E239) Circular Saw View Diagrams & Manuals
Show More Compatible Models
Don't see yours? Try searching our site for :

This item works with the following types of products:

  • Saw Parts
  • Table Saw Parts
  • Miter Saw Parts

This part replaces obsolete part #: 2610993222, 2610915758

Customer Part Reviews ?

4.4
Average Rating (out of 5):
16 Reviews
Click to filter by ratings:
5 stars
11
4 stars
3
3 stars
1
2 stars
0
1 stars
1
  • Highest Rating
  • Most Recent
< PREV
  • 1
  • 2
NEXT >
  • Easy Peasy!
    These brushes look exactly like the originals in my Bosch 4100 Table Saw. Tilting the saw to 45 degrees makes it WAY easier to get the motor cover off and get at everything.
    Guest - August 22, 2023 Verified Purchase
    great part
    The brushes arrived in a timely manner and were just right for my saw.
    Guest - May 12, 2023 Verified Purchase
    Easy repair
    Arrived quickly, whole process very smooth
    Guest - May 8, 2023 Verified Purchase
    Bosch table saw repair
    Great and easy company to deal with. The only place I go for parts and never let down.
    Guest - January 10, 2023 Verified Purchase
    Good service
    Tool now working well
    Guest - December 29, 2021 Verified Purchase
    just the parts I needed
    If you need parts this is the place to find them. My table saw is over 20 years old and you had the parts I needed.
    Guest - August 2, 2021 Verified Purchase
    Very Easy Repair
    OEM brushes for our Bosch chop saw less than a 5 min repair saw is like new
    Guest - July 28, 2021 Verified Purchase
    Bosch saw lives on
    Replacement brush set for an old job-site saw helped me extend the lifespan of a tool that I'm reluctant to replace because it has features the newer models lack.
    Guest - January 18, 2020 Verified Purchase
    Best in the business!
    Fast shipping, the right parts. What more can you say?
    Julie - November 14, 2019 Verified Purchase
    Small part, great customer service
    The whole transaction was smooth and successful. The brushes came promptly and fit perfectly.
    Guest - September 30, 2019 Verified Purchase
    t
    t
    t - t days ago Verified Purchase
    eReplacementParts Team
    t

    Questions & Answers ?

    Our customer Service team is at the ready daily to answer your part and product questions.

    photo of team member
    Ask our Team

    We have a dedicated staff with decades of collective experience in helping customers just like you purchase parts to repair their products.

    Does this fit my product?

    Questions & Answers for Carbon Brush Set


    No questions have been asked yet

    Customer Repair Instructions ?

    All our customer repair instructions are solicited directly from other customers just like you who have purchased and replaced this exact part.

    Easy 30-60 minutes (26 rated repairs)?

    Loud, high-pitched squeal, then motor would not start after cooling down

    Peter - June 6, 2016
    👍 10 of 11 people found this instruction helpful
    Tool Type

    Table Saw

    Difficulty

    Medium

    Time

    More than 2 hours

    Tools Used

    Screwdriver, Pliers, Power Drill, Socket set, Wrench Set, Hex wrench

    I surmised a bearing issue and validated my idea via internet searching for Bosch T-4000 table saw maintenance, finding several articles on bearing, brush, armature, and field replacement, but no articles on performing bearing lubrication or maintenance. e-Replacement had very good diagrams of the saw and saw motor, so I removed the motor and found the bearing on the commutator end of the armature badly burned and rough, the rubber ring melted and the end of the motor housing melted. I ordered the parts and when they arrived, I replaced the bearing, rubber cap that holds it securely in the motor housing, the housing itself, the brushes (even though they looked to be in fairly good shape and just slightly chipped on one edge), and transferred the necessary parts from the old housing.
    The armature and the field both had a thin layer of the melted rubber ring and the melted end of the housing over much of their metal surfaces which I carefully sanded off with very fine Wet-or-Dry sandpaper (armature and commutator) and a cylinder hone (for the field).

    The hardest part was fitting the motor housing end cap back onto the motor housing due to the very limited space and getting the wires and butt-joints into their exact locations so that the cap fit back on and seated into place. I used an old bicycle spoke to prod the wires and butt-caps into place to get everything aligned. Take a picture, take notes, or make a drawing of how the wires fit in the cap if or when you remove it from the motor housing to save yourself the time it took me.

    I have now ordered the other 3 bearings in the motor, though the rest seem okay and I was able to carefully pry out the seal from the other armature bearing and refill it with grease before putting everything back together.

    I will also try to seal any excess holes in the housing for the vacuum port so that I can keep the motor cleaner. I will also always connect a vacuum hose from my Dust Deputy and shop vac when using this saw to keep sawdust out of the motor.
    Did you find this story helpful?
    Thanks for voting and helping fellow customers!

    motor wouldn't perform

    Michael - December 16, 2018
    👍 2 of 2 people found this instruction helpful
    Tool Type

    Table Saw

    Difficulty

    Easy

    Time

    15-30 minutes

    Tools Used

    Screwdriver

    Turned saw on end
    Removed brush caps and brushs
    Replaced brushes and caps

    Burned in brushes by running saw no load for 20 minutes

    Brought saw back to life

    Thank you eReplacement Parts.

    By the way, I received the parts sooner than expected
    Did you find this story helpful?
    Thanks for voting and helping fellow customers!

    The rear bearing on the armature seized and the resultant heat melted a section of the motor housing causing the table saw to lock up.

    mary - June 6, 2016
    👍 4 of 6 people found this instruction helpful
    Tool Type

    Table Saw

    Difficulty

    Easy

    Time

    1-2 hours

    Tools Used

    Screwdriver, allen key, snap ring pliers, gear puller/installer

    Bosch 4000 table saw repair. Remove the rear motor housing (3 Phillips screws) then uncrimp the 3 wires attached to the field winding/carbon brushes. The next step is to remove the four phillips screws that hold the motor housing to the inner gear box. Pull housing towards you to remove. I used a gear puller to remove the bad armature bearing, then proceeded to degrease and clean the armature with electromotive cleaner. Reassembly is the reverse of disassembly.
    Did you find this story helpful?
    Thanks for voting and helping fellow customers!

    Bosch table saw (4100) seized bearing/armature

    Dennis - April 2, 2016
    👍 2 of 2 people found this instruction helpful
    Tool Type

    Table Saw

    Difficulty

    Easy

    Time

    30-60 minutes

    Tools Used

    Socket set, bearing puller

    Thanks to the e-replacement on-line forum, I was able to diagnose the problem, order the appropriate bearing (from VXB.com), and complete the rebuild. As suggested,
    1). remove the blade,
    2) tilt to 45 degrees to provide access to the phillips head screws in order to
    3) remove the motor housing. From there it was simply a matter of
    4) removing the frozen/roached bearing with a bearing puller, cleaning up the armature, and replacing the bearing with a few taps from 10 mm socket and
    5) replacing the carbon brushes

    Motor now spins like a top!
    Did you find this story helpful?
    Thanks for voting and helping fellow customers!

    Brushes for motor were worn out.

    Richard - January 2, 2019
    👍 1 of 1 people found this instruction helpful
    Tool Type

    Table Saw

    Difficulty

    Easy

    Time

    15-30 minutes

    Tools Used

    Screwdriver, Pliers

    1. Tilted blade to 45 deg for easier access to brush location on motor
    2. Removed old brushes
    3. Inserted new brushes.
    Did you find this story helpful?
    Thanks for voting and helping fellow customers!

    Saw started only intermittently

    Anthony - July 27, 2018
    👍 1 of 1 people found this instruction helpful
    Tool Type

    Miter Saw

    Difficulty

    Easy

    Time

    Less than 15 minutes

    Tools Used

    Screwdriver

    Inserted new brushes into motor. Easy peasy, screwdriver was only tool. Took 5 minutes
    Did you find this story helpful?
    Thanks for voting and helping fellow customers!

    Replaced brushes

    Curtis - December 31, 2016
    👍 2 of 3 people found this instruction helpful
    Tool Type

    Table Saw

    Difficulty

    Easy

    Time

    Less than 15 minutes

    Tools Used

    Screwdriver

    Remove the brush caps
    Remove the old brushes
    Install the the new brushes
    Screw the brush caps back on
    Did you find this story helpful?
    Thanks for voting and helping fellow customers!

    Motor lost power and then ran slowly in reverse.

    Jeff - April 14, 2016
    👍 2 of 3 people found this instruction helpful
    Tool Type

    Table Saw

    Difficulty

    Medium

    Time

    1-2 hours

    Tools Used

    Screwdriver, Pliers, Socket set

    I tried the speed control circuit board first and while difficult to stuff the wiring for it back under the motor's end cover, It didn't help to fix the problem.
    Next I ordered the field and a set of brushes. The armature looked fine but I still sanded it down and cleaned the slots between the bars w/ a brass wire "tooth" brush. The field was a very tight fit and difficult to pull from the plastic motor housing. And then, even harder to press back in and have the mounting holes be orientated correctly for the screws that went thru them. I finally took some 150 grit sand paper to the12 support fins in the plastic case and shaved them down just enough so the field would slide into its home a little more easily. All is well now. For $115, I have a mostly new table saw motor, which works like it used to. A local repair shop wanted 3 or 4 times that for parts and labor. Glad I tried to fix it myself.
    Did you find this story helpful?
    Thanks for voting and helping fellow customers!

    failed main shaft bearing

    Michael - December 30, 2018
    Tool Type

    Table Saw

    Difficulty

    Easy

    Time

    30-60 minutes

    Tools Used

    Screwdriver, Pliers, Adjustable Wrench

    separated the table saw top from the body and set aside. opened the end of the motor up and replaced the failed bearing, removed and replaced the brushes and the switch and reassembled the unit.
    Did you find this story helpful?
    Thanks for voting and helping fellow customers!

    Rear bearing on armature froze up.

    Darrin - July 15, 2018
    Tool Type

    Table Saw

    Difficulty

    Medium

    Time

    1-2 hours

    Tools Used

    Screwdriver, Pliers, Socket set, Roto Zip

    Removed old motor housing.
    Replaced motor housing, armature, bearing, ball bearing, rubber ring, and carbon brushes.
    Installed new motor onto saw.
    Did you find this story helpful?
    Thanks for voting and helping fellow customers!

    OEM stands for Original Equipment Manufacturer and means the part you’re buying is sourced directly from the manufacturer who made your product. At eReplacementParts, we sell only genuine OEM parts, guaranteeing the part you’re purchasing is of better design and of higher quality than aftermarket parts.

    Our product descriptions are a combination of data sourced directly from the manufacturers who made your product as well as content researched and curated by our content & customer service teams. This content is edited and reviewed internally before being made public to customers.

    Our customer service team are at the ready daily to answer your part and product questions. We have a dedicated staff with decades of collective experience in helping customers just like you purchase parts to repair their products.

    All our part reviews are solicited directly from other customers who have purchased this exact part. While we moderate these reviews for profanity, offensive language or personally identifiable information, these reviews are posted exactly as submitted and no alterations are made by our team.

    All our customer repair instructions are solicited directly from other customers just like you who have purchased and replaced this exact part. While we moderate these reviews for profanity, offensive language or personally identifiable information, these reviews are posted exactly as submitted and no alterations are made by our team.

    Based on data from past customer purchasing behaviors, these parts are most commonly purchased together along with the part you are viewing. These parts may be necessary or helpful to replace to complete your current repair.

    All our installation videos are created and produced in collaboration with our in-house repair technician, Mark Sodja, who has helped millions of eReplacementParts customers over the last 13 years repair their products. Mark has years of experience in selling and repairing both commercial and residential products with a specialty in gas-powered equipment.

    This data is collected from customers who submitted a repair instruction after replacing this exact part. Customers can rate how easy the repair was to complete and how long it took. We aggregate this data to provide a repair rating that allows customers to quickly determine the difficulty and time needed to perform their own repair.

    eReplacementParts.com
    7174 South 400 West
    Suite 5
    Midvale, UT 84047
    visa mastercard discover american express PayPal