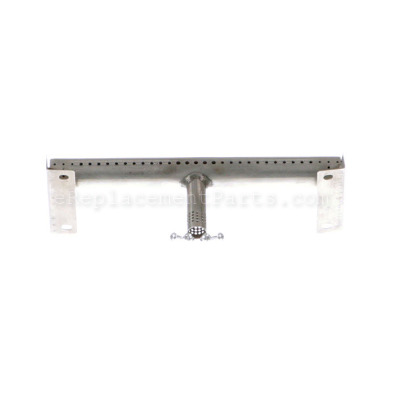
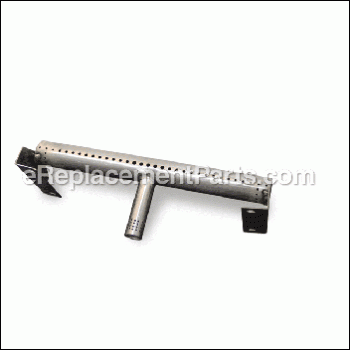
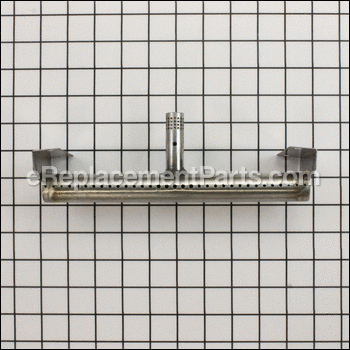
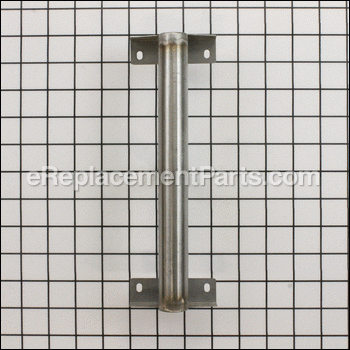


This burner is an authentic Char-Broil replacement part manufactured for outdoor grills. The burner tube is the main burner for the models of grills listed below. The tube is 7 1/2" in length, and is sold individually, please see model diagram for any additional parts.
Burner G511-2900-W1
OEM part for: Char-Broil
Part Number: G511-2900-W1
$14.93
In Stock
Compatibility
This part will fit the following 2 machines
Char-Broil
463272509 Heatwave Infrared 3-Burner Porcelain Grill View Diagrams & Manuals
463250109 RED Intrared Three Burner Gas Grill View Diagrams & Manuals
This item works with the following types of products:
This part replaces obsolete part #: 80017699
Repair Videos ?

Articles:
|
Having trouble getting your grill to light up? A common cause of this issue is a defective ignition switch. We'll sho...
November 08, 2012
|

Customer Part Reviews ?
Average Rating (out of 5):
Click to filter by ratings:
5 stars
1
4 stars
0
3 stars
0
2 stars
0
1 stars
0
< PREV
- 1
Arrived early
The parts arrived a day early and fit perfectly. All I had to do is remove the burnt out parts and these slid into place. Great company to do business with
John -
October 23, 2019
Verified Purchase
t
t
t -
t days ago
Verified Purchase
eReplacementParts Team
t
Questions & Answers ?
Our customer Service team is at the ready daily to answer your part and product questions.

Ask our Team
We have a dedicated staff with decades of collective experience in helping customers just like you purchase parts to repair their products.
Does this fit my product?Questions & Answers for Burner
No questions have been asked yet
Customer Repair Instructions ?
All our customer repair instructions are solicited directly from other customers just like you who have purchased and replaced this exact part.
Burners not lighting correctly
Judy - April 27, 2023
Tool Type
Outdoor Grill
Difficulty
Medium
Time
30-60 minutes
Tools Used
Screwdriver, Pliers, Wrench Set
Parts Used
Replaced the burners that were rusted out
Did you find this story helpful?
Thanks for voting and helping fellow customers!
The burners were rusty, I tried to clean out the ports where gas comes out and one side of all the gas supply ports were blocked.
Brett - September 6, 2021
Tool Type
Outdoor Grill
Difficulty
Medium
Time
More than 2 hours
Tools Used
Power Drill, Socket set, Punch and Diamond tip drive bits
Took out all grates and pans and used a chisel to hammer off the rusted screws to remove the burners and the pop rivets on igniters that still worked had rusted off the so I drilled out the rivets.
Turned grill upside down, and lined up the burner jets after cleaning that had failed and used Diamond tipped dive bits slowly drilling thru the hard metal brackets and used stainless steel screw to reattach the burner jets carefully lining up with the failed spot welds .
Put new burner strikers that came with holes for screwing down and replaced the cover under the burners in the propane tank lower part of grill two screws.
Turned grill back up like normal and then carefully lined up the burners on the now firmly attached burners.
Mounted the igniters so there was a 1/8 inch gap and the tip was in front of one of the new burners.
Hooked up propane , put battery in and turn on burners. The left two lighted fast and nice blue flame. Had to take a small drill bit by hand and cleaned the now solid mounted right jet after removing the burner and turned gas on and stuff blew out of orfice gas jet.
Put new burner back on, had to use larger screws , due to the holes being widen when I chiseled them out. Put in pans and realized the two front bottom Tabs had broken off, so I used two thread bolts and nuts to hole the pan the proper height. Put grates back on and turned each burnèr on right to left and like new the all fired right up.
I had replaced the pans in 2015 as grill sat out in weather and was used all winter and summer long. Note do not unscrew burner jets to clean as the manual states. I did one and the casted port broke on each side by the screw holes and did not see them available. I used a clip to cover the broken sides and secured that gas jet.
I bought this grill in 2009 at Home Depot and ereplacement was the only place I could find the burners with 10 in stock and bought 6 strickers so if burners fail again now under a covered roof over the deck right outside my front door. So for 3 new burners and 3 new strikers that totaled 70 dollars and 3 hours of fixing failed Char Broil spot welds I have a 700 dollar grill in perfect shape that design is far superior to the new design that has tent like covers to deflect grease and replacement burners next to display.
This grill was designed to last by having the pans keep all grease and droppings from burners. I honestly could of used the old burners, but they were rusty and the flame was yellow because mfg failed to tack weld the burner plates and even wth one side of each burner broken it’s now fixed better and the infrared heating design will bring up the grill to 400 degrees jn less than 4 minutes when it’s 3 below and wind blowing 30 miles a hour, I can open my door start grill Right up, and have beautiful seared steaks in less than nine minutes. Also I had to replace the regulator learned the hard way taking a cylinder that was almost as heavy and the gage did not read because the reg had failed.
Bottom line remove burners and if still attached spray WD 40 into jets and no j hook as manual suggests will work. If jets are secure and lined up with burners one might get by with cleaning by hand with a small drill bit by hand. But we’ll worth the money to replace the burners. You save yourself a bunch of money and a great design.
Love epartsreplacement and so glad by chance I heard got the link to them recommended by a you tube video guy repairing a old grill like mine. Parts came quickly delivered to front door. If I can fix that grill anyone can.
Did you find this story helpful?
Thanks for voting and helping fellow customers!
Toughs had rusted through, electronic starter hadn't worked for 2 years
John - September 6, 2018
Tool Type
Outdoor Grill
Difficulty
Medium
Time
30-60 minutes
Tools Used
Screwdriver, Pliers, Power Drill
Disassembled and reassembled, pretty simple. Burner screws had rusted to the point I had to drill out the screws, by far the hardest part.
Did you find this story helpful?
Thanks for voting and helping fellow customers!
Grill burners needed to be replaced.
Foy - April 1, 2018
Tool Type
Outdoor Grill
Difficulty
Easy
Time
Less than 15 minutes
Tools Used
Screwdriver
Parts Used
Removed the old burners and installed the new burners.
Did you find this story helpful?
Thanks for voting and helping fellow customers!
Burners and pans rusted with holes
Brett - July 11, 2017
Tool Type
Outdoor Grill
Difficulty
Medium
Time
30-60 minutes
Tools Used
Screwdriver, Power Drill, Hammer and chisel to get old screw from burner screws.
Removed pans washed grill and around burner screws scrapped rust and charcoal away. Used spray from Ace Hardware one type to clean interior one for exterior and then waxed.
Used Phillips screw driver got 4 of 12 screws out of burners. Rest of screws needed drilled out. After bits all broke used hammer and chisel to remove last 2 screws. Went to Hardware store and got larger screws. Installed 3 burners, installed 2 new pans. Grease cleaned grill plates turned to 500 degrees forgot to shut off cleaned grill great. Electric starter works still. Had to mark handles cleaner remover labels for nobs that were always confusing with permanent black marker ! Cooked perfect bacon wrapped fillets seared then cooked to perfection. Then brats. Still have no figured out how to use rotisserie and how it mounts.
Used Phillips screw driver got 4 of 12 screws out of burners. Rest of screws needed drilled out. After bits all broke used hammer and chisel to remove last 2 screws. Went to Hardware store and got larger screws. Installed 3 burners, installed 2 new pans. Grease cleaned grill plates turned to 500 degrees forgot to shut off cleaned grill great. Electric starter works still. Had to mark handles cleaner remover labels for nobs that were always confusing with permanent black marker ! Cooked perfect bacon wrapped fillets seared then cooked to perfection. Then brats. Still have no figured out how to use rotisserie and how it mounts.
Did you find this story helpful?
Thanks for voting and helping fellow customers!
OEM stands for Original Equipment Manufacturer and means the part you’re buying is sourced directly from the manufacturer who made your product. At eReplacementParts, we sell only genuine OEM parts, guaranteeing the part you’re purchasing is of better design and of higher quality than aftermarket parts.
Our product descriptions are a combination of data sourced directly from the manufacturers who made your product as well as content researched and curated by our content & customer service teams. This content is edited and reviewed internally before being made public to customers.
Our customer service team are at the ready daily to answer your part and product questions. We have a dedicated staff with decades of collective experience in helping customers just like you purchase parts to repair their products.
All our part reviews are solicited directly from other customers who have purchased this exact part. While we moderate these reviews for profanity, offensive language or personally identifiable information, these reviews are posted exactly as submitted and no alterations are made by our team.
All our customer repair instructions are solicited directly from other customers just like you who have purchased and replaced this exact part. While we moderate these reviews for profanity, offensive language or personally identifiable information, these reviews are posted exactly as submitted and no alterations are made by our team.
Based on data from past customer purchasing behaviors, these parts are most commonly purchased together along with the part you are viewing. These parts may be necessary or helpful to replace to complete your current repair.
All our installation videos are created and produced in collaboration with our in-house repair technician, Mark Sodja, who has helped millions of eReplacementParts customers over the last 13 years repair their products. Mark has years of experience in selling and repairing both commercial and residential products with a specialty in gas-powered equipment.
This data is collected from customers who submitted a repair instruction after replacing this exact part. Customers can rate how easy the repair was to complete and how long it took. We aggregate this data to provide a repair rating that allows customers to quickly determine the difficulty and time needed to perform their own repair.