eReplacementParts.com
877-346-4814
Ridgid Parts

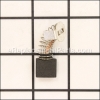
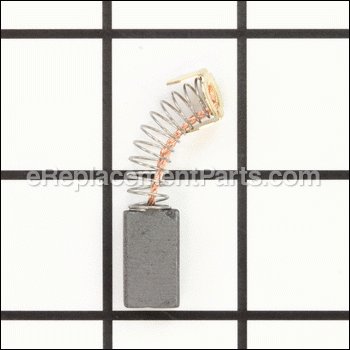
Brush 089006017092

OEM part for: Ridgid, Ryobi

Part Number: 089006017092


Install
Videos!
Grid squares measure 1x1 inch
In Stock
Ships within 1 business day
Easy 15-30 minutes (10 rated repairs)?
OEM: Original Equipment Manufacturer ?
RidgidRyobi
Does this d-block d-md-none fit my product?

Product Description ?

This is an OEM replacement part, sold individually.

• Worn brushes frequently are the cause behind a motor running poorly.
• Replacing brushes can fix a motor that’s operating intermittently.
• New brushes can restore a motor’s electric braking.

When replacing carbon brushes, be sure to inspect your armature for burns, cracks, or other damage which can indicate larger motor problems.

Worn brushes are a common causes of intermittent motor function, reduced electric braking and reduced motor power. A worn-out brush will often be worn down near to the wire lead and can be cracked, pitted, or burned.

This brush is compatible with the tools shown below.

  • Classification: Part
  • Weight: 0.01 lbs.
  • Also Known As: Carbon Brush, Motor Brush
  • Shipping: Ships Worldwide

Frequently Purchased Together ?

Compatibility

This part will fit the following 7 machines

Ryobi

TS1344L Miter Saw View Diagrams & Manuals
TS1345L TS1345L 10-In. Compound Miter Saw View Diagrams & Manuals
TS1344LG 10-Inch Compound Miter Saw View Diagrams & Manuals
TS1346 10-Inch Compound Miter Saw View Diagrams & Manuals
TS1346T 10-Inch Compound Miter Saw View Diagrams & Manuals

Ridgid

R4040 Tile Saw View Diagrams & Manuals
R4040S Tile Saw View Diagrams & Manuals
Show More Compatible Models
Don't see yours? Try searching our site for :

This item works with the following types of products:

  • Miter Saw Parts
  • Saw Parts
  • Tile Saw Parts

Repair Videos ?

Watch the Repair Video for Brush

Customer Part Reviews ?

4.8
Average Rating (out of 5):
6 Reviews
Click to filter by ratings:
5 stars
5
4 stars
1
3 stars
0
2 stars
0
1 stars
0
  • Highest Rating
  • Most Recent
< PREV
  • 1
NEXT >
  • Brush for tile saw
    Is works for the ridgid tile saw
    Guest - October 22, 2020 Verified Purchase
    Easy repair and worked great
    Perfecr
    Guest - April 30, 2020 Verified Purchase
    good price and easy to order
    Arrived quickly and easy to repair the wet saw machine.
    Guest - April 10, 2020 Verified Purchase
    Easy repair
    Fit perfectly
    Guest - July 8, 2019 Verified Purchase
    ereplacementparts.com is my go to for appliance and power tool parts!
    amazingly fast shipping. easy to navigate and parts schematics for every thing under the sun. thank you!!
    Guest - July 3, 2019 Verified Purchase
    Working great, like brand new!
    Parts shipped and arrived on time. Replaced old brushes and its running like a new tile saw. Thank you!
    Guest - June 27, 2023 Verified Purchase
    t
    t
    t - t days ago Verified Purchase
    eReplacementParts Team
    t

    Questions & Answers ?

    Our customer Service team is at the ready daily to answer your part and product questions.

    photo of team member
    Ask our Team

    We have a dedicated staff with decades of collective experience in helping customers just like you purchase parts to repair their products.

    Does this fit my product?

    Questions & Answers for Brush


    No questions have been asked yet

    Customer Repair Instructions ?

    All our customer repair instructions are solicited directly from other customers just like you who have purchased and replaced this exact part.

    Easy 15-30 minutes (10 rated repairs)?

    The brushes in the electrical motor went bad. The housing for the brushes also needed replaced.

    John - July 12, 2016
    👍 4 of 4 people found this instruction helpful
    Tool Type

    Miter Saw

    Difficulty

    Medium

    Time

    15-30 minutes

    Tools Used

    Screwdriver, Pliers

    Once I got the parts, I needed to reassemble the brush housings and the brushes themselves. Then the motor needed to be reconnected to the framing for the diamond blade for my Tile Saw. The parts fit perfectly and the motor started right up once it was put back together. So glad it all worked out. Runs like a champ again.
    Did you find this story helpful?
    Thanks for voting and helping fellow customers!

    Brushes worn out on my tilesaw

    Juan - September 20, 2017
    👍 3 of 4 people found this instruction helpful
    Tool Type

    Miter Saw

    Difficulty

    Easy

    Time

    Less than 15 minutes

    Tools Used

    Screwdriver

    1. Remove the brush caps with a screwdriver 2. Remove the worn brushes 3. Put in the new brushes 4. Screw the brush caps back on

    Did you find this story helpful?
    Thanks for voting and helping fellow customers!

    Wore out brushes

    Michael - March 29, 2017
    👍 2 of 3 people found this instruction helpful
    Tool Type

    Miter Saw

    Difficulty

    Easy

    Time

    Less than 15 minutes

    Tools Used

    Screwdriver

    Remove the brush caps with a screwdriver
    Remove the old brushes
    Install the new brushes
    Replace the brush caps
    Did you find this story helpful?
    Thanks for voting and helping fellow customers!

    Brush replacement

    JAMES - July 25, 2020
    Tool Type

    Miter Saw

    Difficulty

    Medium

    Time

    15-30 minutes

    Tools Used

    Screwdriver, Pliers

    Removed old brushes and replaced with the new ones. Just be careful removing the old brushes, they are on springs. Watch exactly how the old ones come out and get the orientation of the new ones in the same way the old ones came out.
    Did you find this story helpful?
    Thanks for voting and helping fellow customers!

    Brush was gone

    Samuel - April 7, 2020
    Tool Type

    Miter Saw

    Difficulty

    Easy

    Time

    Less than 15 minutes

    Tools Used

    Screwdriver

    Removed the old one and inserted the new one and we were good to go.
    Did you find this story helpful?
    Thanks for voting and helping fellow customers!

    Ceramic tile saw motor would not start, sometimes would start by spinning blade by hand.

    Steven - April 6, 2020
    Tool Type

    Miter Saw

    Difficulty

    Easy

    Time

    Less than 15 minutes

    Tools Used

    Screwdriver

    Removed caps for brushes inspected worn brushes and replaced them.
    Did you find this story helpful?
    Thanks for voting and helping fellow customers!

    Motor had no power/ high amp draw

    Charles - May 23, 2019
    Tool Type

    Miter Saw

    Difficulty

    Easy

    Time

    Less than 15 minutes

    Tools Used

    Screwdriver

    Unscrewed brush caps removed worn brushes.installled new ones. Re-installed caps. Replaced missing rear splash gaurd.
    Did you find this story helpful?
    Thanks for voting and helping fellow customers!

    My bearing went out in my Rigid Wet Saw. I noticed wear on my brushes so I replaced them as well.

    Michael - December 19, 2018
    Tool Type

    Table Saw

    Difficulty

    Medium

    Time

    30-60 minutes

    Tools Used

    Screwdriver, Pliers, Adjustable Wrench

    I began by unscrewing the cover to the wet saw blade. Then I took off the nut that holds the blade on to the shaft with an ajustable wrench and the allan wrench provided with the saw. Next I took the grinder motor assembly off (4 screws) and set it to the side which exposed the bad bearing. I pulled it out and replaced the new one along with some grease for lubrication. I then unscrewed the brush holders (2) and replaced the brushes inside the motor. I put everything back together and tightened everything up and it worked just fine. Thanks ereplacement parts for having the parts I needed to fix my saw and saving me hundreds of dollars bcuz I thought I needed a whole new saw! :-)
    Did you find this story helpful?
    Thanks for voting and helping fellow customers!

    Motor would not start running.

    Peter - August 1, 2016
    Tool Type

    Miter Saw

    Difficulty

    Easy

    Time

    Less than 15 minutes

    Tools Used

    Screwdriver

    Just took out the old brush and inserted the new brush. Motor runs great now!
    Did you find this story helpful?
    Thanks for voting and helping fellow customers!

    Motor wouldn't run

    Steve - March 26, 2017
    👍 0 of 1 people found this instruction helpful
    Tool Type

    Miter Saw

    Difficulty

    Easy

    Time

    15-30 minutes

    Tools Used

    Screwdriver, Allen wrench

    Remove the set screws from the end of the motor housing, and pull the complete brush holder assembly out. Take the new brush holder and press it in the motor housing and tighten the set screw, install the brushes in the new holders, then screw on the brush caps.
    Did you find this story helpful?
    Thanks for voting and helping fellow customers!

    OEM stands for Original Equipment Manufacturer and means the part you’re buying is sourced directly from the manufacturer who made your product. At eReplacementParts, we sell only genuine OEM parts, guaranteeing the part you’re purchasing is of better design and of higher quality than aftermarket parts.

    Our product descriptions are a combination of data sourced directly from the manufacturers who made your product as well as content researched and curated by our content & customer service teams. This content is edited and reviewed internally before being made public to customers.

    Our customer service team are at the ready daily to answer your part and product questions. We have a dedicated staff with decades of collective experience in helping customers just like you purchase parts to repair their products.

    All our part reviews are solicited directly from other customers who have purchased this exact part. While we moderate these reviews for profanity, offensive language or personally identifiable information, these reviews are posted exactly as submitted and no alterations are made by our team.

    All our customer repair instructions are solicited directly from other customers just like you who have purchased and replaced this exact part. While we moderate these reviews for profanity, offensive language or personally identifiable information, these reviews are posted exactly as submitted and no alterations are made by our team.

    Based on data from past customer purchasing behaviors, these parts are most commonly purchased together along with the part you are viewing. These parts may be necessary or helpful to replace to complete your current repair.

    All our installation videos are created and produced in collaboration with our in-house repair technician, Mark Sodja, who has helped millions of eReplacementParts customers over the last 13 years repair their products. Mark has years of experience in selling and repairing both commercial and residential products with a specialty in gas-powered equipment.

    This data is collected from customers who submitted a repair instruction after replacing this exact part. Customers can rate how easy the repair was to complete and how long it took. We aggregate this data to provide a repair rating that allows customers to quickly determine the difficulty and time needed to perform their own repair.

    eReplacementParts.com
    7174 South 400 West
    Suite 5
    Midvale, UT 84047
    visa mastercard discover american express PayPal