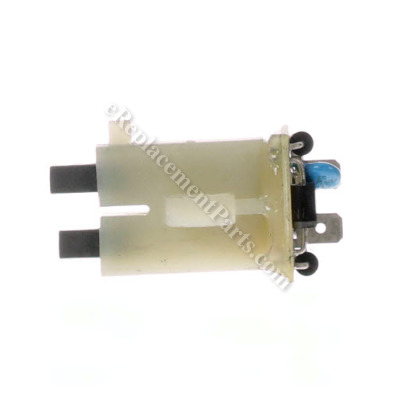
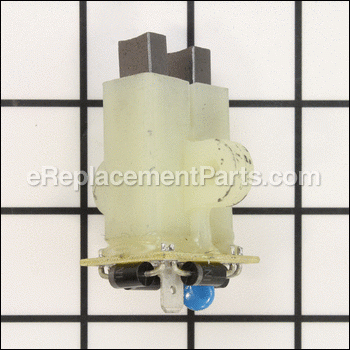
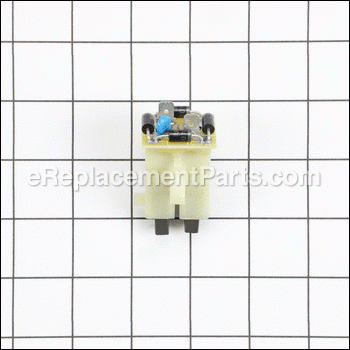
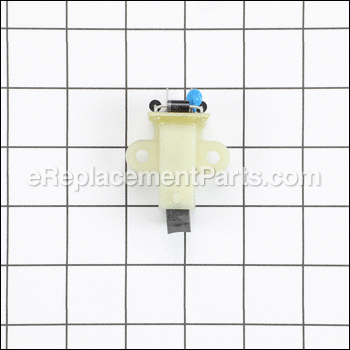


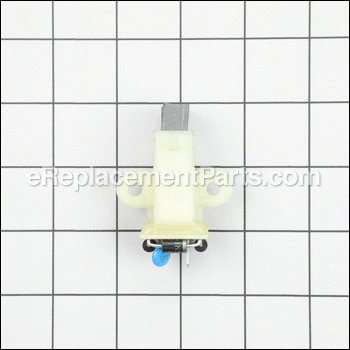

This is a genuine OEM sourced replacement part designed for use with generators. This assembly includes a plastic brush holder, two (2) carbon brushes with a lead wires and springs attached.
Carbon brushes are a commonly replaced part on power tools. Due to normal use and friction brushes will gradually wear down and will require replacement. It is advised to replace both brushes at the same type.
You would need a screwdriver to complete this job.
• Make sure the unit is unplugged
• First remove the cover and gain access to the brush assembly
• Take our old brushes and replace them with the new ones
• Reassembly the cover
Brush Holder Assembly 91825GS
OEM part for: Briggs and Stratton, Snapper, Troy-Bilt, Craftsman
Part Number: 91825GS
$59.96
In Stock
Product Description ?
- Classification: Part
- Weight: 0.04 lbs.
- Shipping: Ships Worldwide
Compatibility
This Brush Holder Assembly will fit the following 195 machines. Confirm this part works with your model, and view the detailed model diagrams and repair help we have to offer.
Briggs and Stratton
Snapper
Troy-Bilt
Craftsman
Show More Compatible ModelsThis item works with the following types of products:
- Generator Parts
This part replaces obsolete part #: 91825
Customer Part Reviews ?
Average Rating (out of 5):
Click to filter by ratings:
5 stars
4
4 stars
1
3 stars
0
2 stars
0
1 stars
0
< PREV
- 1
The part I ordered was the right part and fit perfectly.
It fit the first time. It was easy to install and now my generator is running great
Guest -
October 29, 2022
Verified Purchase
Successful repair.
Parts arrived very quickly, all was as advertised in the descriptions and pictures. Generator was repaired and working within twenty minutes. Thank you.
Guest -
December 15, 2021
Verified Purchase
just like original, no modifications, great fit
great part, just like original part
Guest -
February 7, 2020
Verified Purchase
Generator repair parts
The part was easy to find on their network. Shipping was quick and the part was a excact replacment. I installed the part and the generator works great. Very pleased
Guest -
June 17, 2019
Verified Purchase
Great part
Took way to long to receive. 13 days
Guest -
March 1, 2021
Verified Purchase
Questions & Answers ?
Our customer Service team is at the ready daily to answer your part and product questions.

Ask our Team
We have a dedicated staff with decades of collective experience in helping customers just like you purchase parts to repair their products.
Does this fit my product?Questions & Answers for Brush Holder Assembly
No questions have been asked yet
Customer Repair Instructions ?
All our customer repair instructions are solicited directly from other customers just like you who have purchased and replaced this exact part.
After approximately 15 minutes after starting, lights flickered twice then went out. went to the generator and smelled like burning plastic. later discovered one of the two brushes was melted.
David - December 6, 2015
👍 19 of 20 people found this instruction helpful
Tool Type
Generator
Difficulty
Easy
Time
30-60 minutes
Tools Used
Socket set, sandpaper or crocus cloth
Parts Used
Removed 4 ea. 7mm bolts from back of generator. This exposes the brush holder. Removed 2ea. 7mm bolts securing brush block to generator frame. Then used sandpaper to polish commutator and remove any arcing pits. Pull 2ea. Wires off of brush holder and push onto new brush holder. Make note of wire position prior to removal from old. Install new block onto generator frame securing with 2ea. 7mm bolts. Reinstall rear cover on generator using 4ea. 7mm bolts. Start generator and check for voltage at outlet. I didn't get voltage immediately after starting. Probably took about 1 minute of engine running for brushes to properly seat on commutator and generator output to begin
Did you find this story helpful?
Thanks for voting and helping fellow customers!
Old brushes were worn out.
Whitney - October 19, 2016
👍 10 of 10 people found this instruction helpful
Tool Type
Generator
Difficulty
Easy
Time
Less than 15 minutes
Tools Used
Nutdriver
Parts Used
Removed 4 bolts holding cover on end of generator.
Removed two bolts holding in brush assembly.
Disconnected two wires on brush assembly.
Installed new brushes.
Removed two bolts holding in brush assembly.
Disconnected two wires on brush assembly.
Installed new brushes.
Did you find this story helpful?
Thanks for voting and helping fellow customers!
Not generating electricity. Engine running fine but no electrical output
Shawn - January 21, 2016
👍 10 of 10 people found this instruction helpful
Tool Type
Generator
Difficulty
Medium
Time
Less than 15 minutes
Tools Used
Socket set
Parts Used
Removed four screws off the back of unit to get to the bad brush assembly. Remove two more screws and unhooked two wires to remove the brush holder assembly. Reversed steps to replace new part and the generator working fine now.
Did you find this story helpful?
Thanks for voting and helping fellow customers!
Not generating electricity
Mike - September 10, 2017
👍 9 of 10 people found this instruction helpful
Tool Type
Generator
Difficulty
Easy
Time
Less than 15 minutes
Tools Used
Screwdriver, Power Drill, Socket set
Parts Used
Removed alternator cover
Looked for automatic voltage regulator (AVR), does not exist on the Briggs and Stratton Storm Responder
Removed brush assembly (2 screws) and noticed burned/blown out hole on top end of one of the brushes
unplugged old unit, plugged in new unit and bolted it back down
Still not generating electricity!
Turned on generator, closed the breaker, plugged in electric drill, pulled the trigger and spun the drill head by hand in the opposite direction it was selected to run on (it was in the forward/clockwise direction and I hand spun it counterclockwise) to generate a charge that will travel back up the drill cord and excite/energize the alternator and it started generating again.
Did you find this story helpful?
Thanks for voting and helping fellow customers!
brush set burned out
Frank - November 30, 2015
👍 5 of 5 people found this instruction helpful
Tool Type
Generator
Difficulty
Easy
Time
15-30 minutes
Tools Used
Screwdriver, Pliers
Parts Used
Remove cover from end of generator, remove 2 screws holding brushes and unplug wires.
Just repeat steps in reverse and you are done.
Just repeat steps in reverse and you are done.
Did you find this story helpful?
Thanks for voting and helping fellow customers!
Did not produce 115/120 volts
John - September 8, 2016
👍 2 of 2 people found this instruction helpful
Tool Type
Generator
Difficulty
Easy
Time
Less than 15 minutes
Tools Used
Nutdriver
Parts Used
Removed 2 screws from main cover ,locate brush holder remove 2 screws unplug 2 wires then reversed procedure.
Make sure the wires on the brush set are put back on as they come off, failure to due so will not allow voltage flow across diodes
Make sure the wires on the brush set are put back on as they come off, failure to due so will not allow voltage flow across diodes
Did you find this story helpful?
Thanks for voting and helping fellow customers!
No voltage from generator.
E.J. - December 4, 2017
👍 1 of 1 people found this instruction helpful
Tool Type
Generator
Difficulty
Easy
Time
Less than 15 minutes
Tools Used
Wrench Set
Parts Used
Replaced the brush holder.
Did you find this story helpful?
Thanks for voting and helping fellow customers!
Unit quit charging
Dale - January 10, 2017
👍 1 of 1 people found this instruction helpful
Tool Type
Generator
Difficulty
Easy
Time
Less than 15 minutes
Tools Used
Pliers, Nutdriver
Parts Used
Remove the cover
Disconnect the brush holder and remove
Connect the new brush holder
Install the cover
Disconnect the brush holder and remove
Connect the new brush holder
Install the cover
Did you find this story helpful?
Thanks for voting and helping fellow customers!
generator wouldn't put out electricity
Karen - October 14, 2021
Tool Type
Generator
Difficulty
Medium
Time
30-60 minutes
Tools Used
Screwdriver, Socket set, Adjustable Wrench
Parts Used
Don't know Husband repaired it. Now it works!
Did you find this story helpful?
Thanks for voting and helping fellow customers!
Generator brush assembly melted, no electrical power
Tim - November 7, 2019
Tool Type
Generator
Difficulty
Easy
Time
15-30 minutes
Tools Used
Screwdriver, Nutdriver
Parts Used
Removed the end cover
Unscrewed and unplugged brush assembly
Plugged in new part
Installed 2 screws
Reinstalled end cover.
Started generator, repair successful!
Unscrewed and unplugged brush assembly
Plugged in new part
Installed 2 screws
Reinstalled end cover.
Started generator, repair successful!
Did you find this story helpful?
Thanks for voting and helping fellow customers!
Load More Install Stories
OEM stands for Original Equipment Manufacturer and means the part you’re buying is sourced directly from the manufacturer who made your product. At eReplacementParts, we sell only genuine OEM parts, guaranteeing the part you’re purchasing is of better design and of higher quality than aftermarket parts.
Our product descriptions are a combination of data sourced directly from the manufacturers who made your product as well as content researched and curated by our content & customer service teams. This content is edited and reviewed internally before being made public to customers.
Our customer service team are at the ready daily to answer your part and product questions. We have a dedicated staff with decades of collective experience in helping customers just like you purchase parts to repair their products.
All our part reviews are solicited directly from other customers who have purchased this exact part. While we moderate these reviews for profanity, offensive language or personally identifiable information, these reviews are posted exactly as submitted and no alterations are made by our team.
All our customer repair instructions are solicited directly from other customers just like you who have purchased and replaced this exact part. While we moderate these reviews for profanity, offensive language or personally identifiable information, these reviews are posted exactly as submitted and no alterations are made by our team.
Based on data from past customer purchasing behaviors, these parts are most commonly purchased together along with the part you are viewing. These parts may be necessary or helpful to replace to complete your current repair.
All our installation videos are created and produced in collaboration with our in-house repair technician, Mark Sodja, who has helped millions of eReplacementParts customers over the last 13 years repair their products. Mark has years of experience in selling and repairing both commercial and residential products with a specialty in gas-powered equipment.
This data is collected from customers who submitted a repair instruction after replacing this exact part. Customers can rate how easy the repair was to complete and how long it took. We aggregate this data to provide a repair rating that allows customers to quickly determine the difficulty and time needed to perform their own repair.